 Johnathan Ho entered this amazingly done conversion for our FREE Wraithknight contest, and while he didn’t win this one, he did win the last one we did!
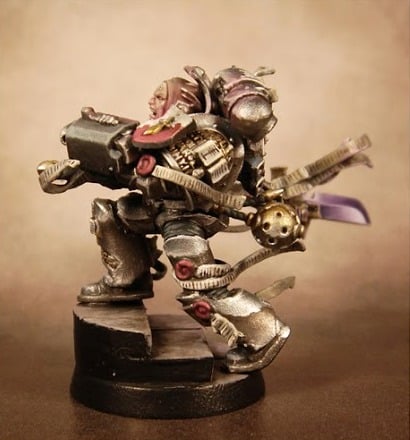
After a little coaxing (not much) Johnathan sent over this article on how he made his “Justicar Weiss”. Now if we can just get him to share more models with us! -MBG
Note that this model was painted before GW changed their paint line.
The color scheme for the model started as an intellectual debate with fellow painter/BnC’er Winterdyne, on the “proper” way Sky-Earth horizons should work on power armor when used in SENMM (Sky-Earth-Non-Metal-Metallics) techniques.
I have never been a huge proponent of NMM, as it takes (in my opinion) far too long to achieve an effect which can be done with similar results in a fraction of the time with “real” metallics (that is, using paints that have metal flecks in them to make them look metallic).
There is the downside, however, that with RMM (Real-Metal-Metallics) that the highlights/shadows are harder to control because the flecks reflect ambient light differently depending on the angle, source, and strength of available light sources.
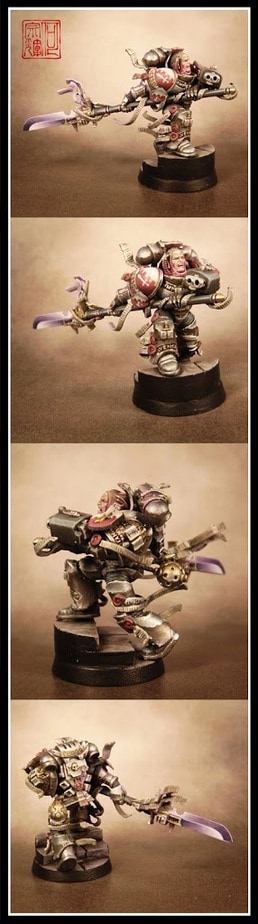
For this model, then, I used a mix of the two techniques, using metallic paints but shading and highlighting with non-metallic paints to control the lights and shadows (particularly important because with Sky-Earth, we need the horizon lines to really pop and be defined.
The model was primed with Krylon Matt Black primer, and dusted with GW Skull White primer to create the initial zenithal highlights. This was followed with several diluted coats of GW Boltgun Metal to get my base colors. Shadows were created by progressively mixing GW Scorched Brown and then GW Chaos Black to create the shadows, with the darkest areas focused around the horizon lines on each piece of armor, and on the back of the model. Highlights were created by progressively mixing Vallejo Air Chrome and then GW Skull White, with the brightest areas focused on (again) the horizon lines, and the edges of armor facing up to the front (where my light was coming from, head on).
The benefit to using a metallic base is that I get the reflective luster of metallic paints, but using non-metallic colors to create the highlights and shadows means ambient light doesn’t alter where I’ve placed them, ensuring I have absolute control of how the model will look. It also makes the model much easier to photograph!
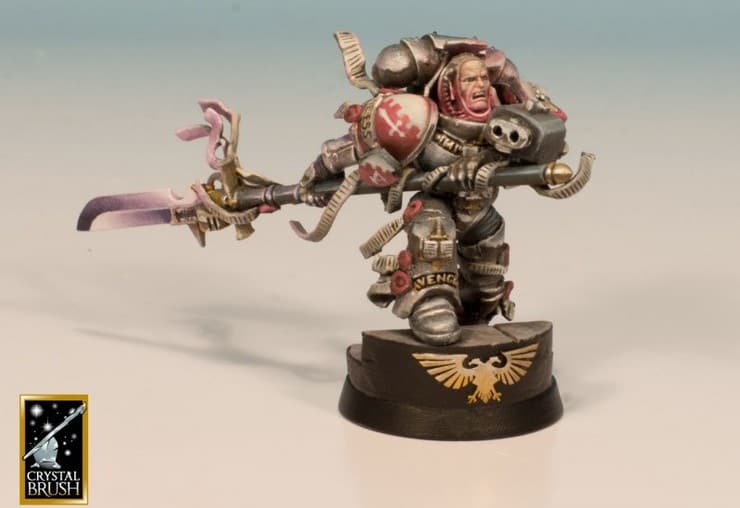
I then used controlled glazes of GW Asurmen Blue to give the armor a blue tint similar to ‘Eavy Metal’s Studio Grey Knights.
The head was primed similarly as above. I started with a basecoat of GW Tallarn Flesh, highlights done by progressively mixing in GW Elf Flesh and GW Skull White. Shadows were created using GW Liche Purple and GW Regal Blue.
The white as GW Codex Grey highlighted up through GW Fortress Grey and GW Skull White. Any “blacks” were GW Chaos Black highlighted up with P3 Coal Black and GW Bleached Bone.
The bladewas basecoated GW Chaos Black, and blended up through GW Liche Purple and GW Skull White.
The reds were basecoated GW Dark Flesh, highlighted up through GW Blood Red mixed with GW Bleached Bone and GW Skull White.
The golds were basecoated GW Iyanden Darksun, highlighted up through GW Burnished Gold, Vallejo Air Chrome and GW Skull White (to match the highlights of the armor). Controlled washes of GW Devlan Mud were then used to enrich the shadows.
The trickiest part then was to create the light sourcing on the head (from the armor) and from the blade (which reflects onto the purity seals, armor, and base). This was achieved by using very thin glazes of the appropriate colors (purples for the blade, reds/pinks for the head) and slowly building up highlights where light would catch. This was hardest on the head, as I didn’t want to overpower the original highlights/shadows I had already created (the light emanating from the armor was supposed to be a subtle effect anyways so it wasn’t going to create strong lighting from underneath).
Minute details were painted (eyes, teeth, markings on his shoulder pad and heraldic shield) and the model was sealed with GW Purity Seal.