
Though I go by the tag, “Brass Scorpion” and Chaos is my favorite range here’s more proof that I work on a lot of other model ranges.
This week I’m going to show you a simple conversion that yields a very cool looking pose for a Tau Empire model. Remember the previous Tau Pathfinders that were just replaced by the new multi-part plastic set from Games Workshop?
Well one of the coolest things about them was the model firing his railgun from a prone position. The new plastic Pathfinder set makes lots of great poses except for a prone one. Or does it?
When I got the new plastic Pathfinders for myself I knew I had to reproduce the terrific prone railgun model from the previous Pathfinders release. It turned out to be fairly easy.
First, I found the legs in the kit that had the flattest pose with the feet somewhat close together.
 |
| This set of legs was the most suitable of the five on the sprue. |
Next, I glued on a torso and set about converting a railgun arm to the new position. This required that the arm be carefully cut at the shoulder. The upper arm will have to be rebuilt and repositioned since much of it was foreshortened by the original pose of the arm. Then make a shallow semi-circular gouge in the back of the collar to allow you to attach the head properly for a prone position.
The steps so far yield the results shown in the first photo below. The model appears to be firing from a prone position with all essential parts attached. The upper arm was rebuilt using some scrap sprue from the kit. The gap in the lower neck area was filled in with some scrap sprue and plastic cement. It’s not necessary to be meticulous with the underside of the model because most of it will be hidden after it’s glued to the base. Finishing the base will hide even more of the underside of the model. So what’s left to do? The feet need to touch the ground and the right arm needs support.
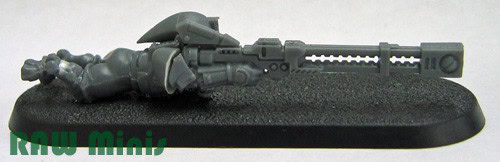 |
| Step 1: Build the basic firing pose by converting the head and arm. |
In this photo you can see that the legs now lie flat on the ground. This was done by cutting them most of the way through at the knees, then filling in the gaps with a bit of sprue cut to shape and plastic cement. The right arm now has a bit of scenery supporting it. The bit of elevated ground under the arm was made with two-part epoxy. If you have Apoxie Sculpt, Milliput or Kneadatite (“Green Stuff”) those will all work just fine. Of course, the model will eventually be fully painted and scenic based once I really get going on my Tau army.
|
| Step 2: Convert the legs and support the firing arm. |
Adding a little unique flair to your army by converting even just a few models here and there is a great way to put your own personal touch on a project and boost your enthusiasm for finishing it. Models like this make great conversation pieces when showing off your army at a local game shop.
I’m just getting started on my Tau and it will be a while till there’s real progress to show on it. This was one of the first models I worked on for the army. It’s little things like this that give me the energy and enthusiasm I need to tackle building and painting a large model collection. I used similar techniques for posing some of my Imperial Guard Heavy Weapon Teams and that may yet turn out to be a conversion article for another time.
