Dark Eldar school is in session. Don’s miss these tactical tips about vehicle deployment and how to successfully wrap your powerful attack vehicles around your 6″ Archon bubbles. Let’s begin.
You’d be surprised how easy it is to actually get your Archons into a good position so you can start utilizing these massive benefits. Despite your frustrations over not being able to use this aura while inside vehicles and Venoms still being stuck at a 5-man capacity, I’m here to tell you that everything is going to be OK.
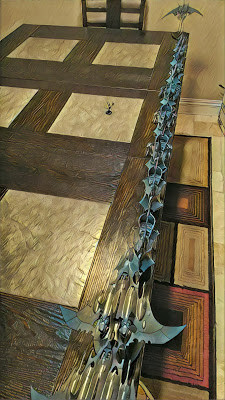
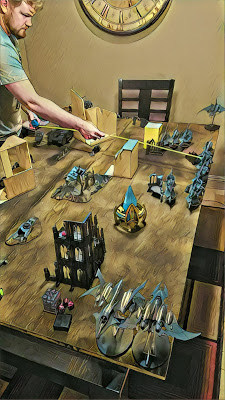
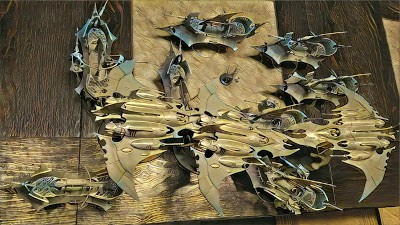
First, I want to show off this deployment type. It doesn’t have to be exactly like this or this extreme, but I want to showcase the long and thin deployment. Our vehicles are extremely thin and our threat range is extremely long. Our most powerful weapons such as Dark Lances and Dissies both have 36″ range and we have obscene movement on all of our vehicles. With a 14″ move on the Ravager, this gives us a combined threat range of 50″ base without any Obsidian Rose or Flayed Skull buffs.
Depending on where you and your opponents set up, you will almost always have the ability to nullify a lot of their firepower if you deploy on the board’s edge. In Pitched Battles like this one, that position allows you to be out of range of their most powerful weapons. Remember, the total vertical length of the table is 48″, and distances will only increase once we start getting into diagonals. Whenever I get to a table and look at the terrain, I do my best to know what my opponent is fielding and where he puts them down so I can deny him every advantage.
The Archon was able to get out of the Raider and move 3″+8″ for 11″ total movement on the disembark. Look how far he’s able to make it up to the table when a Raider deployed behind the Ravagers in the middle/right of the table. This is without him Advancing, so you can just imagine how well Dark Eldar can move on foot compared to others.
Learn this, remember this, and don’t be afraid to Advance for some extra range just so you can get his bubble into play. With enough experience, you will be able to move him first after doing a quick measure of your furthest vehicle, so you know that if you move that, everything close will be in range to move towards your Archon’s buff. Don’t worry, this will come more natural the more you play.
My opponent is measuring a distance for Hellblaster units behind his Land Raider. From the upset look on his face, we can assume he realized that I parked 37″ away from his Plasma Incinerators. Even with a 6″ move and 30″ range, no matter what he does, he can’t engage me with those guns. This is what every experienced Dark Eldar player does and an exceptionally important skill for all new generals to learn.
The best form of preventing damage is by denying them the chance to deal damage at all. I’m absolutely serious about understanding your opponents’ most lethal weapons, the ones capable of destroying your vehicles and countering them with attention to range detail (anti-threat).
Measure twice, move once, that’s the rule. I absolutely cannot stress this enough: I don’t care if you have to measure every single gun (within reason) from the other guy’s army, ask them the weapon ranges (you will learn in time) so you can deny damage while planning to counter-attack on your turn.
This is why movement, weapon range, and thus effective shooting threat range is so important. It’s so you know how you can inflict the maximum amount of damage while taking little to no damage in return (by outranging, by denying LoS, or by gaining cover). That’s pretty much a mini-game in itself for Dark Eldar generals.
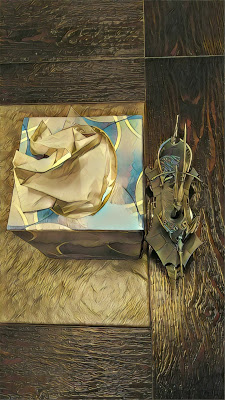
Another deployment trick I like to do is isolate pockets of fire and line of sight. I purposely pulled some tissues up to block the sail, but I wanted to show you the difference between deploying wider versus narrow. It’s extremely important for Dark Eldar players to examine the terrain on the table in relation to their greatest threats. Directly in front of the tissue box (immediate left of the Raider) is a unit of Devastators at ground level behind cover.
In this first picture, the Devastators can draw onto the Prow and the Aft of the Raider, just catching the rear sail. It’s important for you to analyze at all times exactly why you’re seeking shelter and from what weapon specifically. If there were bolters on the other side of this tissue box I might not care as much.
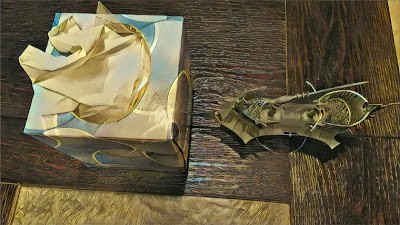
When you straighten the Raider out, he can no longer see you at all unless he moves, and even then, only a few guns will be able to draw Line of Sight. This brings us to another hugely important strategy for Dark Eldar players: force your opponents to move their heavy weapons. Unless they have some amazing rule that allows them to stabilize their weapons, they will suffer an aiming penalty.
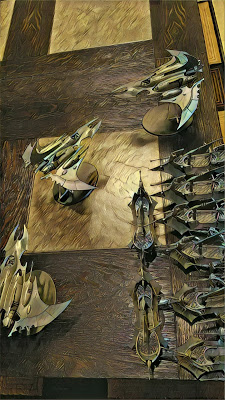
For your reference, the Raider above the Archon in the middle is within 6″ and so is the Raider on the bottom. The only thing not in range is the Raider on the lower left. Keep in mind that Raiders and Ravagers have the Hovering rule; which lets you measure the distance to and from the model’s hull for the purposes of the bubble. You don’t count the gun (although some people argue against this), you only count the gun when you shoot. Since all of our vehicles are a mile long, you can get quite a bit of range if you fly your vehicles in a certain way.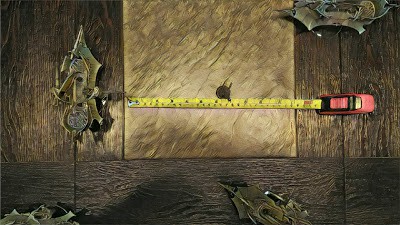
In case you’re wondering, a Raider is about 7″ long from Prow to Aft depending on if you’re counting the rear sail or not. This allows you to be in bubble range and extend your weapon range out pretty long distances while still benefitting from the Archon’s re-rolls.
I stacked my entire army into the range of the bubble except for that one Raider on the bottom left of the screen. Oh, and that stupid Ravager that’s still pointing his gun at the Archon threatening to kill him.

Here’s another example of what this looks like in an actual game. The red circle is the Living Muse and the yellow circle is another Archon. At this point, all my Dissies are in range of the 6″ of the Living Muse and only those two Raiders at the top of the picture are out (but within range of the other Archon).
When you have this much speed and maneuverability, you can pretty much do anything. For the Razorwings especially, once you make this convergence on the first turn to benefit from Living Muse, they will fly away from the rest of the game pretty much. That’s fine because the first turn when you converge should be the turn where you inflict the most damage. Your first turn should be your greatest opportunity to inflict a massive Alpha Strike with a shoot list.
The last picture is some flyer hacks and defensive deployment used against those pesky alpha assault armies. Assuming we’re playing Pitched again (every mission/deployment is different), we’re going to turtle up into the corner like this. The reason: to be out of range of as many of their guns as possible on the opposite side of the table. Next, we’ll concave our fighters around our ships as much as possible. You do it just enough so that the distance from your closest Raider is outside max possible charge distance (12.1″), and then you give yourself some more distance with the Razorwings. This pushes their deployment of 9″ further from your vehicles, making the fighters the only targets they can realistically charge.
If they don’t have Fly, like in the case of Genestealers, they’re screwed. Against Flyrants or Blood Angels, you push out your Fighters more so even with pile-in and consolidate (7.1″ total) so they can’t reach your Raiders. If they do commit, make sure you punish them. What your opponents often don’t realize is that closing in on all those Blasters and Poison shots is actually beneficial for you. Don’t forget that in massive counter-attacks against over-extended foes, it’s almost always worthwhile to disembark with your Warriors and unload on them with Archon buffs active.
Thanks for joining us for this educational bit on vehicle deployment and how to successfully wrap your powerful attack vehicles around your 6″ Archon bubbles. Hope you learned a few new things to take your Dark Elder games to the next level.