Check out the latest Dark Eldar survival tips for vehicle-heavy play. To get the most out of Dark Eldar vehicles and the units inside them, you have to be very careful in how you move them.
Dark Eldar vehicles are powerful because they have Fly and great movement, however, they are fragile. If you use them incorrectly, they will die and so will your dudes. If you’re going to die, you better kill a lot of stuff to make your death worthwhile.
Here are some useful terms for you to remember:
Falling Back
Units starting the Movement phase within 1″ of an enemy unit can either remain stationary or Fall Back. If you choose to Fall Back, the unit must end its move more than 1″ away from all enemy units. If a unit Falls Back, it cannot Advance (see below), or charge (pg 182) later that turn. A unit that Falls Back also cannot shoot later that turn unless it can FLY.
Open-topped: Models embarked on this model can attack in their Shooting phase. Measure the range and draw a line of sight from any point on this model. When they do so, any restrictions or modifiers that apply to this model also apply to its passengers. For example, the passengers cannot shoot if this model has Fallen Back in the same turn, cannot shoot (except with Pistols) if this model is within 1″ of an enemy unit, and so on. Note: the passengers cannot shoot if this model Falls Back, even though the Raider itself can.
Hovering: Instead of measuring distance and ranges to and from this model’s base, measure to and from this model’s hull or base (whichever is closer).
Airborne: This model cannot charge, can only be charged by units that can FLY, and can only attack or be attacked in the Fight phase by units that can FLY.

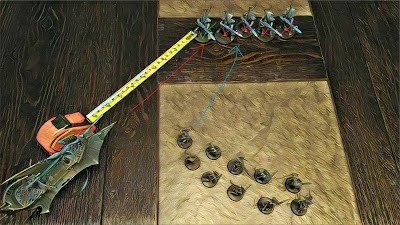
Now we can begin our lesson. First, look closely at the measuring tape and enjoy the glory that is DE movement and threat range. You get out of the vehicle by measuring from the hull (including the tip of that Shock Prow) for 3″. You move 7″ with your Warriors and 8″ with your Wyches. You have roughly 1″ because you measure to the edge of your 25mm base, so you have a total movement hull to edge of base of 11″. You then have a Rapid Fire range of 12″, your Blasters reach out to 18″, and the rest of your stuff that matters hits from a mile away. Just with Rapid Fire Splinters you have a total threat of a little over 23″ out of a transport when you measure from the base.
If you’re playing with Warriors in a gunboat, you want to stay in that gunboat as long as possible. This is because the Raider is Open-topped and you can get much more mileage out of it with better durability (T5 10W 4+/5++/6+++) than shooting at paper armor Warriors out in the open. You have much greater threat range inside a Raider as well because it can move 14″ and you can still Rapid Fire out of it measuring from the hull. That means you have a threat range of 26″ of threat, a few inches greater than your warriors walking on foot. Your warriors move almost as fast as your Raiders.
So why get out? Because your Archon’s aura doesn’t work while you’re inside the Raider. It only works when you’re outside which is why it’s very worthwhile to sometimes unload all of your stuff within 3″ of your Raider (so they can quickly jump back in next round), get within 6″ of that sweet ass bubble of the Archon, and then unload like crazy. It’s like having Flayed Skull’s re-roll 1s for all of your weapons. If you have Writ of the Living Muse while using Black Heart, here’s all those crazy re-roll 1s to Wound as well.

This is what I mean when I say get out, get the bonus from the Archon, and reap the whirlwind. You’re still within 3″ of your Raider so you can taxi back in next movement and your Archon is still in range because 6″ from base to base is actually ridiculously long. The biggest thing I want you to take away from this picture is that I angled the camera downwards deliberately here. Your Warriors can fire from beneath your Raider because Line of Sight is a real thing (model’s point of view). Sure, they can probably only see something in front of them, but LoS is one of those things I will bring up time and time again with Dark Eldar. LoS really matters for them because denying damage while doing damage is the key hallmark of the faction.
Another subtle tip from this example is that the Archon has 2 units in front of him before he can be shot if your opponent doesn’t have any flyers of their own. Be wary when there are flyers on the map because they can zoom across the battlefield and eat you alive if you’re not careful. Those Hemlocks of mine have claimed so many careless generals’ lives.
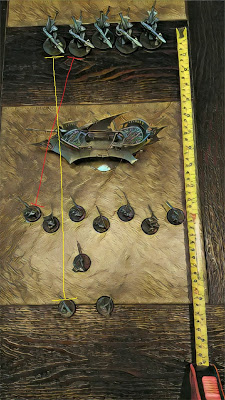
The first thing to notice here is the range and coherency of the models. Note that all my units in the front marked red are in Rapid Fire of that unit of Wraithguard while the most valuable damage weapons, the Blasters, are in the back marked yellow. When you pull models, you can pull the extra rifles from the front to possibly deny a charge, and to preserve your longer ranged weapons whenever possible. As a shooty army, you should preserve as much damage whenever and however you can.
Look at the placement of the Raider in front of the Wraithguard. Yes, I know they’re WG and they shoot like crazy but pretend they aren’t and I’m just using them as models. The Raider is long, a little over 7″ and acts as a perfect defensive obstacle for units that want to charge your paper armor dudes in the back. By putting a Raider in front of them, you form an artificial wall for your opponents to go around. This prolongs the charge distance of your enemies and keeps your Warriors alive another round. Sometimes, this means you must make sacrifices. For Dark Eldar, I strongly encourage you to employ such tactics because, for us, it’s any means to the end. It’s both fluffy and is perfectly applicable in-game.
Here’s where Fly comes in handy. If you have units inside the Raider, once you Fall Back they can’t shoot. If your Warriors are caught in the open and are now in melee, they can’t Fall Back and shoot. Your Raider, however, has the Fly rule and can Fall Back and shoot. This is why if they don’t kill the Raider, they won’t stop it from firing on them. The same applies to our Ravagers as well.

Let’s pretend those WG don’t auto-hit the Razorwing and therefore will murder him. Let’s treat them like TH/SS Terminators or something. They see multiple juicy targets to charge. But, that Raider is 9″ away, and those Warriors are a little under 12 so it’s not impossible. Oh boy, here comes a flyer 1″ away. Yup, I just increased the charge distance of those Terminators to barely possible on the Raider and not possible at all on the Warriors. It gets even sadder because if you declare the charge because you’re not careful and account for the distance traveled, I can still Overwatch even if you fail. This is the advantage of the Airborne special rule that flyers have. Unless that unit has Fly, you should do this and make your opponent really upset.

This picture shows you the value of having multiple units in a Raider. There are 2 units of 5 Warriors (2×5 config) with Blasters in a single Raider. Everything is in Rapid Fire range and the Blasters are slightly in the back. Red and blue symbolize the first movement action I take, then the second, and yellow presents where the Raider goes and everyone disembarks so I can scoop up blue squad next round if they’re still around. Always have an exit strategy and a follow-up plan. You have to be methodical, cunning and smart with how you play the game. Now that my plan is laid out, I lay into my targets with firepower.
MSU is an abbreviation for Multiple Small Units. This has been around forever and I’ve played way too many years of DE, High Elves, Dark Elves and other MSU-based armies to understand the value of it. For Dark Eldar, this has some great uses because it allows you to do shit like the above picture.
Here are some of the other benefits of having 2×5:
- Can split up squad as and when needed
- Same number of Blasters as 10-man units
- Can double up on PGLs or other sergeant weapons
- Less vulnerable to Ld
- Can build Brigades fast, but you also fill slots quick
The biggest boon is your ability to split up: Your opponent has to shoot one squad to death instead of 2 so he can oversaturate fire and potentially waste shots. This is mainly because when you declare targets, you have to declare where all your shots are going and from which guns before you roll dice. This means if you really want a squad dead, you have to commit. Not that it takes a lot to kill off DE infantry units in the open, but being frugal on shots or some lucky 6+++ saves means that a sole Blaster dealing S8 AP-4 D6 damage is going to go around shooting you in the dick.
Likewise, if you spread wide enough, he now has 2 targets to charge instead of 1. Look at the distance between the two units above. He’s definitely going to commit to one side if he wants a good chance, and even if he charges one squad, that’s still another Blaster that’s free to shoot and not in Fall Back mode.

In this example, I placed the Archon within buff range of both units while placing two Raiders there to form the Great Wall of bad decisions. They cannot go around to assault my dudes because that’s an impossible charge. They can’t fire on the Archon because there are multiple units in front of him. The only logical target there is the Raiders, and if they charge into them, Raiders are wide enough (almost 3″) to stop any follow-up Consolidation prize in the Warriors in the front. The only thing they can do is Consolidate into the other Raider, in which case I’ll Fly away and shoot him with my entire army next turn.
Now imagine I had about 4 more squads of Warriors in the back there by my Archons. That’s a lot of units ready to follow-up, amplify damage via the Archon’s bubble, and ready to lay waste to the units who over-extended and are now in Rapid Fire range of a lot more guns. This is an instance where charging the enemy is actually bait because it draws them in closer to the kill. What looks like suicidal Raiders at first are now very worth it because you might have traded an 85-point Raider that is now fodder, with 225 points of key damage dealers. That is a huge points swing in your favor.
You want to force as many decisions for your opponent as possible because the more decision trees you construct, the more paths there are to failure. Shore this up with baits, feints, LoS, cover, outranging, and movement shenanigans, and you’re one step closer to becoming a better Eldar player.
We have to be constantly mindful of our opponents’ weapon ranges and what that means for our more fragile units.
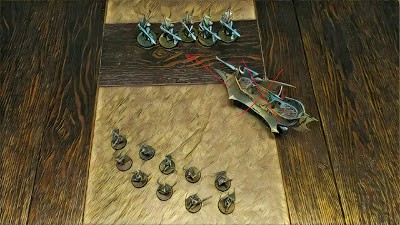
What I’ll try to do here is to charge my Raider first so I can tie up those units so my lightly armored Wyches can get in there unhindered and do their thing without having to worry about Overwatch. This is very important for all Dark Eldar players unless you’re playing Coven; in which case you probably don’t care because T6 4++ FNP 4W Grots are balanced units.
For example, the Wraithguard up there all have 8″ D-Scythes. They will eat me alive if I charge in there while I’m in range of all their weapons. Likewise, picture a unit of 10-man Space Marines with Meltaguns in there as well. This is where your knowledge of weapon ranges come into play. You know the range of the Meltagun (12″, 6″ melta range) and you know where the meltas are located. Great, now don’t be within their melta range and position your Raider so that you outrange his greatest chance to hurt you.
Vroom, 14″ of movement later, now we’re talking. Look at the position of the Raider here after I relocated. Now, only 1 of the 5 Wraithguard with D-Scythes have range on my Raider. If I’m feeling extra cheeky, I can be at 8.1″ away from him so he can’t OW me at all (if you’re out of range, you can’t declare OW). Then again, my charge will be a little longer, so there’s a risk vs. reward scenario there.
However, I want to mention that my Wyches are positioned the same way, concaved a little because now only 2 of the WG can hit the closest Wyches vs. everyone else who was conveniently placed 8.1″ away. I will pull from the back, of course, allowing my closer Wyches to get the charge and bring the rest of the girls in. If I’m running a 2×5 squad of Wyches, the principle here still stands. To min-max, you move the Wyches in a checkerboard formation so both squads have the same chances to get in.
Remember again; measure twice, move once. That is the Dark Eldar way.