Need to score objectives? Check out these cunning 40k tactics for how to move a 2nd time during assaults by getting “closer” to your enemy.
Nick Nanavati brings back the Brown Magic with something cunning combat tactics that could improve your fight.
Today, in another lovely tactical segment, I go over some sneaky pile-in tricks for you guys! Last week I covered how to charge things, so I figured it’d only be fitting to go over a trick I love to use when actually fighting things.
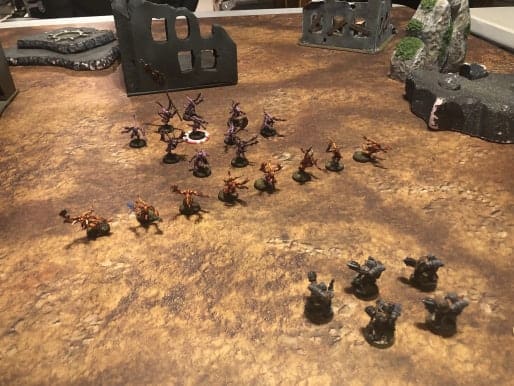
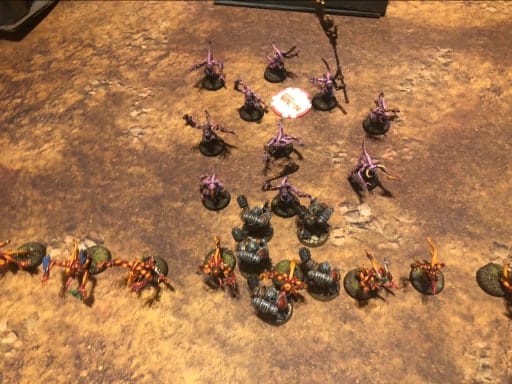
Here we have a unit of orange horrors screening the unit of pink horrors sitting on the objective. This is to ensure that the Grey Knights can’t run in there and contest it. Let’s assume for this demonstration that the GK have the objective secured rule, but the horrors don’t because of the way that their detachments are set up.
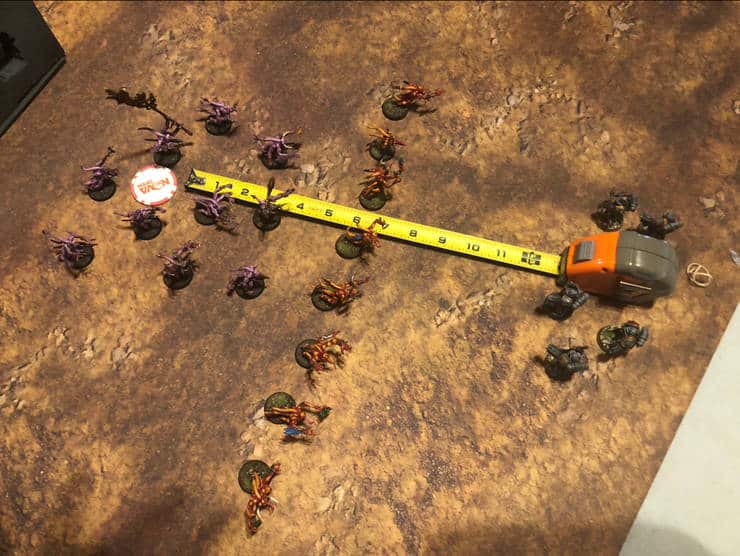
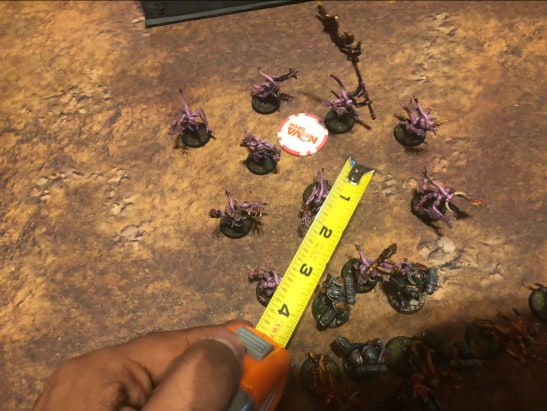
As we enter the charge phase the Grey Knights rolled the classically average 7 on 2d6. I even busted out the handy-dandy tape measure to show you exactly how far 7″ can get you. Nowhere near close enough to get to within 3″ of the objective. But you’re a good player, right? You’ve been keeping up with your Brown Magic articles, so you understand that after killing the orange horrors, the Grey Knights will be able to pile in 3″ further to potentially get within 3″ of the objective!

Wellll, not quite! As an avid follower of The Brown Magic, you know you should premeasure everything. So, before moving your models, you bust out your handy dandy tape measure and find your Grey Knights are actually further than 13″ away from the objective. That means your 7″ charge + your 3″ consolidation at the end of your fight + the 3″ radius from the objective for capturing it (13″ total) won’t be enough to get you into range. Sad times indeed.
Fret not humble Grey Knight player, all is not lost. There are actually some really sneaky moves you can employ here to get within range of the objective!
This is where I positioned the Grey Knights after moving their initial charge move. I was very deliberate to keep them fairly far from the orange horrors on their initial charge move, allowing me to still pile in during my fight phase. Note, had I based the horrors with some of my grey knights I would not be able to pile in with those models due to the fact that in order to pile in, you must move your model closer to closest enemy model, and if you are base to base, you can never actually get closer.
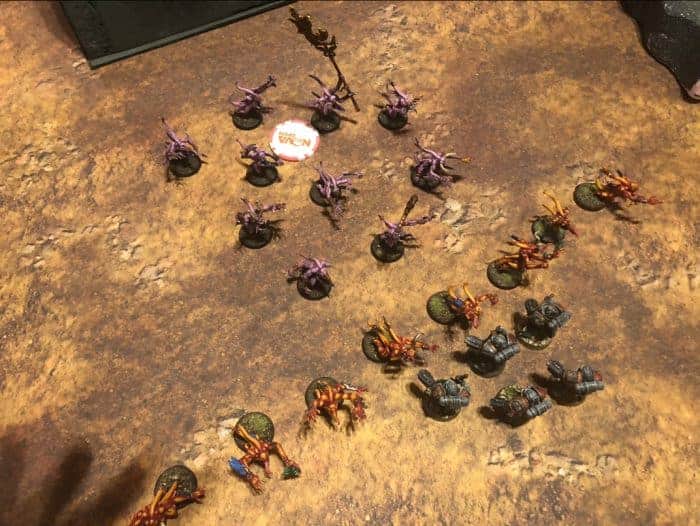
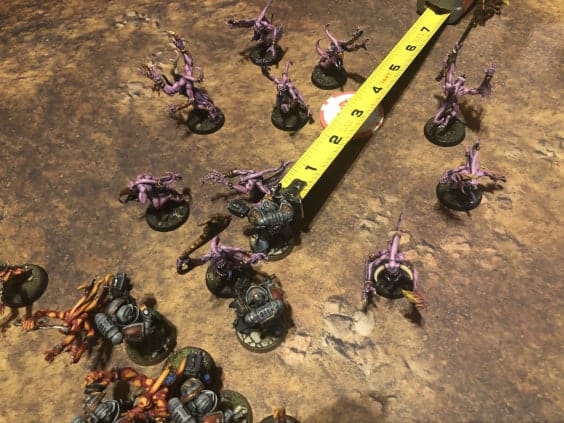
This picture illustrates that the front rank of Grey Knights are exactly 1″ away from the pink horrors. More specifically, the Grey Knight nearest the tape measure is exactly 1″ away from the horror nearest him, the next Grey Knight over is exactly 1″ away from the horror nearest him, and finally, the grey knight furthest from the tape measure is exactly 1″ from the horror nearest him. This means that those three Grey Knights may pile in however they like so that they end closer to those respective models. “Closer” being defined in this sense as a measurement of distance that implies if they are currently 1″ away they must end .99999″ away or closer after their pile in.
Now, let’s see how to use and abuse that maliciously!

Here’s how I did my initial pile in with my Grey Knights. I walked right passed the horrors that were standing right in front of me. I made sure to finish .99999″ away from them, thus ensuring the pile in was legal, as I finished “closer” than when I started.
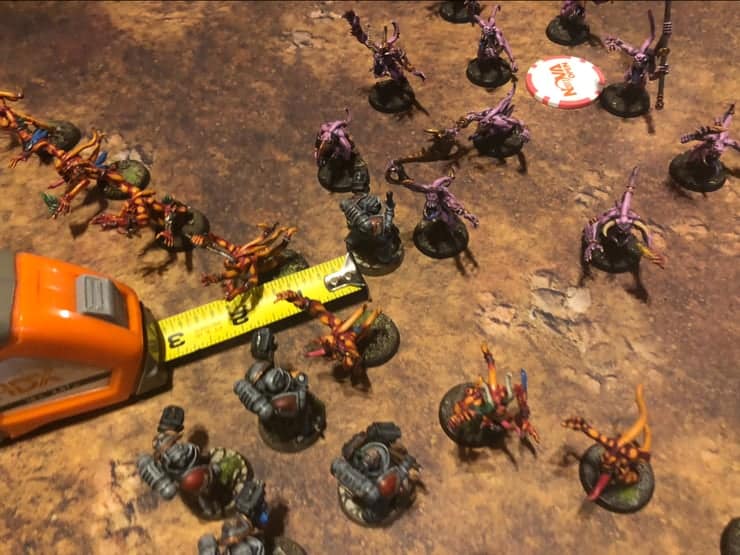
A cool thing happened here though! My two most forward Grey Knights are now closest to the pink horror standing right in front of them (roughly .5″ away). This will become relevant the next time they attempt to pile in (their consolidation move). A consolidation move and a pile in move follow the same basic rule of ending closer than you started to the nearest enemy model.
Well, the unthinkable happened. Fateweaver pulled off some of his sneaky daemon tricks and the orange horrors escaped from the flurry of Grey Knight attacks unscathed! Thankfully, that doesn’t matter, because the Grey Knight player used this cool thing called tactics!
Now, the Grey Knight player moves in for his final consolidation. He needs his two models nearest the pink horror to finish closer to the horror than where they started. Since they are about ~.5″ away they need to finish .49″ away from the pink horror or closer.
And ring-around-the-horror we go! The Grey Knight uses his final consolidation to walk right by the horror standing in front of him (ending closer to it than from where he started), and well within range of the objective!
And here’s the final shot of how the Grey Knight charge went. Even though literally nothing died, the Grey Knights won the battle, by capturing the “defended” objective!

Oftentimes, you’ll hear me run around preaching that assault is more powerful than shooting, and this is precisely why. Assault and shooting are both mechanisms for dealing damage to your opponent, but assault can also function as a second or even third movement phase! It may be more subtle, but once you can start to see situations like the above beginning board state on the left, and visualize the step by step process of how you can transform it to the above board state on the right, you’ll really start to see why the highest caliber 40k players respect assault so much.
So go out there, play some games, and try to see how you can shift the emphasis of your tactics and strategies from killing to winning!