Kenny from Next Level Painting is back to help us nail down some techniques for painting freehand detail on miniatures in his latest tutorial.
Kenny usually does full-scale painting tutorials, but in order to paint well, you also need to practice! This week he’s helping us by adding a new tool to our arsenal. Freehand can be hard and is certainly intimidating, but Kenny shows us how to do it quickly and easily on any of our minis.
Painting Freehand Details On Miniatures: Tutorial
 Starting off with a simple color scheme, you’ll want to add some rough outline shapes using a very light coat of black and slowly work your way up to a fuller coat.
 You can then start filling in the color around your outline and any other effects you want to add. Kenny wanted to add fire, so here you can see the first steps of the flame effect as well.
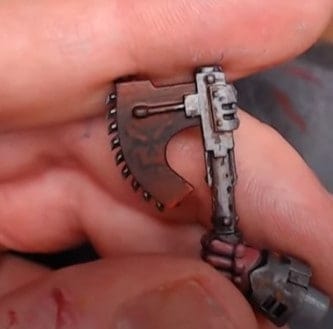
 With the first color down, you should begin to brighten up some of the areas to give it some depth. Kenny highlighted the areas that would normally be highlighted on a skull to really make it feel 3D.
 Keep moving along the process of highlighting and adding colors. Wet blending and stippling are your friends here. So take your time and make it look its best! You can also darken the blacks here to add more contrast.
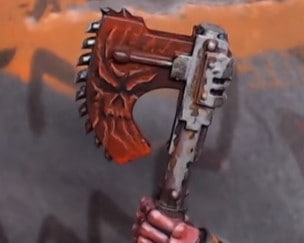
 Finally, finish off any effects, such as these glowing eyes, and finish the highlights. One last solid edge highlight and the piece is done! Practice makes perfect, so just keep at it and you’ll be a pro in no time.
If you liked this tutorial, you can also support Kenny on his Patreon page, and stock up on all the great Chaos gear over on his Heretic Swag store. Or see what other tutorials he has here.