Recently I re-posted an article from the From the Warp blog, and didn’t really check the formatting, which sucked pretty bad when I put it on here.
It’s a great article that has come up for me time and time again. I apologize, but I just had a chance to go back and fix it, as I figured I owed to Ron and you all to make it right.
Re, re-post below, and you can always check out the original here which I fixed as well, and will keep labeled for retrieval.

When I read this my mind was blown, I never even thought you could fix wrecked barrels, and just gave up on several of my models because of this.
Kudos to Ron at FTW for the post. Be sure to hop over to FTW’s blog for more awesome hobby articles.
From FTW; 3 steps to fixing damaged boltgun barrels
If you’re not careful when you go to drill out your gun barrels, you can damage them beyond repair. Here’s how you can fix that if you find yourself in this very situation.
As part of a project I was finishing up, I ended up getting a few models that had damaged gun barrels. It doesn’t take much either, a slight misalignment of the hobby drill and the next thing you know, you’re accidentally drilling out the side of your barrel and you’ve ruined the whole bit.
The best way I’ve found to fix this is to simply make a new gun barrel and glue it in place of the damaged one. It’s not as hard as you think and you don’t need anything more than you’ve probably already got lying around on your hobby desk.
What you’re going to need to make a new barrel
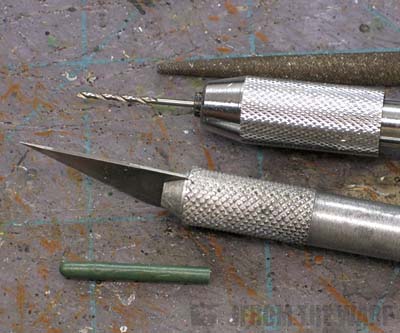
You’ll need a few things to pull this one off. The only thing not shown in the picture above is superglue. The X-Acto blade needs to have a new, sharp blade for this to work best. The drill is the standard GW drill.
The greenstuff is a previously cured roll that I made beforehand. I deliberately made it for this project in the same diameter as a bolter/bolt pistol gun barrel so I could use it for this very thing.
The order of operations
There is a sequence to doing things so you can make it as easy as possible. I’ve found that if I try it other ways, it tends to become a little more difficult as I go along. The overall idea is to keep as much stability in the greenstuff as long as possible while you’re drilling and cutting away at it.

The first step is to cut one end of the greenstuff flat. This will be one end of the new gun barrel. Make sure it is nice and flat and not at an angle. This is where the file comes in for fine tuning the surface.
The second step is drilling the cross hole in the barrel. This is done with the drill bit just a tiny fraction of space back from the cut end of the greenstuff roll. Leave no more space than you want on the finished barrel here. It will be close to the edge, but if you’re careful, you’ll be fine.
Take your time when drilling and go slowly. That way, you get a nice, clean hole in the end. The greenstuff can be tricky so you’ll need to just keep at it until you get a nice cross hole through the barrel.
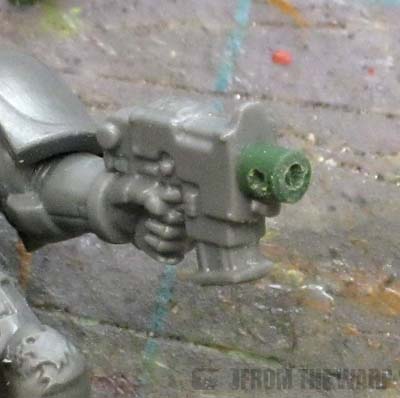
The third step is to cut the other end of the barrel (the side that will mount to the weapon itself). Cut this close to side port so that the port is centered on the new length of barrel. You want this to be nice and square as well so that you get a clean, smooth, flat surface to glue to the gun itself. Use the file as needed again.
Last is gluing the new gun barrel to the previously cleaned up weapon front and finish it off by drilling out the muzzle itself again.
Worst case scenario… you mess it up once again and have to start all over. The best thing though is that you don’t lose the use of the entire bit because of a damaged gun barrel.
In the case of something like a heavy bolter, it’s a matter of rolling out a larger piece of greenstuff to work with and drilling larger holes. With something like a storm bolter, you just do two of the smaller barrels and glue them side by side for the old school look.
About the Author: Rob Baer
Rob Baer
 Job Title: Founder, Publisher, & Managing Editor
Founded Spikey Bits In 2009
Socials: Rob Baer on Facebook and @catdaddymbg on X
Bio: Spikey Bits started with Rob trying to stay motivated to hobby on his backlog of projects and share his knowledge with others during the early blogging era. Virginia restless, miniature painter & cat dad. He blames LEGOs as there was something about those little-colored blocks that started it all.
Scale model hobbyist in the 80s, miniature wargamer, and trading card player ever since. He’s played every edition of Warhammer 40k and Warhammer Fantasy since 5th Edition, but Titans of all sizes will always be his favorite! It’s rumored that his hobby vault rivals the Solemnance Galleries, containing rulebooks filled with lore from editions long past, ancient packs of black-bordered Magic Cards, and minatures made of both pewter and resin.