 Brown is back with some more great tips that many of us can use in our next game. Come take a look at some tips on screening and why still important on turn 2 even.
Editor’s Note: This article, written before the Big FAQ, shows just how balanced some of the top player’s were and can still be. With a few minor tweaks, both of these lists are legal again, and the whole article highlights the fact that deep striking wasn’t just a tactic for turn one, and that screening is still important in the post Big FAQ world.
Hello Internet! I’m back again with a whole new topic I’d like to beat to death: screening. I really cannot stress enough how important screening is. It’s literally the most important tactic you can employ in competitive 40k. If you’re sitting there at home thinking “Well I took some rangers or scouts so I should be alright.” then this article is for you. So grab your nicest bottle of wine, sit down by a nice scented candle or a fireplace, and make sure it’s really intimate because we’re about to have a deep and meaningful conversation.
Also if you have not read Andrew Gonyo’s multi-part article on screening, do yourself a favor and read it. He really goes into great detail explaining the basics of screening and its importance. I’ve even linked it here for you because I know how hard effort can be.
In this article, I’m going to give you guys a real treat. Not only am I going to cover some advanced screening using real world, practical examples, but I’m also going to do it using a variation of Sean Nayden’s unorthodox LVO list!
That’s right 0 Dark Reapers, 0 shining spears!

Here’s my list and Jim’s list in summary form:
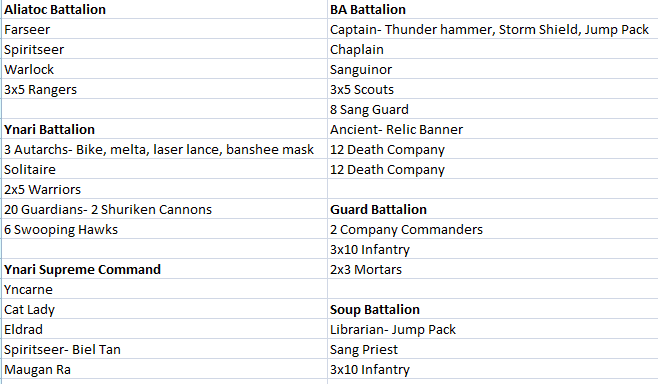
(It’s really cool and convenient how they worked out to be exactly the same length in Excel.)
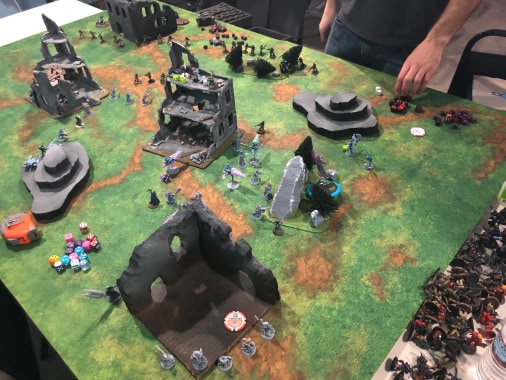
Here’s a pic of our deployments post infiltration. It was Vanguard and Jim went first.
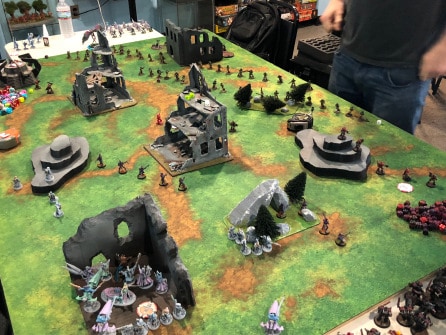
I made sure to put enough screens out so that I could comfortably deploy and not worry about his Deep Strikers, but not so much that I had no secondary screens after turn 1. I also made sure that none of my units behind the screen were within 3″ of the front line. This way the units would be too far apart from each other such that Jim’s BA couldn’t declare a charge on both when they arrived.
Lastly, I had to make sure there was no place for Jim to land a sneaky, overzealous Captain in my deployment zone. That’s why you’ll see an Autarch and some Rangers off on their own.

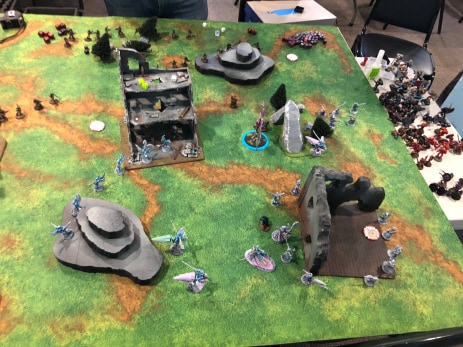
Here you can see the aftermath of Jim’s top of 1. 1 unit of DC came in on the left and wrecked my Ranger and Warrior screens on the bottom left. On the right, 5 Scouts moved up and killed 5 Warriors and consolidated into the Rangers. And some Scouts took the center as well.
That’s the Yncarne over by the DC if you were wondering. She appeared there after the DC killed my Rangers. Jim still has another unit of DC and Sang guard in reserve and my screens took a beating, so let’s see what I can make work.
Here’s what the game looked like after my turn 2. I cleared the DC with some smites, some shooting, and the Yncarne charging in to finish them off. My Rangers, which were engaged with the Scouts, left combat and moved up, expanding the screen outward on the right. I Deep Struck the Hawks in my own deployment zone and then used Soulburst (because I failed Quicken despite Spirit Stones) to recreate the middle screen. It’s hard to tell from the picture but that most bottom Hawk is actually reaching the table edge so nothing can come in and threaten Characters on the bottom left side.
I charged another Autarch and the Solitaire into the Scouts which were occupying the forest. They made quick work of the Scouts and the Yncarne teleported to their position (after he chopped the last couple DC). To finish my screen I had to get a bit creative. My Solitaire triggered Soul Burst off, killing the Scouts to fight again (since I already used move again on the Hawks) so he piled in towards the Guardsmen far away. Now obviously he can’t swing, but he used the Pile In for movement to complete my screen and keep my more valuable Characters safe.
So if we look at the turn as a whole- The DC are gone, I increased my board control and my screens are replenished: now with hawks, a solitaire and 5 rangers. And there are still no gaps for a captain to come in due to the placement of rangers in my back corner.

Jim responded by mortaring a lot of the Hawks away and bringing his second unit of DC in to kill my solitaire and Rangers. His goal was just depleting my screens so that hopefully he can deal a crippling blow to my Characters with the Sang Guard in the following turn.
Knowing that it was going into Jim’s turn 3 next, I knew my bottom of 2 was my last turn which I needed to upkeep such a tight screen for the incoming BA. With that in mind, I threw down my trump card: the Guardians.
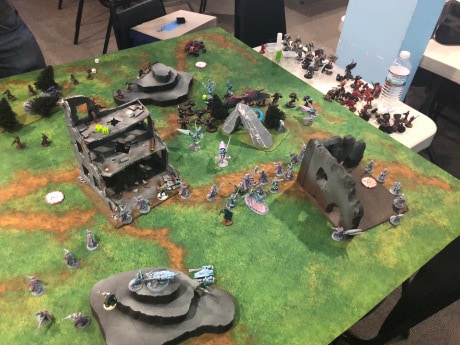
Here’s my bottom of turn 2 post-movement. The Characters and friends started to come out a bit more as I expanded my board control. The Autarchs and Yncarne got ready to smoke the DC. The 2 Hawks that survived the mortars jumped over the DC to help screen a bit more. (While they may not be doing much in the above picture just wait until you see how the turn shapes up). Maugan Ra and Rangers hold down the back so I don’t get run over by Deep Strikers due to carelessness.
And the Guardians. The lovely Guardians. They came down in a giant line ready to protect me from all the mean angels coming in wishing to do me harm.
But wait there’s more! Here’s the same shot after I cast quicken, killed the DC, and triggered a soul burst to move an Autarch back out of harm’s way.
As you can see I used Quicken on the Guardians to really expand the radius of their screen. They reach all the way from the bottom left up through the center of the board and back into my deployment zone by my Rangers. It does appear that my Yncarne and green Autarch found themselves on the wrong side of the screen though. Luckily for me, I had a plan!

I used my, now protected and fortuned, Guardians to charge the Guardsmen unit directly in front of them (which I intentionally did not shoot at all). But I didn’t charge them with the intent of doing damage, not even with the intent of trapping one in combat. I simply charged them for free movement. As you can see in the above picture (which is how I ended my bottom of 2), most of my Guardian unit just used their charge distance to reposition into a semi-square around my entire army.
Between the Guardians doing this, the 2 remaining Hawks standing directly in front of the Yncarne, and the Rangers and Maugan Ra covering my backfield, I created a perfect nest around my highly valuable character core in which no golden angel people could enter.
Not only that, but take a look at the amount of board space the army has recovered over time. Here’s a side by side of my deployment vs the end of my bottom of turn 2.


We ended up playing out the game for a couple more turns but once all of Jim’s sang guard and characters had to Deep Strike into his own deployment zone it was mostly just a matter of clean up for the Eldar.
I chose this battle as it really captured the value of screening properly, not just as a defensive tool to stay alive but also to demonstrate how you could use it aggressively to take board space from your opponent. Screening really is the most important thing to master and doing so will really elevate your game to the next level.
I apologize for the picture quality, you can blame Apple for not giving their phones a better camera. Hopefully, in the near future, I can get some better equipment to increase the quality of these things.
I hope you enjoyed your bottle of wine and our time together. But alas, I must bid you farewell!