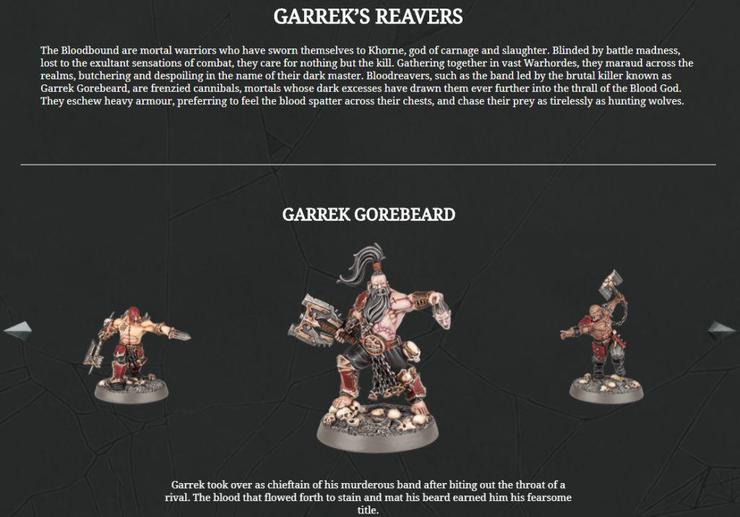
Let’s take a look at the cards for Garrek’s Reavers from the Shadespire core set and what tactics to use for this warband.
To view the Universal cards, take a look at our previous article walking through each card. To put together a good deck for Garrek’s Reavers, we must first start with objectives. This will determine your play style and how to build out your other cards.
Garrek’s Reavers Only Objectives:
- Blood for the Blood God (1 glory): Score immediately if three or more fighters made a charge action this phase
- Coward (1 Glory): Score this immediately is an enemy fighter begins a move action adjacent to your fighters and ends it adjacent to none of them
- Draw the Gaze of Khorne (1 Glory): Score this immediately if your warband takes out two or more enemy fighters in this phase
- It Begins (1 Glory): Score in end phase if one fighter from each warband it out of action
- Khorne Cares Not (2 Glory): Score in end phase if five or more fighters are out of action
- Khorne’s Champion (6 glory): Score this in the third end phase if all fighters except one of yours are out of action
- Let the Blood Flow (2 glory): Score this immediately if three or more of your fighters made a successful attack action this phase.
- There is only Slaughter (1 Glory): Score in end phase if no fighter is holding an objective
- Worthy Skull (1 Glory): Score in end phase if enemy leader was killed this round
Usually my goal with Garak’s Reavers is to get upgrades on my guys as fast as possible and, to do that, I need to get Glory without sacrificing my units. So, I would start by adding a couple of hold objective cards and the supremacy objective card. Then, I use my superior mobility and ploy cards to maneuver around my opponent and get some glory for upgrades. After that, you go for blood in rounds 2 and 3 so you could add all the objectives listed above to your deck and try and score them. The key is to try and get the immediate score objectives or the easier, less glory rewarding cards done without losing many units. Your warband is hard to beat when they have a lot of upgrades, but to start the game they cannot stand toe to toe with many units.
Garrek’s Reavers Only Ploys:
- Blood Offering: A friendly fighter suffers one damage, but on their next attack they get two bonus attack dice.
- Blood Rain: All attacks in the next action use the duel swords characteristic
- Boon of Khorne (Reaction): When a friendly fighter kills an enemy unit, remove all wounds from a friendly fighter
- Desecrate: Remove one objective you hold from the battlefield
- Final Blow (Reaction): Play after enemy fighters action takes an adjacent friendly fighter out of action. Their attacker takes one point of damage.
- Fueled By Slaughter: (Reaction): When a friendly fighter is taken out of action, you can take an attack action with a friendly model
- Insensate: First friendly fighter to suffer any damage in the next activation only suffers one wound
- Khorne Calls: Roll one extra dice on your next attack action
- Rebirth in Blood: Reaction: When your last fighter is taken out of action, roll a defense dice. On a shield or crit, remove all wounds from them and place them on a starting hex in your territory.
- Skulls for the Skull Throne (Reaction): When a friendly fighter kills another fighter, draw two two power cards
- Unstoppable Charge: This fighter can charge through other fighters
I am more for board control and maneuvering with these units. My goal is to isolate my opponent’s models and getting support against them. The universal cards have great cards for this like confusion, shardfall, and sidestep so defiantly take a couple of those. Then for the ploys above, I like all of them except Skulls for the Skull Throne and Final Blow. Skulls for the Skull throne seems cool but you’re taking up a power card to have it in your hand so you’re only getting one bonus card. With Final Blow, it is one damage when one of your models dies. In some instances, one damage could kill a model more often then not it does not. Also, it involves one of your models dying, which is never a good thing, even for a Khorne warband. I love Blood Rain and Insensate as great defensive plays in case your opponent gets tricky and manages to have support on one of your models. They both help keep your warband alive. Desecrate is hit or miss, generally I do not include it because objectives are only scored once (in most cases). Though you could run one of your weaker models into your opponent’s zone using sprint, and then Desecrate to remove one of the objectives. So, it is how you want to structure your deck that determines what kind of ploys to use.
Garrek’s Reavers Only Upgrades:
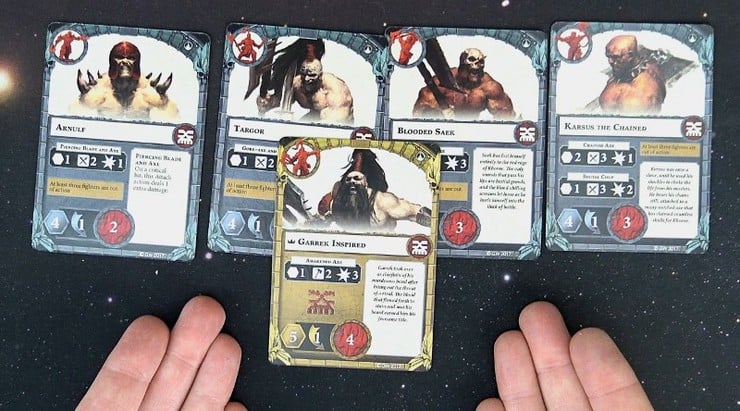
- Berserk Charge (Saek): Duel Swords and Hammers are successes on charge attacks
- Bloodslick: +1 Defense
- Deadly Spin (Targor): Range 1, three dice (duel swords), one damage, targets all adjacent enemy fighters
- Ever-Advancing (Garrek): Reaction: When this fighter can be driven back, instead you can push them one hex.
- Frenzy: Roll an extra attack dice when this fighter charges
- Grisly Trophy (Garrek) When this fighter takes an enemy fighter out of action, gain one additional glory point.
- Terrifying Howl (Karsus): Action Push each enemy fighter one hex
- Whirlwind of Death (Karsus): +1 Damage to all attack actions
- Wicked Blade (Arnulf): Rage 1, three dice (duel swords), two damage, crits cause cleave
These are your bread and butter to winning the game, especially against Stormcast and Ironskull’s Boyz. You absolutely need to upgrade your heavy hitters to take out the higher wound and better defended models. Anything that adds a bonus to damage is excellent. From the universal deck the +1 wound cards are great for Arnulf and Targor as it can allow them to take more then one shot, and the extra damage is good for anyone (especially Saek). Controlling model placement is also clutch for this warband to get those support roles (double swords are tough to get) so the pushing upgrades are also solid upgrades to any of your models.
There you have it, use the first round to score some glory for upgrades while keeping your fighters alive is key to this warband. By doing so you can then use your mobility and now superior fighters to take out the more heavily armored warriors. Against Sepulchral Guard, you could be more aggressive as they die much easier and will out number you, but you still need to play smart with these glass cannons. Otherwise, you will find yourself inspired but that is because you lost 3 of your own fighters.
![]() Check out more “newbie” tips for the Hobby
Check out more “newbie” tips for the Hobby