40k Champion Nick Nanavati is back with even more great tips on how to win more games. Today, he’s going to be covering how to better place objectives.
Good morning ladies and gentlemen (or evening depending on your locale)! Today I want to cover a topic rarely talked about- Objectives. Objectives are essentially the win condition for most games of competitive 40k, and yet they’re one of the least discussed aspects of the game strategically. If you’re going to center your entire game plan around holding poker chips on a table, shouldn’t you try to optimize where they are?
First, I think it’s important to identify the different factors that you should consider from an objective placement standpoint.
- Your army’s overall strategy and play style
- Your opponent’s overall strategy and play style
- Terrain
- Deployment Style
- Matchup

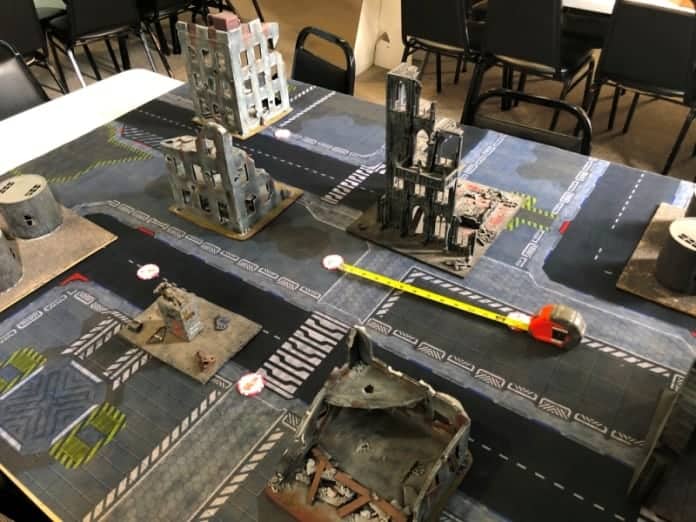
I’m going to preface all the things you should do or consider when placing objectives by showing what NOT to do. Here we see a standard table with objectives scattered about fairly evenly. This fundamentally demonstrates two players who didn’t really think strategically about where they were placing objectives when placing them. Rather, they just placed them “where they felt like” or “where they looked fine”. You will very rarely find a situation where both armies and players want an evenly dispersed and moderately spread objective placement like that. While it is possible you and your opponent’s goals align on where to place objectives (typically mirror matches or similar style lists), they still don’t want them in this conservative, middle of the road objective placement.
Many army styles naturally gravitate towards board control, combat capability, and keeping their forces centralized. Examples of this could be my Adepticon Chaos list, Ork hordes, Necrons etc… When playing with an army that has this style, be sure to place objectives in such a way that you don’t have to go out of your way to score them. You want to easily score objectives while working your army naturally.

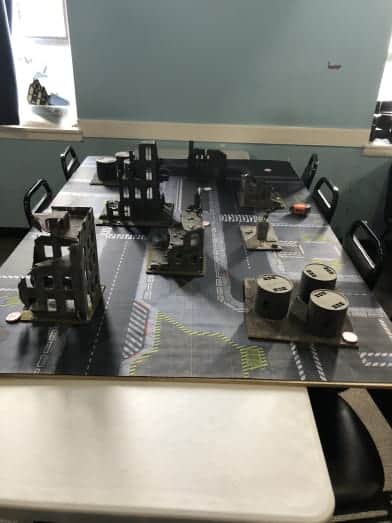
Here’s a great example of how to set objectives as someone who plans on moving his army into the middle of the table. All the objectives are centrally placed, and 12″ from at least any other 2 objectives (as close as they can be). Imagine a horde of pox walkers sitting in the middle of the table there. They would own 4 objectives, meaning they can just sit there in the middle of the board doing nothing (their natural state of being) whilst simultaneously winning the game.
Now, you may be wondering why your opponent would let you do such a thing, but it’s actually super easy to set up. Imagine your opponent placed the first objective in the center (a conservative and natural move) then you can respond by placing the objective on the right-hand side under the orange tape measure. Your opponent, who is “smart”, doesn’t want to load one side full of objectives against a pox walker horde, so he sets another objective on the far left, opposite the objective you just placed. You are now able to place the objective pictured at the bottom, creating the diamond-esque pattern featured above where your pox walkers can sit in happiness.
On the flip side, some armies who like to sit far away and maximize their mobility (I’m looking at you Eldar, DE, GK) want to spread the objectives as far as possible to leverage their speed advantage.
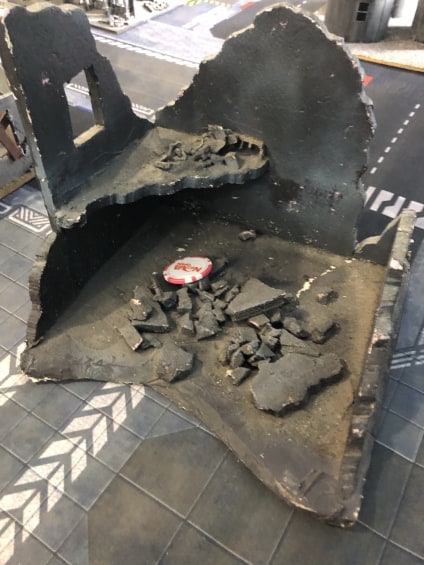
I apologize for the picture quality, but if you look closely you can see 2 objectives in the bottom corners, 2 in a line down the middle, and one off in the top right corner. This is what would likely happen if the opponent of the pox walkers in the same above scenario placed objectives strategically. To demonstrate how it would work, Player A (let’s call him Eldar) places the objective in the top right-hand corner. Player B places his first objective on the middle line of the board but nearest that objective to create an objective zone for him to camp his poxes. Player A responds and places an objective in the bottom left, opposite to his initial placement. Player B places his last objective in the center of the board- still within that little objective zone he’s created, but also acknowledging that he may have to actually work to capture the last objectives. Finally, player A places his last objective in the bottom right corner, far away from that little objective castle.
But what do you do if you have an army that doesn’t particularly care where the objectives are due to its flexible play style? Simple: you try and determine what your opponent wants to do, and then actively place objectives to make his life as hard as possible. Remember, in this case, value taken away from the enemy = value gained for yourself.
Now that I’ve covered how strategic objective placement and army styles interact, let’s talk about terrain. One really effective and fairly common tactic players employ when placing objective is putting them near line of sight blocking terrain, so a unit can hold an objective whilst being hidden from enemy shooting. This is an awesome tactic and one you should certainly make use of, but be cognizant of when NOT to do it. There’s no point in going out of your way to place an objective behind terrain against pox walkers that don’t have guns for example. This can actually even work against you if your opponent can get to your hidden objective he can start controlling it whilst being immune to your shooting! The point here is to just take your specific opponent into consideration when making choices, don’t just go into auto pilot.
Another aspect in objective placement which is seldom talked about is height. Unless the tournament you’re attending rules objectives to be infinite height, then placing them at different altitudes around the table can have a huge impact on the game.
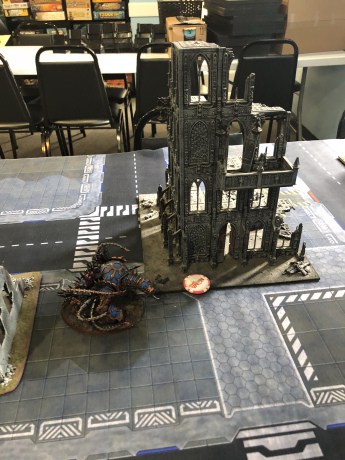
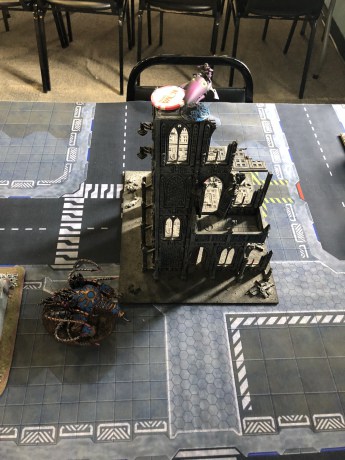
On the left picture above we see a very happy Maulerfriend holding an objective. Everyone loves a happy Marulerfriend. He’s adorable. And on the right, we see a very sad Maulerfriend who hasn’t learned how to climb stairs. On the other hand, the Autarch with his fancy schmancy jetbike is quite content sitting at the top of the ruin holding an objective and shooting his shuriken catapults at the poor Maulerfriend.
The next thing I want to cover is deployment style and objectives. This is a much more abstract concept, but understand that as the deployment style changes, the middle of the table and the edges of the table also change with it. So, be aware of how different deployments will fundamentally change “where the game is played” and act accordingly.
Finally, I think a huuuuge topic to cover is stacking objectives. How many times have you lost a game (or won a game) because you got the side of the board with all the objectives? While that may seem like luck, it could also be a byproduct of skill. If you are in a losing position matchup wise and need a little luck to go your way in order to win the game, maybe you should stack the objectives to one side and just hope you win the roll. On the flip side, if you are on the favored side of a matchup, you should actively try and spread the objectives to reduce the impact of winning the roll for sides.

Imagine in the above map, a Tau player is playing hammer and anvil against an Ork horde. The Tau player obviously has most of the advantages being that the deployment maximizes the distance between them, so he does the classic Tau move and puts an objective deep into a deployment zone on the right.
*Note, he didn’t place his first objective in the center of the board because he read the first half of this article and learned placing an objective in the center against a board control army is bad.*
The Ork player recognizes he’s down in position match-up wise and decides to act strategically. (Very un-Orky I know). He responds by placing an objective on the same side as the Tau player’s objective (the right side). The Tau player wises up and puts his second objective on the left side to diversify the objective spread. The Ork player then doubles down and puts his second objective on the right side, realizing his down position in the match, and puts a lot of emphasis on the roll for sides. Finally, the Tau player just places his final objective on the left. From here if the Tau player wins the roll for sides and chooses the objective stack, he’s just going to win a game he should have won anyway. However, if the Ork player wins the roll for sides he may have flipped the odds so far in his favor that he actually wins the game.
As you can see, the difference between players placing objectives with care and thought is very different from players placing objectives with no rhyme or reason. There are strategic checkpoints in literally every aspect and every choice of 40k, and that’s part of what makes it so cool. So, next time you get out there and place your objectives, really try and think about where and why you’re placing them where you are. That’s all, for now, folks, see you soon for another artistic masterpiece by yours truly!