Checkout this great article on how to make custom bases by Red Stick Studios!
Building Wood Plank Bases
Base Creation
– Bases of choice (30mm Warmachine bases used for this guide)
– Balsa wood strips (no larger than 1/4”-3/8”)
– Super Glue
– Clippers
– X-acto Knife
– Zip Kicker, or some form of super glue accelerant
Instructions
The process to create the initial base is very simple:
1. File the edge of your base to make sure it’s ready for painting when you are finished, rather than waiting till the end to do it.
2. Taking your clippers, snip random lengths of balsa out, taking care not to crush the ends too much (clip with flat edges against the part of the wood you want to use, as this will ensure you get a good cut without crushing the ends of each piece)
3. After getting a sufficient amount of pieces, take them and dry fit them to your base, seeing what you like on the base, and how realistic it looks to you. Also make sure to fill in the slot if your base has one, with a small piece of wood trimmed down. This limits the worries of the table showing through the base gaps.
4. Once you’re satisfied with the pieces, or if you just choose to wing it instead, start by gluing down a piece. This can be personal preference at this point, as to whether you want to work edge to edge, or middle out.
5. Repeat process of placing random pieces on the base until you only have triangle shaped areas left, getting as much of the base filled as possible. You can cut small pieces to fill in the gaps, or leave the gaps there, whatever your preference is.
Finished Product
 |
|
| Completed wood plank base. Image copyright Red Stick Studio 2011. |
Your usual painting supplies (palette, wet palette, water, napkins for drybrushing and cleaning brushes and so forth).
– A good drybrush, and for this project, a flat brush is ideal.
– P3 Thalmar Black
– P3 Umbral Umber
– P3 Bootstrap Leather
– P3 ‘Jack Bone
– P3 Menoth White Highlight
– GW Dark Angels Green
– White
Step 1
Prime the base black. This can be either a brush primer, or spray prime. If you choose to spray prime expect to need to go back over it with a thinned down coat of black to get into the deep crevices.
 |
| Step 1, painting wood plank bases. Image copyright Red Stick Studio 2011. |
Step 2
Drybrush the base with Umbral Umber. At this point you won’t notice much, even in the image, but it’s important to build up from a good dark brown.
 |
| Step 3, painting wood plank bases. Image copyright Red Stick Studio 2011. |
Step 3
Drybrush the base with Bootstrap Leather. It’s also important to note, don’t try to clean out your brush during this, at all. The subtle mix of each of the colors will help give you the wood grain look, and it will give each base a slightly unique look, but keeping it uniform as well.
 |
| Step 3, painting wood plank bases. Image copyright Red Stick Studio 2011. |
Step 4
Light drybrush of ‘Jack Bone. Concentrate more on the plank edges and a light dusting to the wood itself. You don’t want to hide the previous colors you’ve drybrushed onto the base at this point with this color.
 |
| Step 4, painting wood plank bases. Image copyright Red Stick Studio 2011. |
Step 5
Highlight the very edge with ‘Jack Bone/Menoth White highlight 50/50 mix, making sure you only get the actual edges, and where the boards end. This gives you a bit of wear in the appropriate places.
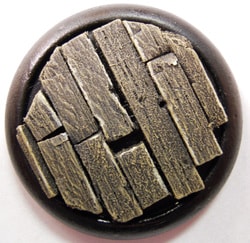 |
| Step 5, painting wood plank bases. Image copyright Red Stick Studio 2011. |
Step 6
Now that you’ve completed the planks, it’s time to do the rim of the base. Thinned Thalmar Black will accomplish this, painted carefully around the base, missing the planks entirely.
Step 7
Once this has dried, then paint on your arc markings, preferably with a template to guide you, if this is applicable. For this mini, it is, as it’s the base for Pirate Queen Skarre, Privateer Press Warmachine Cryx Faction Warcaster.
Did you know there’s free templates available for painting front arc marks? Check out where I downloaded my free pdf.
Step 8
If you’re coloring the arc, now’s the time to get it done. This one is done with Dark Angels Green for the front arc of the mini.
And… You’re done!
Finished Base
 |
|
| Pirate Queen Scarre. Image copyright Red Stick Studio 2011. |
Alas, while the photo is dark, it was taken to show the scaling of the planks in relation to the scale of the miniatures, and I no longer have the figure to rephotograph it.
Be sure to checkout Red Stick Studios, or contact them at redstickstudio@gmail.com for more great hobby tips and more! -MBG
