Today we have a great guest post by Rage of Khorne from The Order of Chaos gaming club.
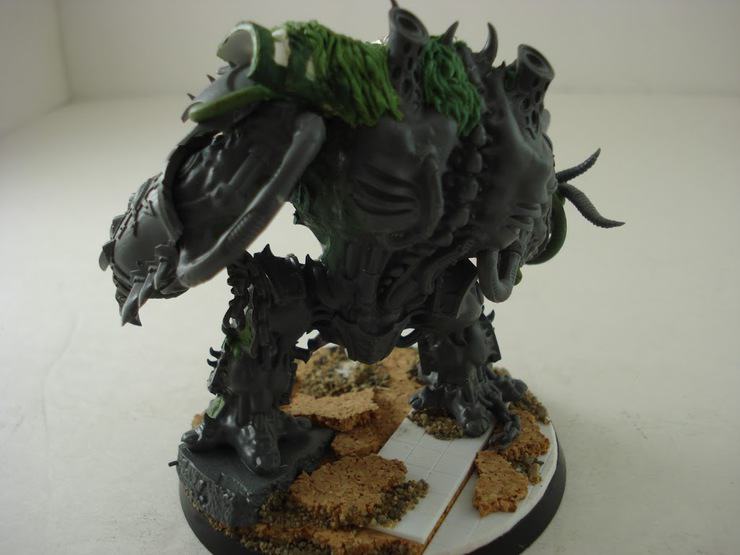
I spread them out and dry fit some of the pieces together to get an idea of how much green stuffing I would need to do. Extra bitz were collected from dark eldar, space marine, and chaos space marine kits and I mixed up some green stuff in preparation for the first part of assembly.
 I used a jeweler saw to cut the helbrute at the shoulder after it was assembled so I could get the pieces lined up properly. The parts I didn’t want were set aside for later use or added to my bitz box.
When I had the approximate shape done it was time to start filling gaps and sculpting muscle. I used a round headed sculpting tool for this and after the green stuff was dry I filed away any rigid bits.
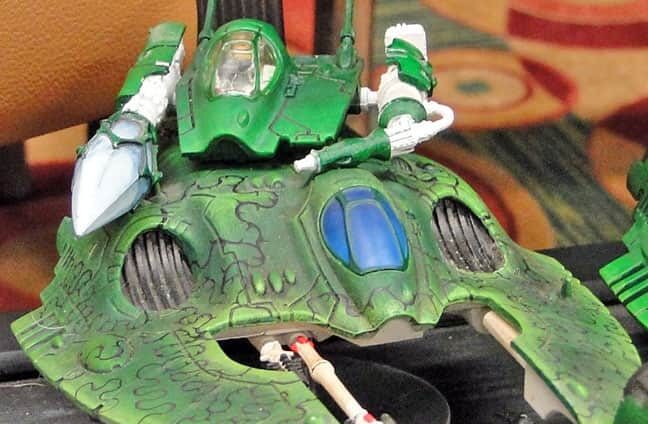
I wanted to make the helbrute look feral and animalistic so I included extra tusks and an animal’s fur on its back. The fur was done last to ensure I didn’t ruin the sculpting job with a poorly placed finger.

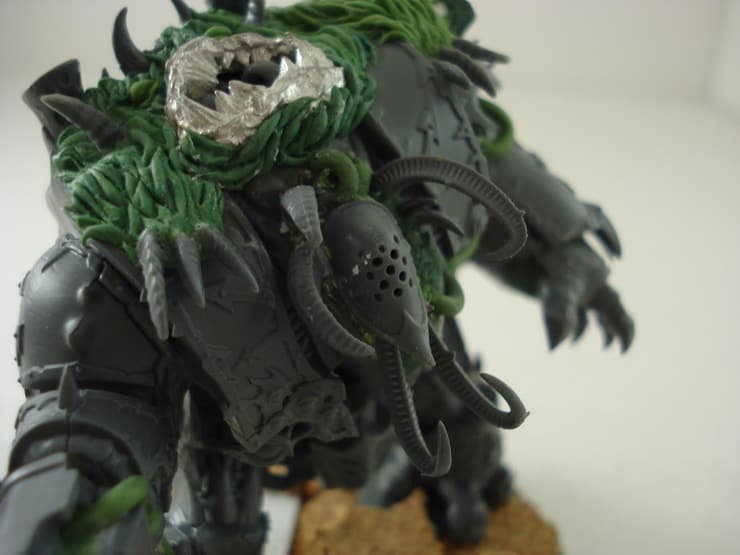


I definitely dig the Dark Eldar Talos bit for the head, and the “veteran of the long war” feel to him. What say you? -MBG

About the Author: Rob Baer
Rob Baer
Job Title: Managing Editor
Founded Spikey Bits in 2009
Socials: Rob Baer on Facebook and @catdaddymbg on X
About Rob Baer: Founder, Publisher, & Managing Editor of Spikey Bits, the leading tabletop gaming news website focused on the hobby side of wargaming and miniatures.
Rob also co-founded and currently hosts the Long War Podcast, which has over 350 episodes and focuses on tabletop miniatures gaming, specializing in Warhammer 40k. and spent six years writing for Bell of Lost Souls.
Every year, along with his co-hosts, he helps host the Long War 40k Doubles Tournament at Adepticon and the Long War 40k Doubles at Las Vegas Open, which attracts over 350 players from around the world.
Rob has won many Warhammer 40k Tournaments over the years, including multiple first-place finishes in Warhammer 40k Grand Tournaments over the years and even winning 1st place at the Adepticon 40k Team Tournament.
With over 30 years of experience in retail and distribution, Rob knows all the products and exactly which ones are the best. As a member of GAMA (Game Manufacturers Association), he advocates for gaming stores and manufacturers in these difficult times, always looking for the next big thing to feature for the miniatures hobby, helping everyone to provide the value consumers want.
While he’s played every edition of Warhammer 40k and Warhammer Fantasy (since 5th Edition) and has been hobbying on miniatures since the 1980s, Titans of all sizes will always be his favorite! It’s even rumored that his hobby vault rivals the Solemnance Galleries, containing rulebooks filled with lore from editions long past, ancient packs of black-bordered Magic Cards, and models made of both pewter and resin.