Want to make painting a battleline unit go quickly? Let’s try out using an airbrush for speed. Don’t worry, it’s my first time too!
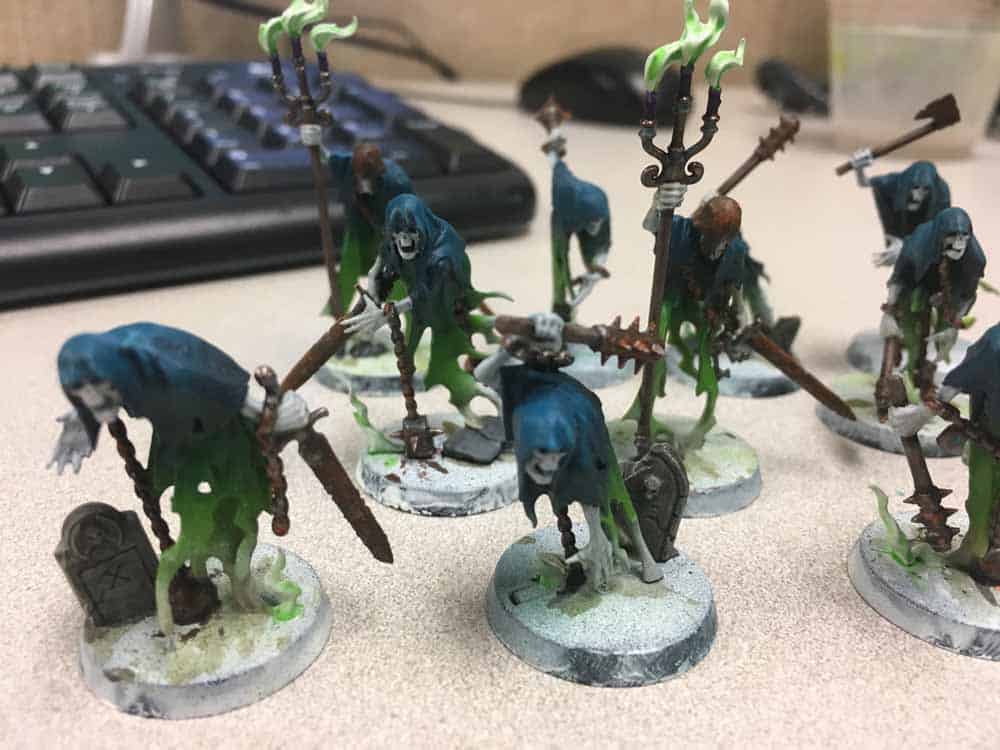
Today we are going to tackle another one of the battleline units for our new Nighthaunt army and I want to get it done fast. But, this one is a doozy with the Chainrasp horde. I took the 20 models from the Soul Wars starter set and ended up making two dread wardens out of it in case I wanted to run two 10 model units instead of one 20.
However, I have plans to get another 20 and potentially do two units of 20 and maybe the Chainguard Battalion. Anyway, it’s always a struggle for me to do a larger battleline unit like this because it makes sense to do them all at once to save time and paint. The idea here is that using the airbrush will make that go quicker, though I’ve never done this many at once with an airbrush so there’s only one way to find out.
*I primed these models using Vallejo White Surface Primer*
Previous Articles in this Series:
-
A Noob’s Guide to Learn Airbrushing & Display Making
Table of Contents & Article Summary -
Learn Airbrushing from a Beginner: Painting Nighthaunts
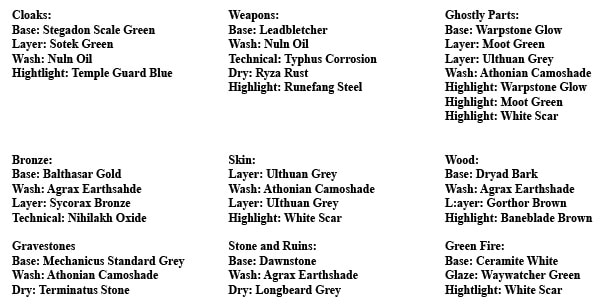
Colors:
*Writers Note: I forgot to list the purple candle colors. They are: Base Naggaroth Night, Wash: Druchii Violet, Layer: Xereus Purple, Highlight: Genestealer Purple. *
Airbrush Safety and Set Up:
I tend to wear a decent respirator when I am using the airbrush even when not priming even though I am not sure it’s required. In my mind, you’re still atomizing tiny particles of paint so, better safe than sorry! I also like to use a plastic glove on my left hand which is the one holding the miniature. I don’t think the paint can hurt your skin but, it prevents you from having to get all that paint off.
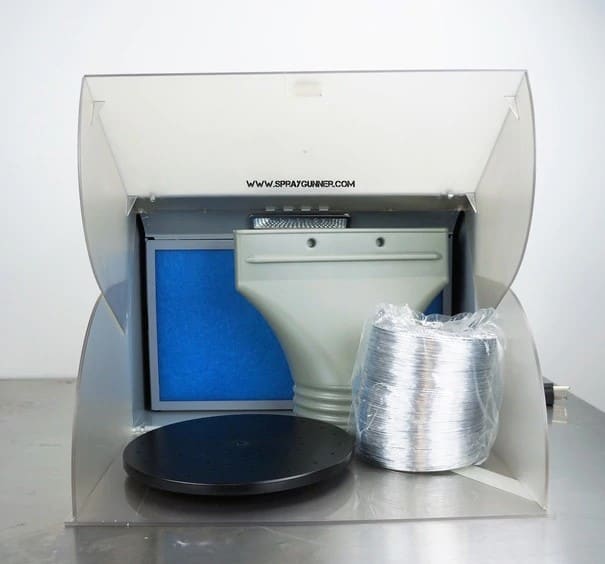
Portable Hobby Spray Booth by NO-NAME Brand: $99.00
Finally, I don’t have an airbrush booth but I do have a large kitchen table. I put a big piece of cardboard down on that table and open a nearby window. In general, I like to have airflow when painting (anything from airbrush to walls) even though I live in the mitten state and it is freezing outside. I set my air pressure to 20 with the idea that I can use the bleed-off valve when I want more detail.
Airbrush (the Good):
As a timesaver, this thing was money. I was breezing through colors and slinging paint very quickly. I was able to put down a good chunk of the main colors on all 20 models in about 3 hours, including some cleaning I had to do. (See Airbrush the Bad.)
The fade also looks much better than anything I could do with a brush, so I think I’m getting much better with this tool. After getting these base coats down, I hit the model with the washes. I returned to them another day to do some finer detail spraying and bring out some raised parts.
Airbrush the Bad:
The moot green again exploded in my airbrush even though I used very little amounts of thinner and water. With much swearing, I cleaned out my airbrush and was frustrated that all the other colors were going on great until this one paint.
I was getting the “skim milk” consistency that all the YouTube videos say you should shoot for and was still getting either a clogged or super watery spray of the Moot Green and Ulthuan Grey. I think it has something to do with how thin they are. When I went back for round two, I still got a water-like spray, but it didn’t explode out of the airbrush and I was able to continue very gingerly. (More on this later.)
Editor’s Note: try using some Vallejo Flow improver in your airbrush. The instructions listed on the bottle work well for problems like this!
Airbrush the Ugly:
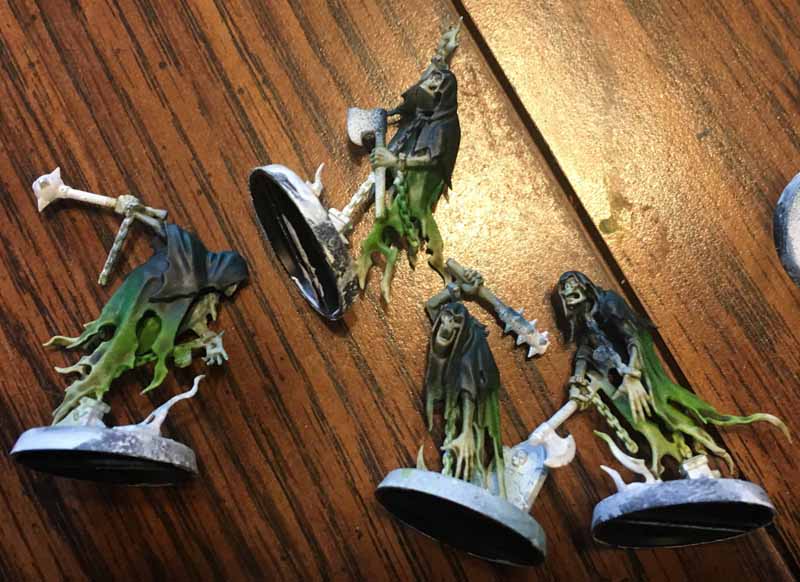
I tried to do the skin tones with an airbrush and this is where I think I have hit a wall with this tool. The picture above is my attempt at doing the skin with the airbrush without masking anything off. I just don’t think the needle and brush are made for this small of detail.
You can see where a lot of the Ulthuan Grey goes beyond the skin and gets on the other parts. I conferred with Rob Baer about this he said it’s very hard to get detail with an airbrush beyond something about the size of a Space Marine shoulder pad.
I will have to keep that in mind for my next batch of models.
Editor’s note: It’s true… sometimes smaller details like this are just better painted with a brush still.
All the Rest (Brush Work):
After finishing up the airbrushing, I went about highlighting the major areas. (I need to revisit this part because I rushed through it.) Then I moved on to the weapons. This is basic. Just remember when you’re doing the rust effect, go lightly at first with the Ryza Rust or you might bring out a little too much orange color. If you make it too bright when you highlight with Runefang Steel, cut scratches into it to break it up a little bit.
With the Bronze, I added the Oxidizing effect for the first time and I think I was a little scared. You can hardly see it in the pictures and if I come back around to these guys, I might be a little bolder next time. The rest of the brushwork is basic stuff with your standard base, wash, and either highlight or dry brush.
Moving Forward:
I was bummed about the paint exploding in my airbrush again and really didn’t have an answer for why it was happening. That’s when I checked one of my older posts and noticed I had a comment. (I really try and read and respond I promise.) Ryan Cooper mentioned replacing the Vallejo Paint Thinner with Vallejo Flow Improver to solve my exploding paint issues. So, I hopped on the old computer and ordered a bottle for next time.
Editor’s Note: Great minds and all!
I plan on replacing the thinner with that for all the paints to see if that really does make a difference. After this set of 20 I’ve got two battleline units done, so I am going to do the heroes from the Soul Wars set. I don’t think I will end up using the Lord Executioner in many games, but it is such a cool model that I am going to paint it up anyways.
Also, I am starting to think about the display board and basing these models and I’m leaning toward a mossy, forest-type ruin. However, I keep coming back to an inner-city graveyard scene as well in my mind, so I’m torn as to what to do. I hope to have a decision made up by the time I reach 1000 points so I can begin gathering the materials I’ll need to build this thing. If you have any ideas let me know in the comments!
On the Paint Table:
- Lord Executioner
- Spirit Torment
- Knight of Shrouds on Ethereal Steed
- Guardian of Souls with Nightmare Lantern
Finished Nighthaunts:
- 6 Spirit Hosts: 240 Points (Battleline 1 of 3)
- 20 Chainrasp Horde: 160 Points (Battleline 2 of 3)
- (400 Points Total…. Long way to go!)
More AoS How-To For Noobs!
This post contains affiliate links, meaning that Spikey Bits will earn a commission if you click through and make a purchase.
