If you’re a fan of Chaos you’re probably also a fan of Skulltaker. He’s a great looking model and for those who play lots of games he certainly dishes out the damage.
Just about the only thing better than Skulltaker is Skulltaker riding a Juggernaut. After all the only thing cooler than a daemon is a daemon riding on another daemon!
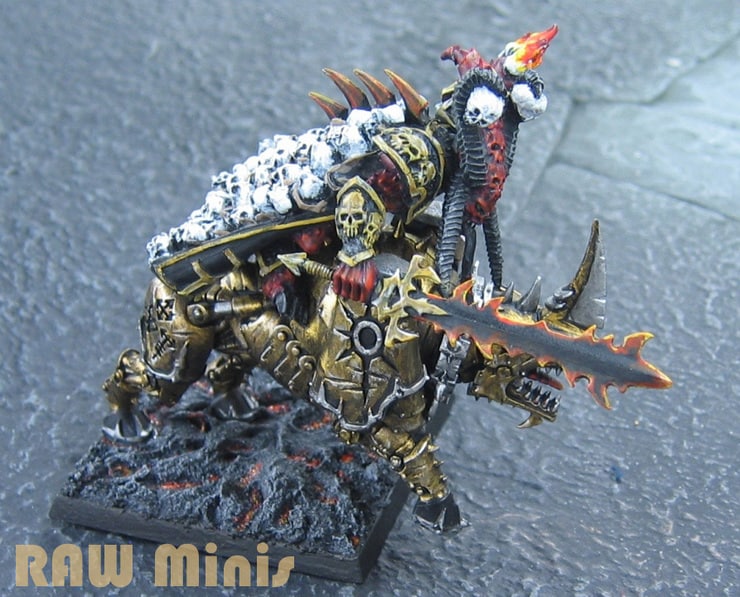 If you’re like me and I know I am I have also been a little disappointed that Games Workshop never released a mounted Skulltaker model. However, when the metal GW models were switched to the Finecast resin material converting a mounted Skulltaker became easier than ever.
Back when Skulltaker was a metal model converting him to ride on a Juggernaut Of Khorne was a bit laborious. Sawing through metal models requires care and significantly more effort than cutting through any of the types of plastic used by GW for models now. This resulted in a lot of “surfing” Skulltakers, which is to say I used to see a lot of conversions that were just the unconverted Skulltaker model pinned and super glued standing on the back of a Juggernaut. He either looked like he was surfing or bareback trick riding like one sees in a circus.
Cool as he is Skulltaker is not a surfer! He does not wear tiny little swim trunks or listen to The Ventures (cool though The Ventures’ music is, look it up kids). Skulltaker is a daemonic killer he has no time to master surfing or trick riding. His only skill is taking skulls and at that he is a master.
So seriously folks, what’s an easy way to get Skulltaker on the back of a Juggernaut without just standing him there? Well as it turns out the existing molded pose does not require a lot of conversion work. A minimal amount of cutting and sculpting (skullpting?) to one leg will do most of the trick and it’s easy now that he’s no longer a solid chunk of pewter alloy.
The materials and supplies needed for this project are one Finecast Skulltaker model, a Juggernaut Of Khorne taken from either the Bloodcrushers or Skullcrushers kit by Games Workshop, hobby clippers, a modeling knife, sculpting tool, a short piece of metal rod (a piece of a number 2 jumbo paper clip will do nicely), sandpaper, super glue and plastic cement.
First, use your flush cutting hobby clippers to carefully cut through the left leg just below the knee guard (poleyn in Medieval plate armor nomenclature). What little bit of the lower leg is molded to the inside of the cloak will now have to be removed. Be careful not to destroy the cloak or the left foot. Since the lower left leg is neither complete nor easily salvageable don’t worry about ruining that. I used a nice sharp modeling knife for this part. After extricating the intact foot from the cloak carefully remove any vestiges of the lower leg from the inside of the cloak with your modeling knife, then sand it smooth with a small bit of sandpaper. Clip the foot carefully if you have not already done so from the remains of the lower leg.
Next, carefully remove the pile of skulls from beneath Skulltaker’s right foot. Smooth the bottom of the foot with some modeling knife back scraping and an emery board or sandpaper.
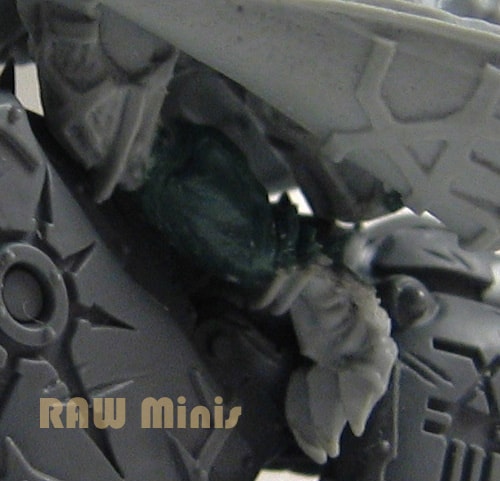
Now put a metal pin in the left knee and attach the foot to the other end at an angle that allows Skulltaker to brace himself on a Juggernaut. Use a fully assembled Juggernaut to test this out before proceeding further. The exposed length of the pin should be the length of the lower leg. This pin will be the armature on which you will be sculpting a new lower left leg. Using his right leg for visual reference, apply some Kneadatite (“Green Stuff”) around the armature between the knee and foot. Carefully sculpt it into the required shape and detail. Note that the back of the anklet Skulltaker is wearing will need to be sculpted as well. Alternatively, you could remove the part that’s already molded there. I chose to complete the anklet’s rear detail which never actually existed when the back of the leg was molded to the inner cloak.
The photo below shows the results after a new left leg has been sculpted. I also had to add a claw to the back of the foot. It’s another piece of detail that never existed on the model because it was “hidden” inside the cloak. You can either sculpt a claw or carefully cut into shape a piece of scrap plastic left over from your work so far and glue it in place.
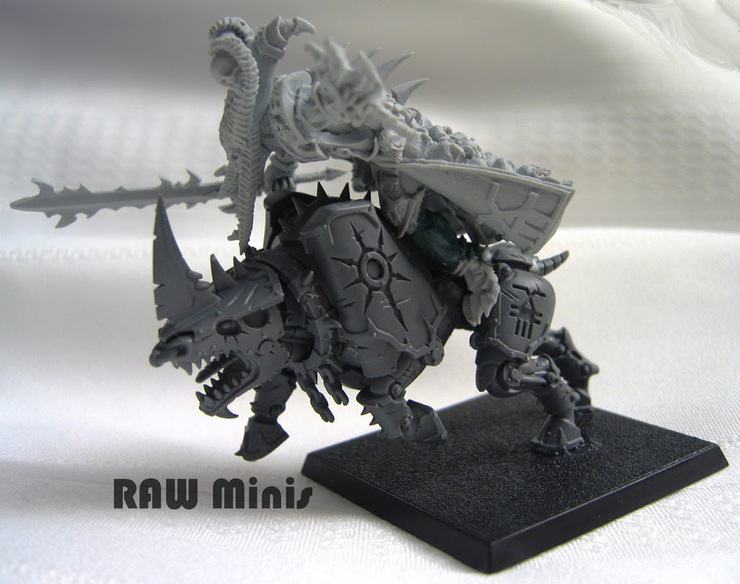
Here’s how Skulltaker will now look mounted on the Juggernaut (see photo below). However, I did not glue him in place at this stage. First you obviously need to let the Green Stuff sculpting you’ve done harden and that takes a few hours. By then the glue you’ve used will be long dry as well. Carefully set Skulltaker aside to set. Meanwhile, you can prime the Juggernaut and begin painting that.
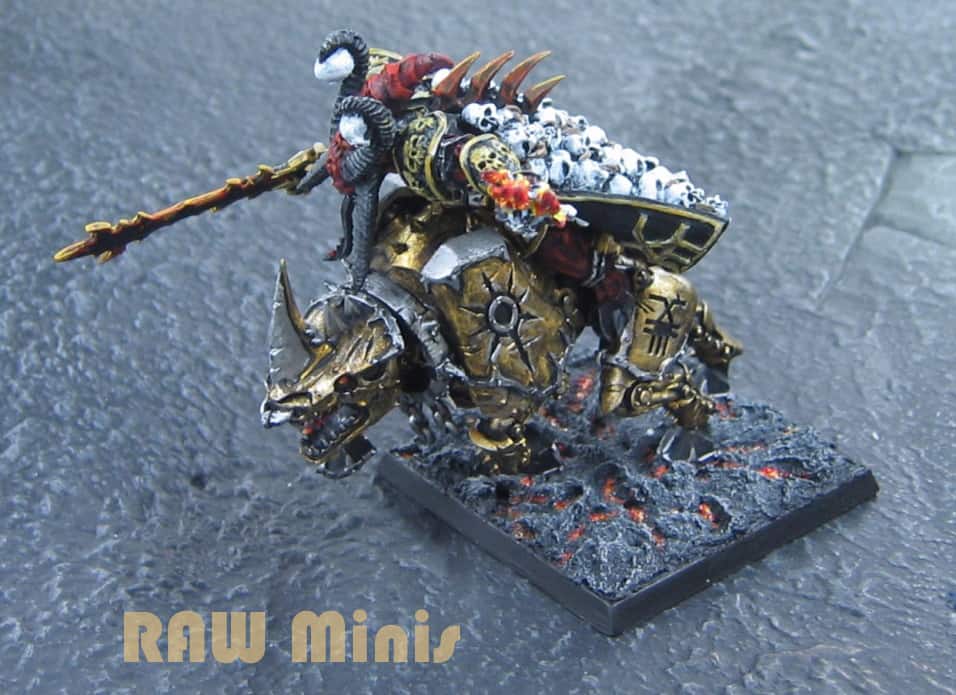
After the Juggernaut has been painted you’ll want to prime and paint your newly converted Skulltaker. You’ll also want to finish the base of the model. I chose a molten lava theme making it appear that the daemonic warping power of Skulltaker and his steed are blistering the earth beneath them as they ride headlong into battle.
That’s all there is to it. One mounted Skulltaker painted and ready for battle. Now let’s take some skulls!
This was a fun project for me as it was challenging enough to be interesting without taking so much effort that it robbed me of a lot of time working on other models. Since cutting, scraping and sanding was easy with the new Finecast Skulltaker I was able to focus my energy and time purely on the creative part of the project like figuring out what needed to be sculpted and how best to position Skulltaker on the Juggernaut with the least amount of damage through cutting and converting to the model.
Since I play only casual “story driven” type games with friends I’ve mounted all my Daemons on square bases for two decades to make them easily useable in both Warhammer Fantasy and 40K. You can double the fun of your models by using them for two game systems.


