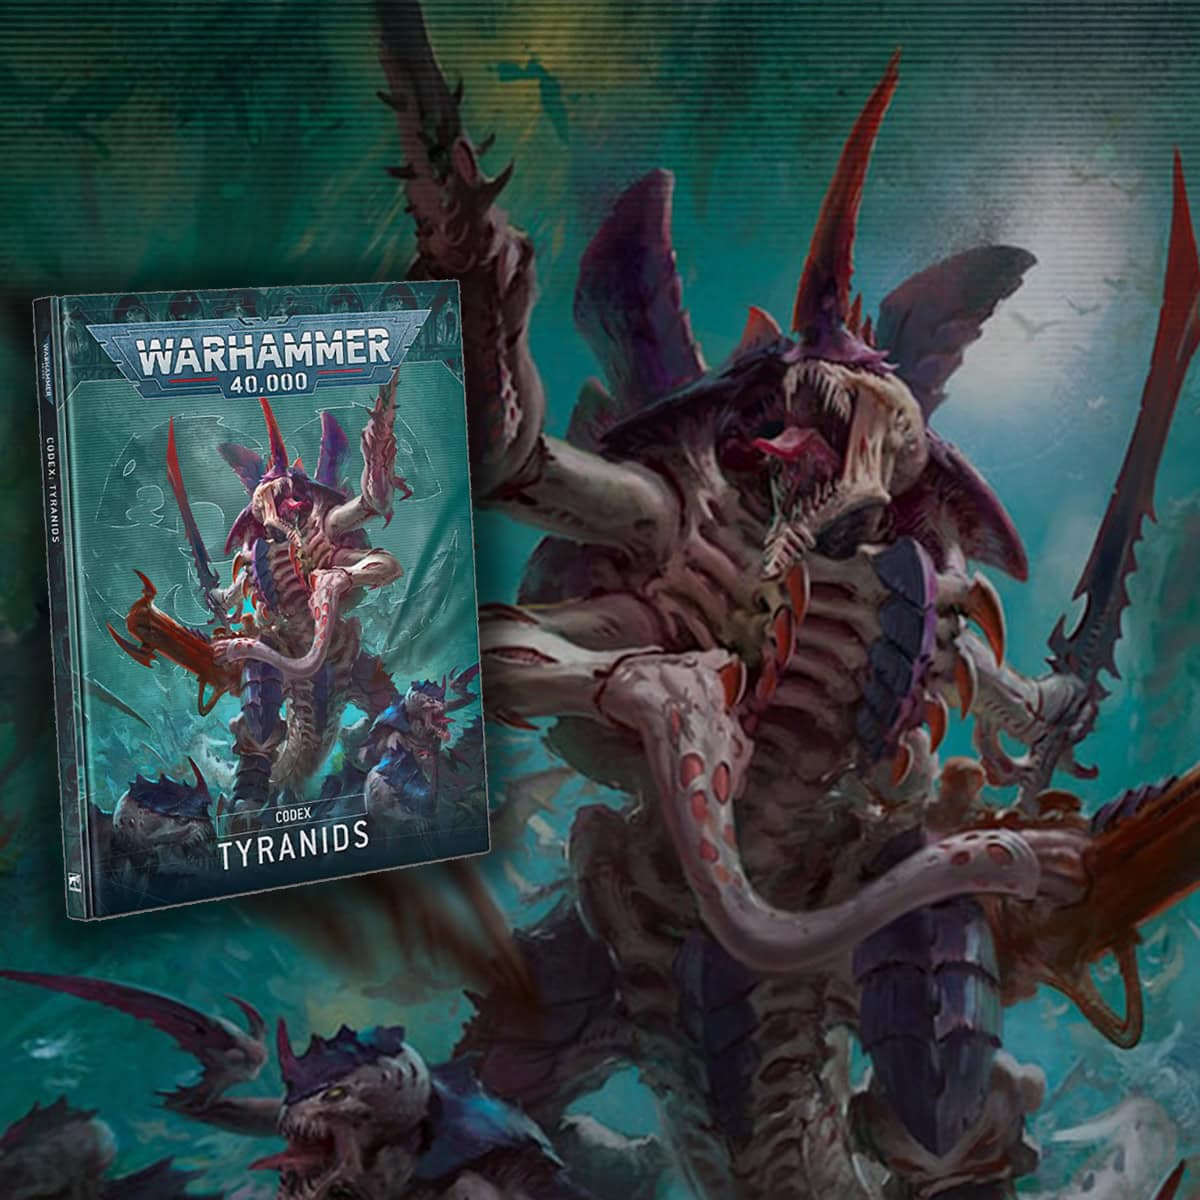
Breakdown of the Tyranid army rules plus key supporting mechanics like Synapse ranges, tokens, and common rule interactions to know.
The Tyranids are back with a reworked army rule, and the new Codex changes how the swarm actually plays at the table. This guide sticks to the parts that decide games: how Synapse keeps your army functioning, which abilities and effects you’re tracking every turn, and which of the six detachments fits the list you want to run.
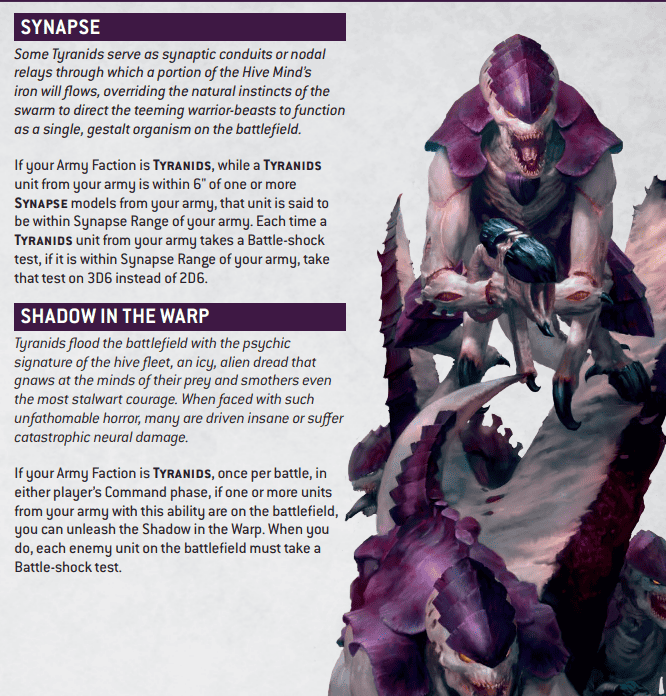
Honestly, the whole thing hinges on Synapse range now. Keep your broods inside it and Battle-shock turns into your opponent’s problem instead of yours. Let those Synapse creatures die and your control, your buffs, and your regeneration all crumble in a hurry, which is a big part of why the army swings so hard on where it lands in the meta from one dataslate to the next.
So we’ll take it in order: the core army rules first, then all six detachments, then a unit-by-unit look at the new datasheets, so you know exactly how to play Tyranids in 10th and 11th Edition.
The video below runs this same breakdown out loud, going unit by unit through the Codex, so it’s worth a watch if you’d rather listen while you paint than read before game night.
Tyranids Codex 11th Edition Strengths and Weaknesses
Updated on August 5, 2026, by Rob Baer with refreshed Tyranids Codex 11th Edition detachment rules, revised unit breakdowns, and current points references. Originally published December 2023.
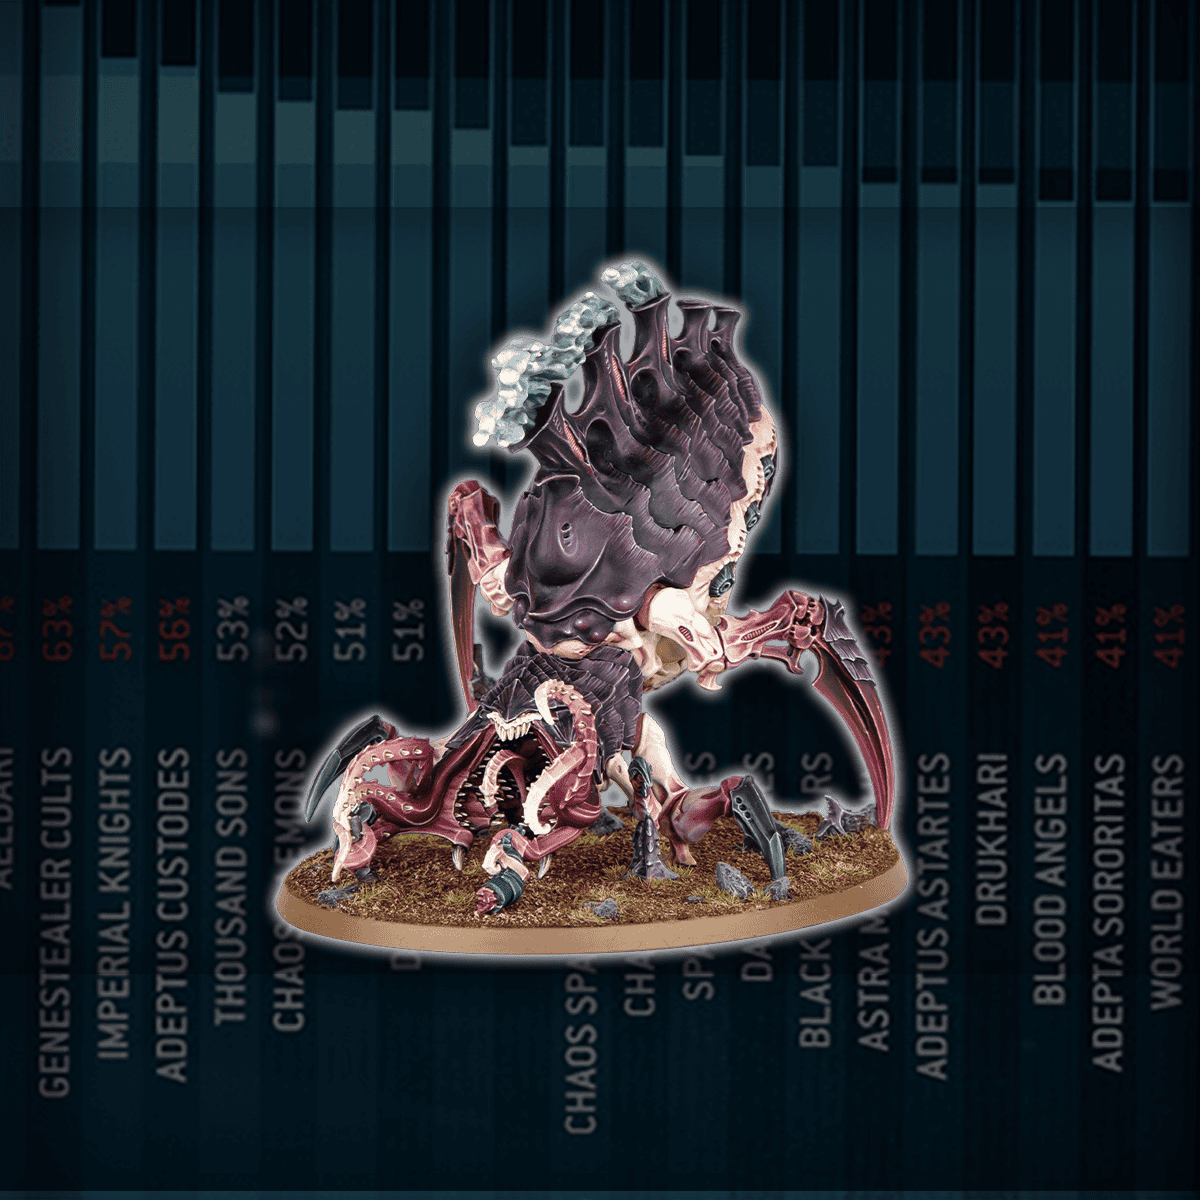 Strengths of the new Tyranids Codex
- Synapse provides Tyranid players incredible control over Battle-shock, keeping your swarm stable and aggressive.
- Shadow in the Warp can cripple enemy morale and swing objectives in your favor.
- Six distinct detachments, from Unending Swarm’s unit recycling to Crusher Stampede’s monster synergy, allow for wildly different list builds.
- Units like Norn Emissaries, Winged Prime, and Neurotyrant offer strong centerpieces for varied strategies.
- Regeneration and board control make Tyranids surprisingly durable for a melee-heavy army.
Tyranids Codex Weaknesses
- Once Synapse creatures are gone, your core rules, control, and buffs crumble fast.
- Elite armies with strong ranged firepower can pick apart key nodes before the swarm closes in.
- Managing overlapping Synapse auras, buffs, and regeneration effects can be complex in longer games.
Tyranids Rules and Playstyle: Mastering the Hive Mind
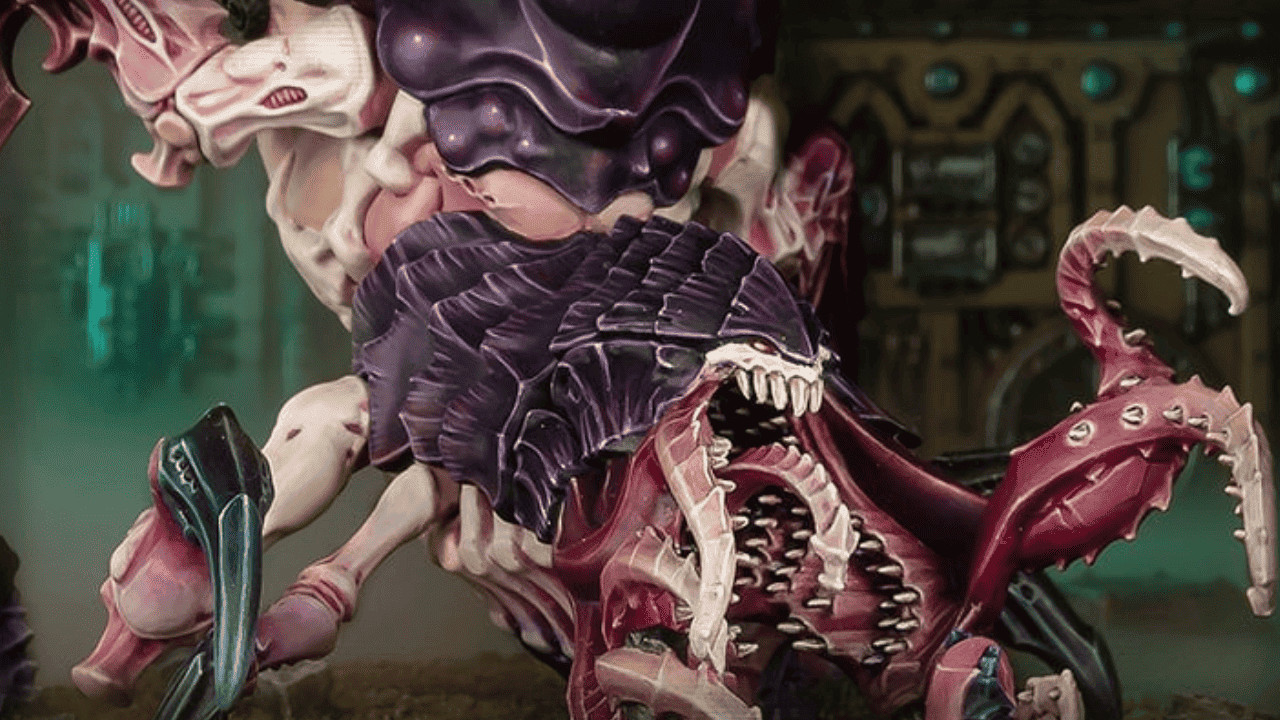
The whole army runs on three moves you repeat every turn: keep your broods inside Synapse, pick the right thing to kill, and trade up while your regeneration quietly refills the board. Get those three right and the Warhammer 40k Tyranids feel less like a loose horde and more like a machine that keeps grinding after your opponent’s has stalled.
Target priority is the skill that wins games with them. Synapse creatures come first on your opponent’s kill list, so screen your Neurotyrant and Tyranid Prime early and don’t let a Lone Operative wander out of the bubble on turn one. On your side, forcing Battle-shock is where the army earns its points, since a shaken unit can’t hold an objective the way it should, so you stack Shadow in the Warp onto whichever midfield objective you want to flip and let the panic do the scoring for you.
That’s also what “controlling the pace” actually looks like on the table. It isn’t a vibe, it’s Synapse bubbles staged one move ahead of your monsters so your fast melee threats never fall out of range when they crash into the middle. Push a Synapse node onto the center objective turn two, and you get to decide where the game is fought instead of reacting to where it goes.
So why bring them? Three reasons that all show up on the score sheet. You flip and hold objectives because Harvester regeneration keeps bodies on points your opponent thought they’d cleared. You win the morale game because Shadow in the Warp turns their Leadership into your extra damage. And you win the trades because a swarm is happy to lose a Gaunt brood if it buys a turn of position for a Carnifex.
Where it gets personal is the detachment pick, since each one rewards a different plan, from the monster-heavy Crusher Stampede to the swarm-recycling builds. Whatever you land on, the opening turns look about the same.
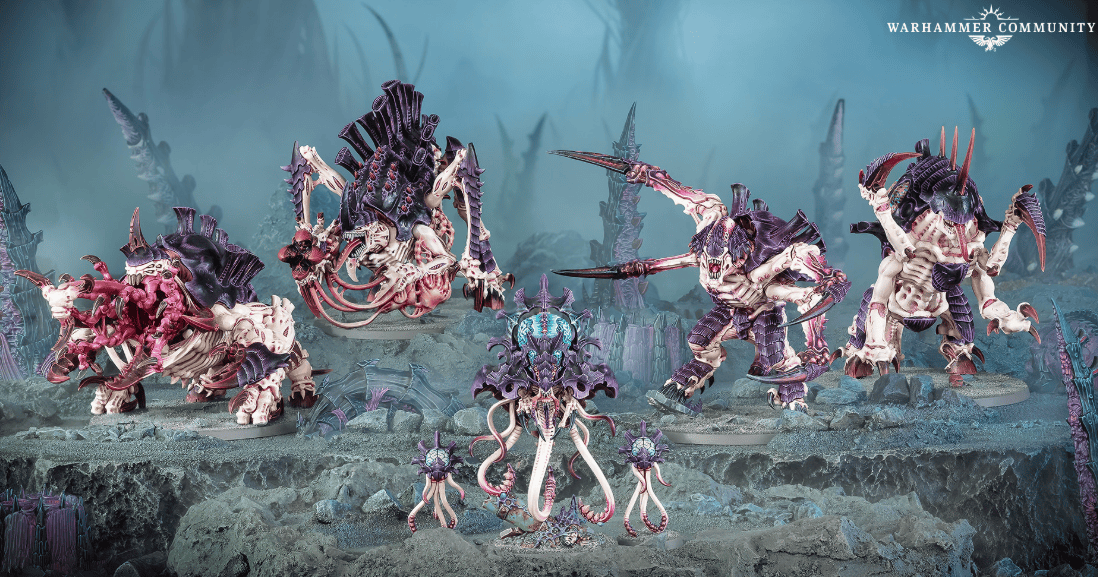
Here’s the gameplan to run most nights:
- Deploy your Synapse characters central and screened, never on a flank where they get sniped off turn one.
- Spend turns one and two on position and objectives, not heroics: walk your bubbles up, grab the middle, and bank early points.
- Fire Shadow in the Warp the turn before your big charge, so their units are already Battle-shocked when your monsters and Genestealers pile in.
Do that and the mid-game tips your way on its own, which is right when the Hive Mind is scariest.
Warhammer 40k Tyranids Codex Detachment Rules Explained
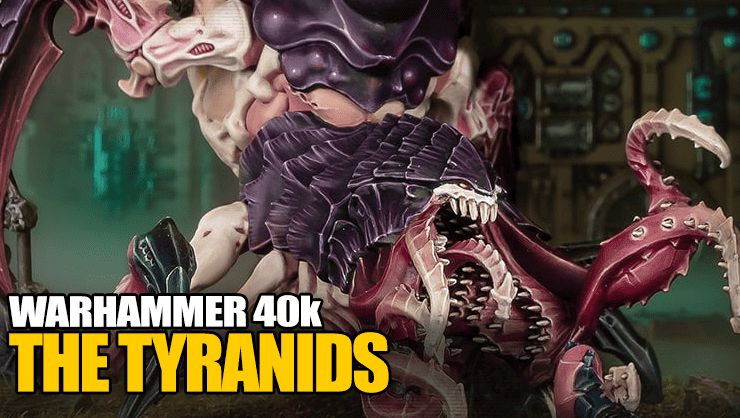
Now, let’s get into all the new detachments for the great devourer. Currently, the six Tyranid detachments for 11th Edition 40k are:
- Invasion Fleet (same as index cards)
- Crusher Stampede
- Vanguard Onslaught
- Unending Swarm
- Assimilation Swarm
- Synaptic Nexus
Synaptic Nexus Tyranids Rules and Enhancements

Pick Synaptic Nexus when your list already leans on staying bunched up, because everything good here only works while you’re in Synapse range. The invulnerable-save option is the safe default against shooting armies, the advance-and-charge boost is for aggressive swarm lists that want to be in combat by turn two, and the extra hit rolls suit a monster-light build that needs the accuracy. You commit to one, so match it to how your army actually wants to fight.

The thing to track all game is your Synapse coverage, not just your Synapse characters. Keep a running mental note of which units are inside a bubble each turn, because the second a brood drifts out it loses the whole detachment benefit, and that’s usually the moment a charge falls apart. Override Instincts is the enhancement to keep CP aside for: falling back and still shooting for 1 CP is what saves a unit that gets tied up by a screen you’d rather not be stuck in.
Vanguard Onslaught Tyranids Codex 11th Edition Detachment
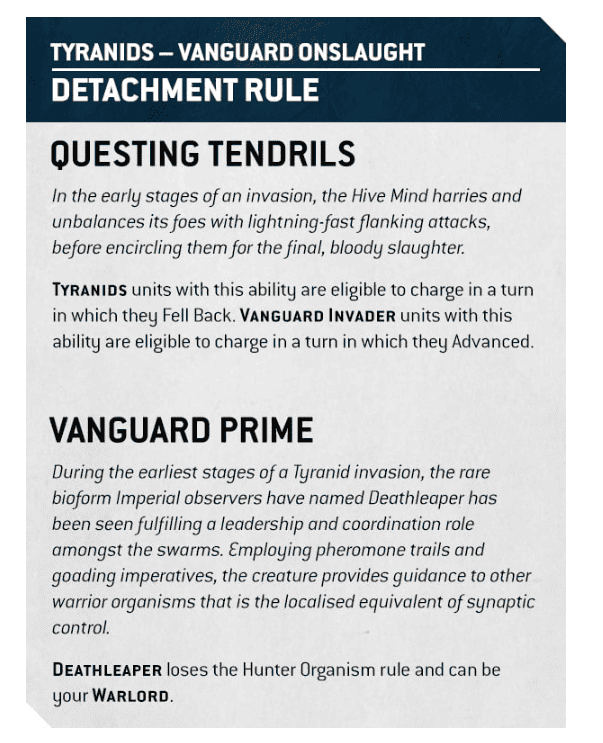
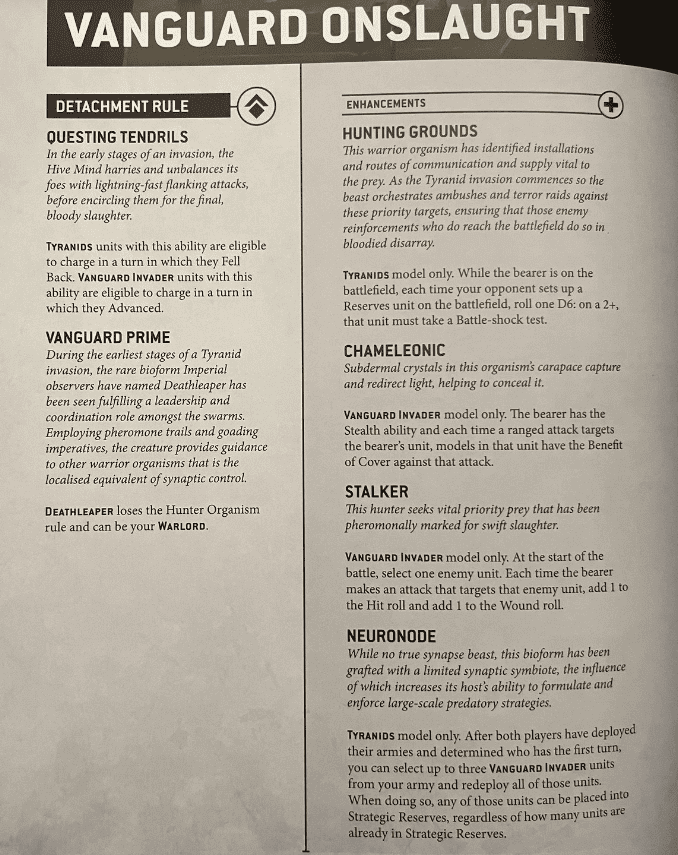
This is the assassination detachment, and the ideal core is exactly what it sounds like: Genestealers, Broodlords, Von Ryan’s Leapers, and a Winged Tyranid Prime to run the show. Deploy aggressive but hidden, using Infiltrators and reserves so your fastest threats start close enough to reach a backline character on turn one without standing in the open first.
On CP, the priority is the stratagem that deletes an enemy character mid-fight for 1 CP, so hold at least one command point through the early turns for it. Unseen Lurkers is your other must-keep, since slipping a unit into charge range without getting shot on the way in is what turns a fragile brood into a landed hit instead of a pile of dead bugs.
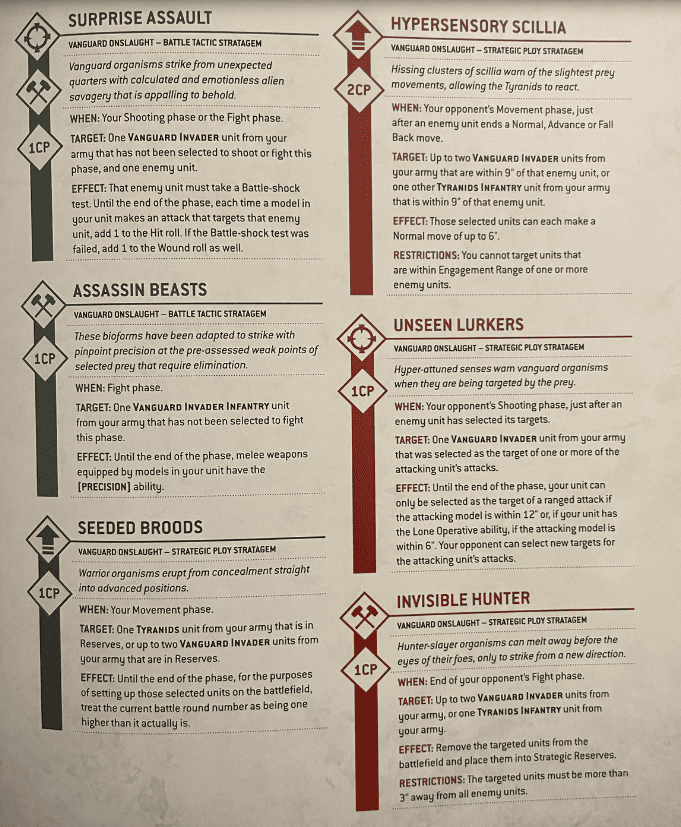
The Chameleonic Enhancement on a Winged Prime, plus Deathleaper as your Warlord, gives you two characters that are miserable to pin down and perfect for hunting the units your opponent was counting on. It’s sneaky and it’s mean, and against a gun line it’s often the only Tyranid plan that gets you into combat on your terms.
Assimilation Swarm Tyranids Detachment Guide

Assimilation Swarm changes how you think about objectives before it changes anything in combat. Because Harvester units heal and spawn bodies while they’re sitting on a point, you want them planted on objectives early and left there, not thrown forward into a fight they don’t need. Your movement plan flips from “get everything into combat” to “anchor the Harvesters, screen them, and let the regeneration make them impossible to shift.”
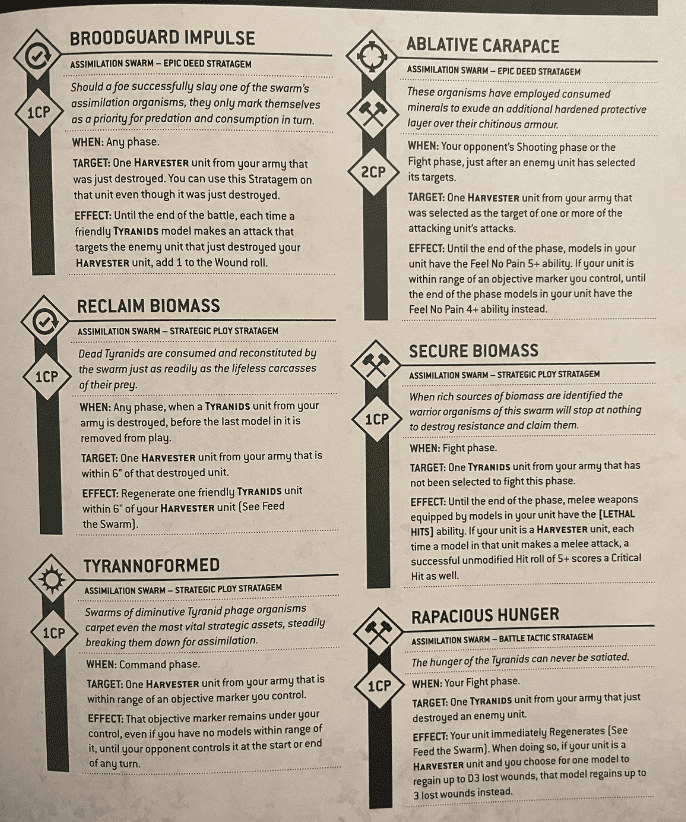
The common mistake we see is over-extending those anchor units to chase a kill. The second a Harvester leaves its objective, it stops doing the one thing this detachment is built around. Reclaim Biomass is the payoff for playing patiently: your opponent finally drops a big bug, you spend 1 CP, and it walks right back onto the point like nothing happened. Pair that with Secure Biomass hitting on 5+ with Lethal Hits and the swarm just refuses to leave.
Unending Swarm Tyranids Rules and Tactics

Unending Swarm has a loop you run every single round, and once you’ve got the rhythm it plays itself. Throw a cheap combat unit into a fight to tie it up and trade, spend 2 CP to bring that wiped brood straight back the next turn, then push the fresh bodies onto whichever objective just opened up. Trade, respawn, flip. Repeat until your opponent runs out of models.
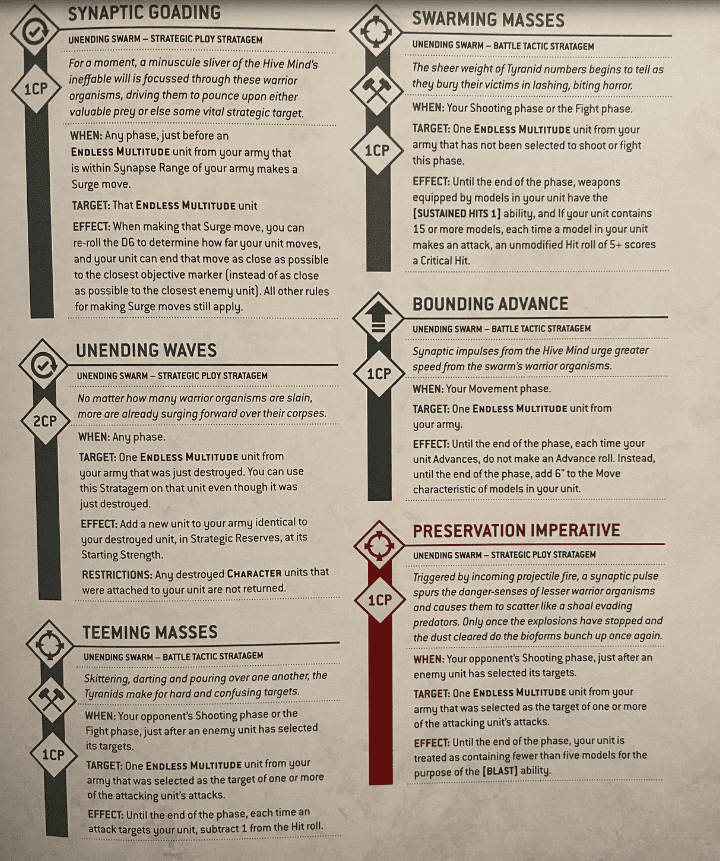
Swarming Masses handing your throwaway units sustained hits on 5+ means even the cheap broods hit harder than their points suggest. The matchups it struggles into are the ones that ignore the loop: heavy shooting that deletes whole broods before they reach combat, and elite armies that don’t care how many Gaunts you respawn because they’re destroying them without many losses. Against those, lean harder on objectives than on the body count.
Crusher Stampede Tyranids Codex 11th Edition Breakdown
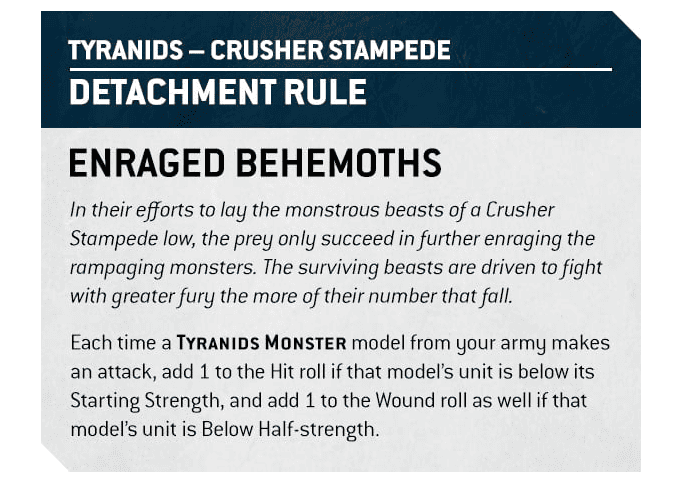
Crusher Stampede turns your biggest bio-monsters into the whole plan: the more damage they take, the harder they hit back, and in 11th Edition MONSTERS and VEHICLES are tougher than ever, so they stick around long enough to cash that in.
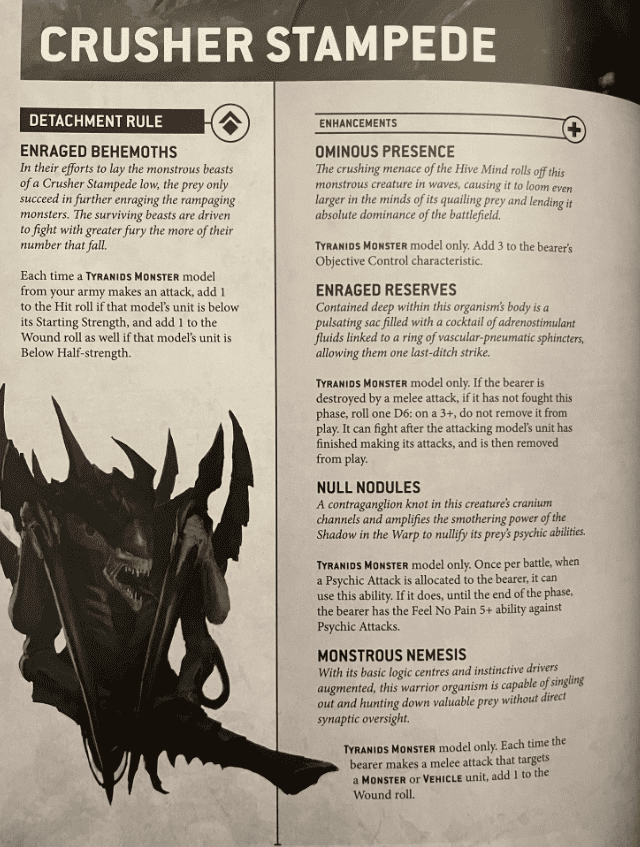
The list-building restrictions matter. A wall of Carnifexes, Mawlocs, and Tervigons looks great until you notice you’ve got nothing cheap to hold your home objective or screen a deep strike. We’d keep it to a monster core with a couple of small Gaunt broods for chaff and screening, not an all-kaiju roster that hands over the backfield. Ominous Presence helps here, since it keeps your big bugs scoring objectives instead of just stomping around the middle.
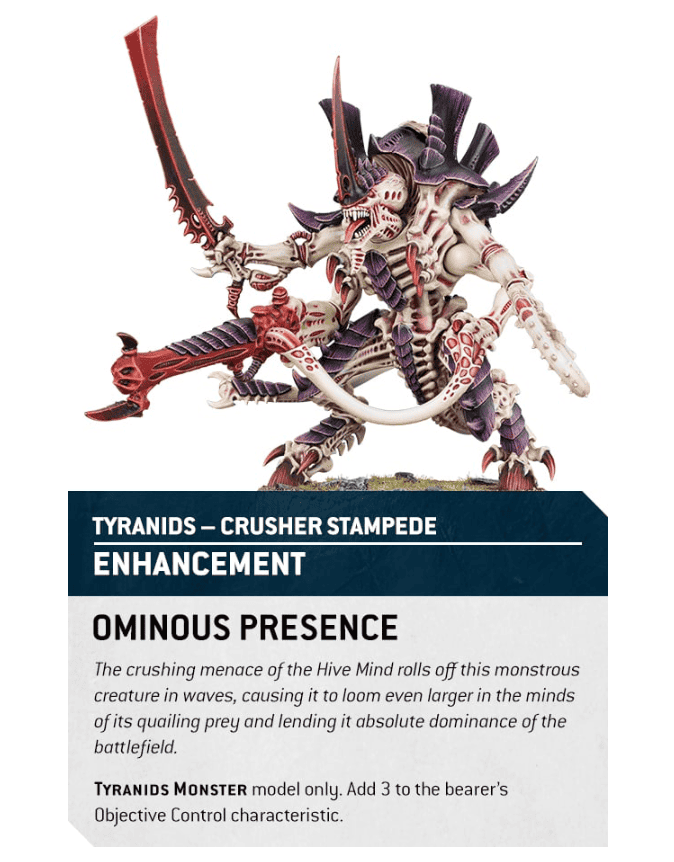
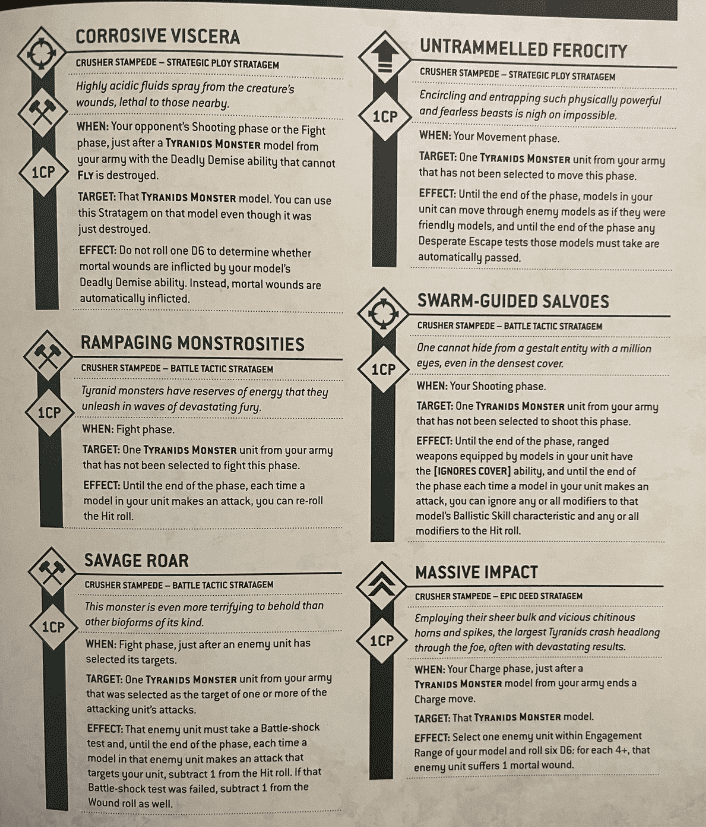
Movement and terrain are the real test with a monster list. Big bases catch on ruins, so plan your lanes before you deploy and don’t promise yourself a turn-two charge across a board you can’t actually cross. Corrosive Viscera lets you melt a target with mortal wounds when the dice won’t cooperate, and Rampaging Monstrosities hands you re-rolls to hit so your handful of big swings actually land.
Invasion Fleet Tyranids Codex Tactics and Rules
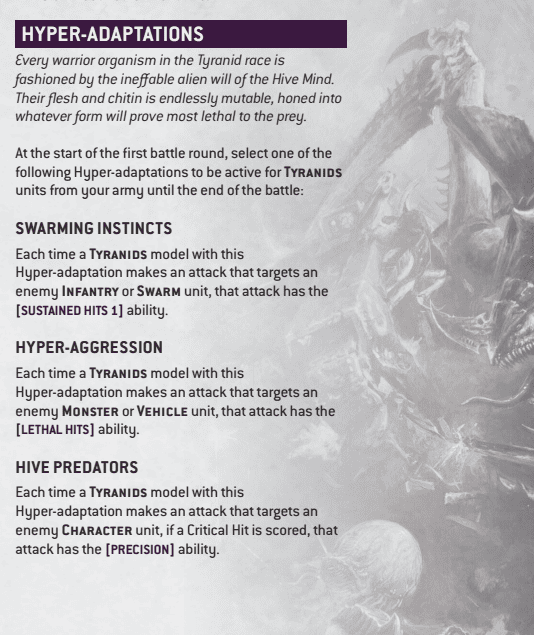
Invasion Fleet is the index detachment, and it’s still one of the best because it lets you tune the whole army to the table in front of you. The decision tree is simple: go anti-infantry when you’re staring down a horde, anti-tank when it’s a mech list, and anti-character when your opponent leans on a buffing hero you need gone. You lock that choice in, so read the matchup before you commit rather than defaulting to the same one every game.
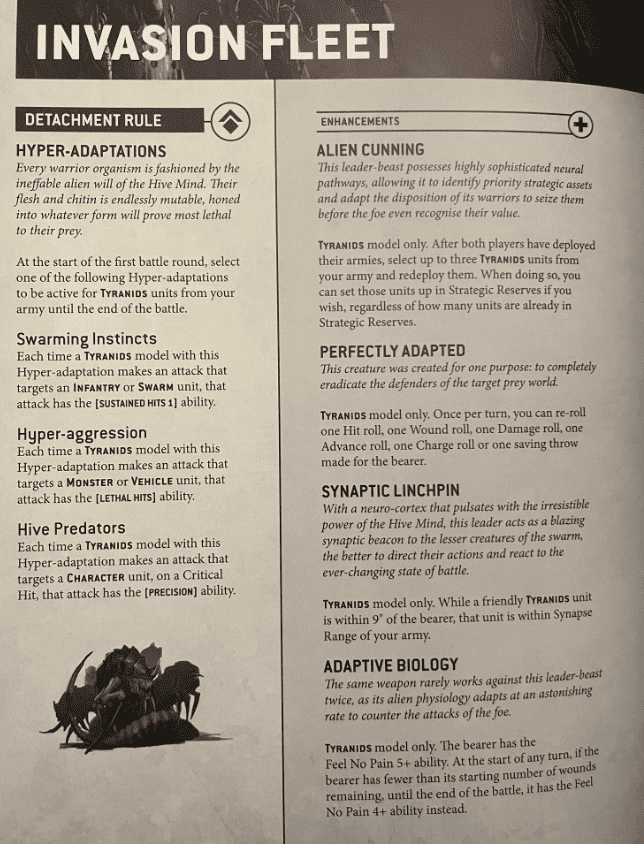
Handing a big bug a 5+ or 4+ Feel No Pain is the fun part, since it roughly doubles the effort it takes to drop it. A typical turn runs like this: Rapid Regeneration for 1 CP keeps a wounded monster on the table, Adrenal Surge turns a middling combat into a blender, and Overrun scoots your bugs another 6″ after they’ve eaten something so they’re already threatening the next target. Death Frenzy is the insurance, making sure anything that does go down takes a passenger with it.

Now, let’s dig into the new Tyranid units and how they bring the swarm to life.
Tyranids Codex Character and Unit Breakdown
Norn Emissary and Norn Assimilator in the Tyranids Codex
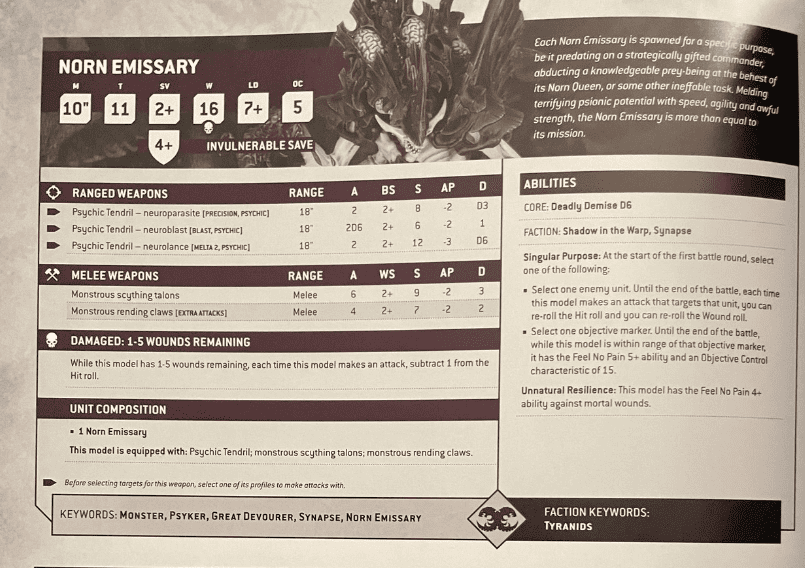
The Norn Emissary struts onto the battlefield with a 4+ invuln and a statline that screams “final boss”: 16 wounds, T11, and a 2+ save. This thing isn’t just tough; it’s cinematic.
One of them nearly flattened Lord Solar Leontus himself before Trajann Valoris and his golden boys barely managed to bring it down. Even then, the Emissary left a trail of shredded Custodes in its wake.
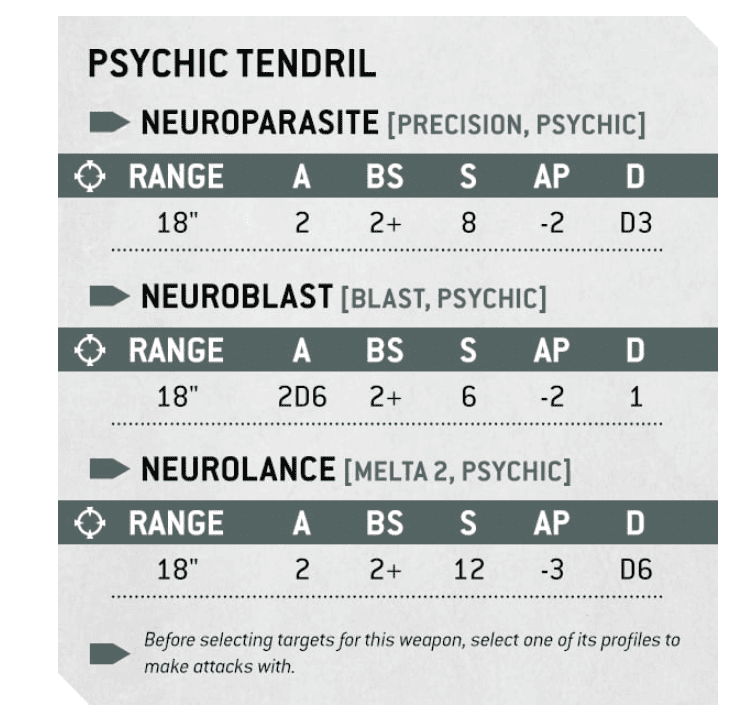
Its psychic attacks make it a true multitasker, blasting infantry, deleting characters, or punching holes in tanks without breaking a sweat.
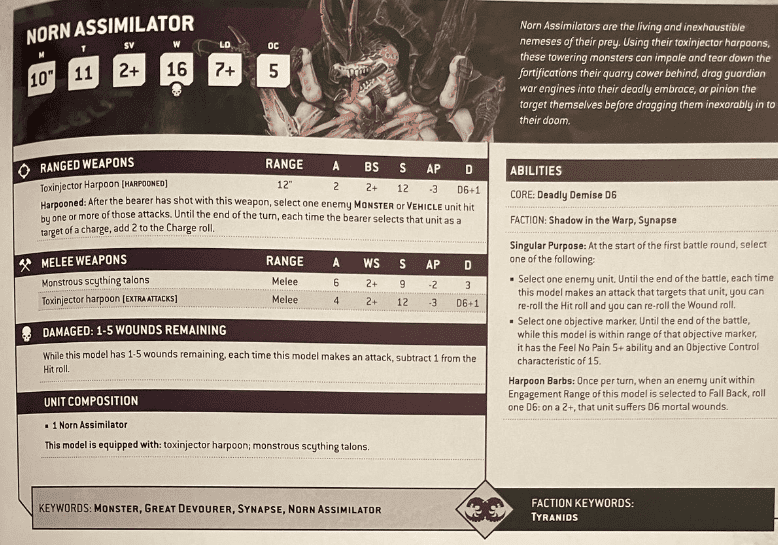
The Norn Assimilator, on the other hand, trades mind tricks for pure muscle. It fires giant toxinjector harpoons that impale anything unlucky enough to be in range, then drags itself into combat with a bonus to charge rolls.
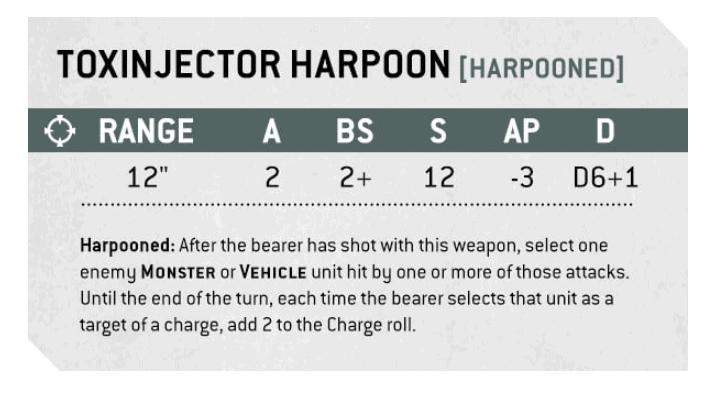
Getting hit by one is bad. Getting reeled in after? That’s just insulting.
What the Norn Emissary actually teaches you is target priority and screening. It’s a psychic multitool that can blast infantry, delete a character, or crack a tank, so point it at whatever your opponent least wants gone and screen it on the way up, because 16 wounds still folds to focused fire if it walks in alone. The Assimilator plays the objective bully instead: reel a key unit in, hold the point, and dare them to spend a whole turn digging it back out.
Tyranids Lictors and Deathleaper: Codex Highlights

The models are amazing, but the Neurolictor is the one that earns its slot. Its job on the table is threefold: screen your backline with a Lone Operative body that’s a pain to shoot, farm CP and debuffs while it sits there, and slip forward to hunt a character once your opponent is already Battle-shocked from Shadow in the Warp. It won’t one-shot a tank, and that’s fine, that’s not its mission.
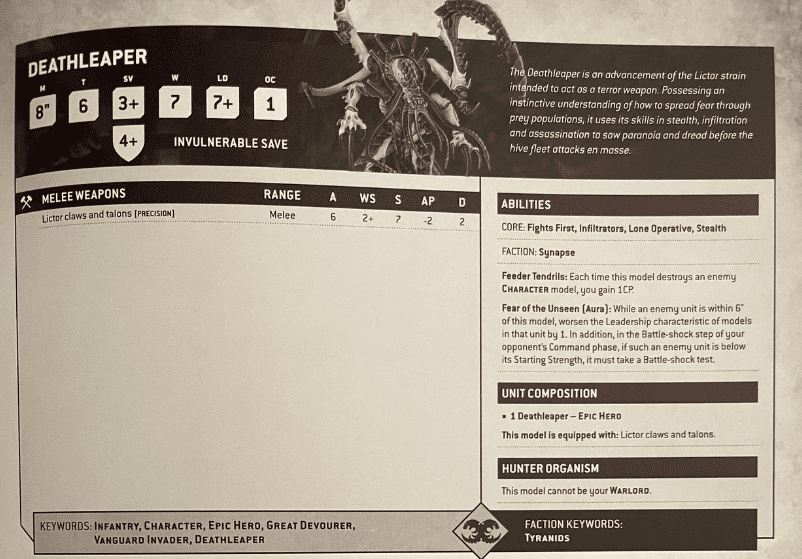
The positioning tip is to keep it just inside cover on the edge of the midfield, close enough to threaten a leader next turn but far enough back that Lone Operative and Stealth keep it breathing. Played that way, your opponent doesn’t just lose a unit or two, they lose their nerve, and a panicked army stops scoring the way it planned to.
Von Ryan’s Leapers: New Tyranids Codex 11th Edition Unit
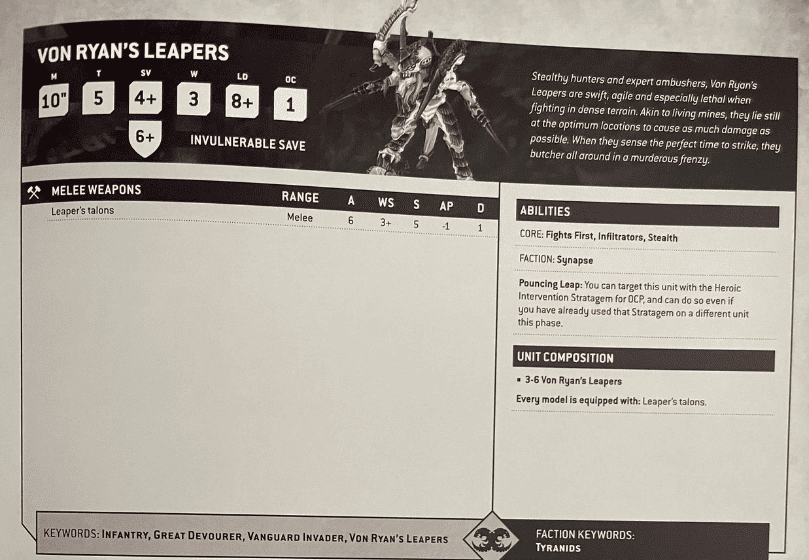
Von Ryan’s Leapers are a genuinely annoying little unit, and with Infiltrators, Stealth, and Fights First they punch well above what they cost. Deploy them up the board with Infiltrators so they start in your opponent’s face, then use the free Heroic Intervention to jump into fights they weren’t invited to. They trade beautifully into chaff, backfield objective-holders, and squishy support units, landing their hits first before those models get to swing back.
The counterplay to respect is a dedicated screen. Because they want to charge into an opponent who walls off their characters with a cheap unit can blunt the Leapers and make them spend a turn chewing through the wrong target. So pick your charge to land on something soft, not on the screen they’re daring you to hit.
How to Play Tyranids: Neurotyrant
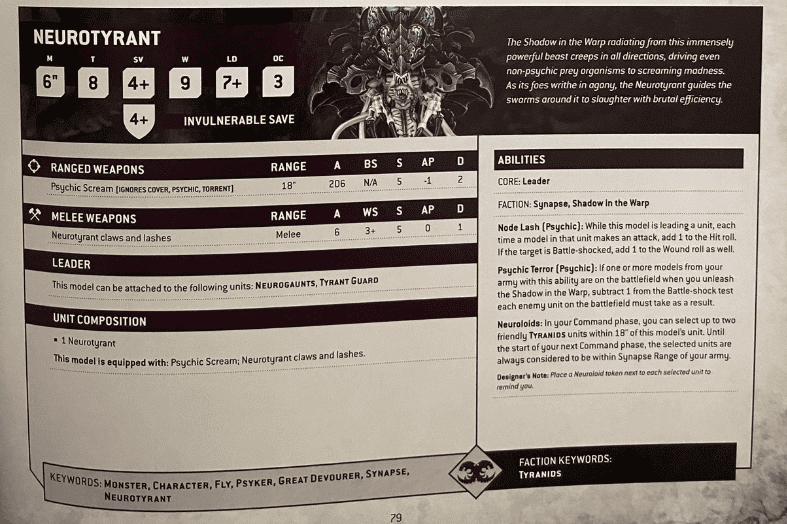
The Neurotyrant is your Shadow in the Warp amplifier, and timing is the whole trick with it. You want that army-wide debuff landing the turn before your big commitment, so the enemy is already failing extra Leadership tests and sitting Battle-shocked when your charges go in. Fire it too early and the panic wears off before you cash in; too late and you’ve wasted the window.

The units that love to use this are the ones that punish shaken enemies: your Neurolictor shredding Battle-shocked infantry, and any melee threat that wants objectives sitting undefended when it arrives. On top of a solid stat line and nasty weapon options, the Neurotyrant makes everything your opponent does just a little worse, which is exactly how the Hive Mind likes it.
Barbgaunts and Neurogaunts in the Tyranids Index and Codex
 With a big unit of these, they will get an insane number of shots (on average, you should get 3.5 per model, so five would give you 17-18 attacks).
Then, with the blast rule, the number can get really crazy. So, while they don’t have AP and only D1, they could still take out tons of infantry. Plus, they also minimize enemy movement, which is huge.
 Well, all Tyranid armies and swarms need some cannon fodder, and these are looking to fit the bill, but only one attack in combat and no shooting makes them nothing more than models on the table to get objectives and disrupt the enemy; however, they do have one excellent rule.
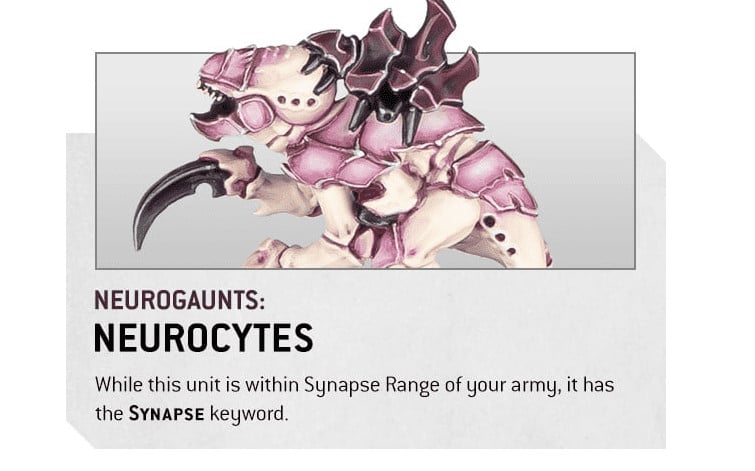
They might look like glorified snacks for Guardsmen, but these little creeps have a clever trick up their spindly sleeves, they extend the Synapse Range of your heavy hitters like the Hive Tyrant and Winged Tyranid Prime.
Those weird growths on their backs? Yeah, they’re basically living Wi-Fi boosters for the Hive Mind. Run them up ahead of your big bugs to keep the signal strong between your fast melee monsters and your backline leaders, it’s smart, slimy strategy at its finest.
Final Thoughts on the Tyranids Codex 11th Edition
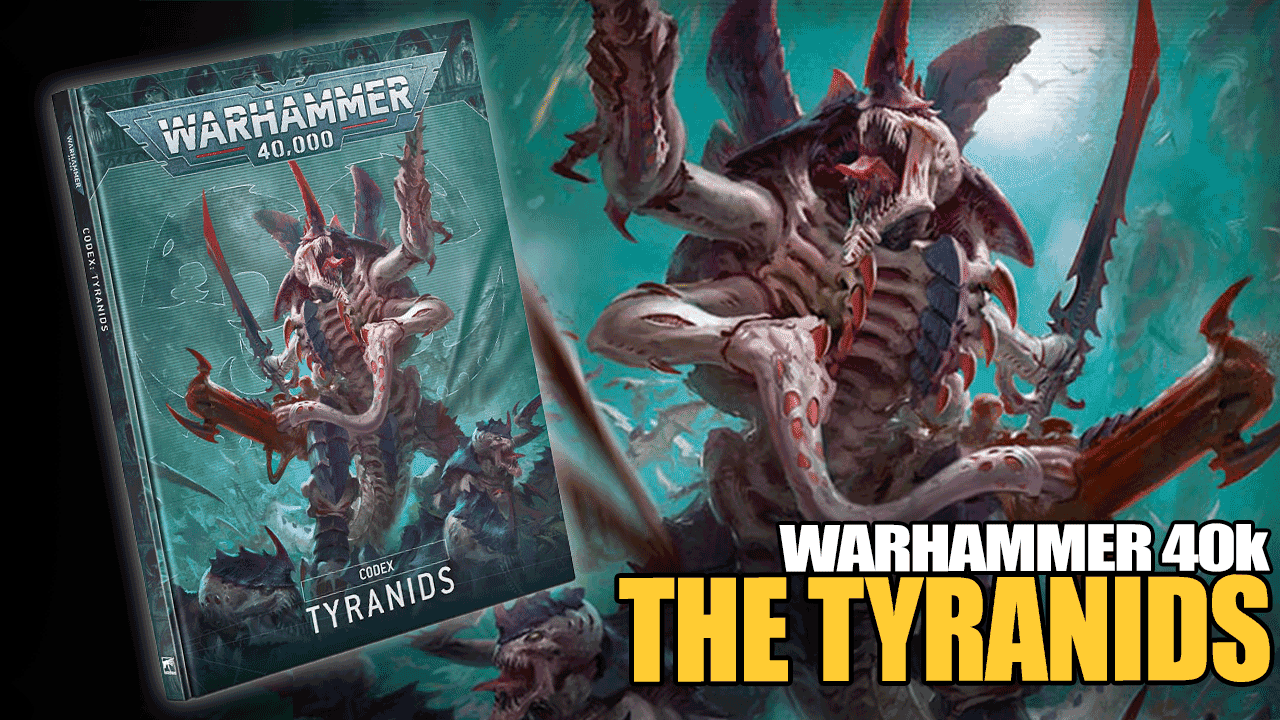
If you’re just starting a hive fleet, don’t try to learn all six detachments at once. Here’s where we’d point a new player first.
- Start with Invasion Fleet. It’s forgiving, it tunes to any matchup, and it teaches you the core army before you specialize.
- Build around three core units: a Neurotyrant for the Shadow in the Warp debuff, a big brood of Gaunts to hold objectives and stretch your Synapse, and one heavy hitter like a Norn Emissary or a Carnifex to do the killing.
- Track two things every turn: your Synapse coverage and your Battle-shock. Nail those two and the rest of the Codex starts clicking fast.
Learn that shell first, then branch into Crusher Stampede or Vanguard Onslaught once you know how the swarm wants to move. The Hive Mind rewards patience, so grab your biggest bugs, get a few games in, and let the army teach you the rest.
Where to Get the Tyranids Codex PDF or Physical Book

Grabbing your Tyranids Codex through our handpicked retailer list below helps Spikey Bits keep the lights on, and every qualifying purchase supports the site at no extra cost to you. Pick the option for your region to dodge the usual out-of-stock headaches.

If you just need the rules, Wahapedia has the full Tyranids datasheets for free, while Games Workshop’s official book is the way to go when you want the lore, art, and extras in one place.
🔗 Related Reads:
- All The New 40k Tyranids Minis!
- Updated Tyranid Points Changes
- Best Warhammer 40k Army List Builders
What do you think about the Warhammer 40k codex rules for the Tyranids or their PDF?What do you think about the Warhammer 40k codex rules for the Tyranids or their PDF?[/wpdiscuz-feedback]