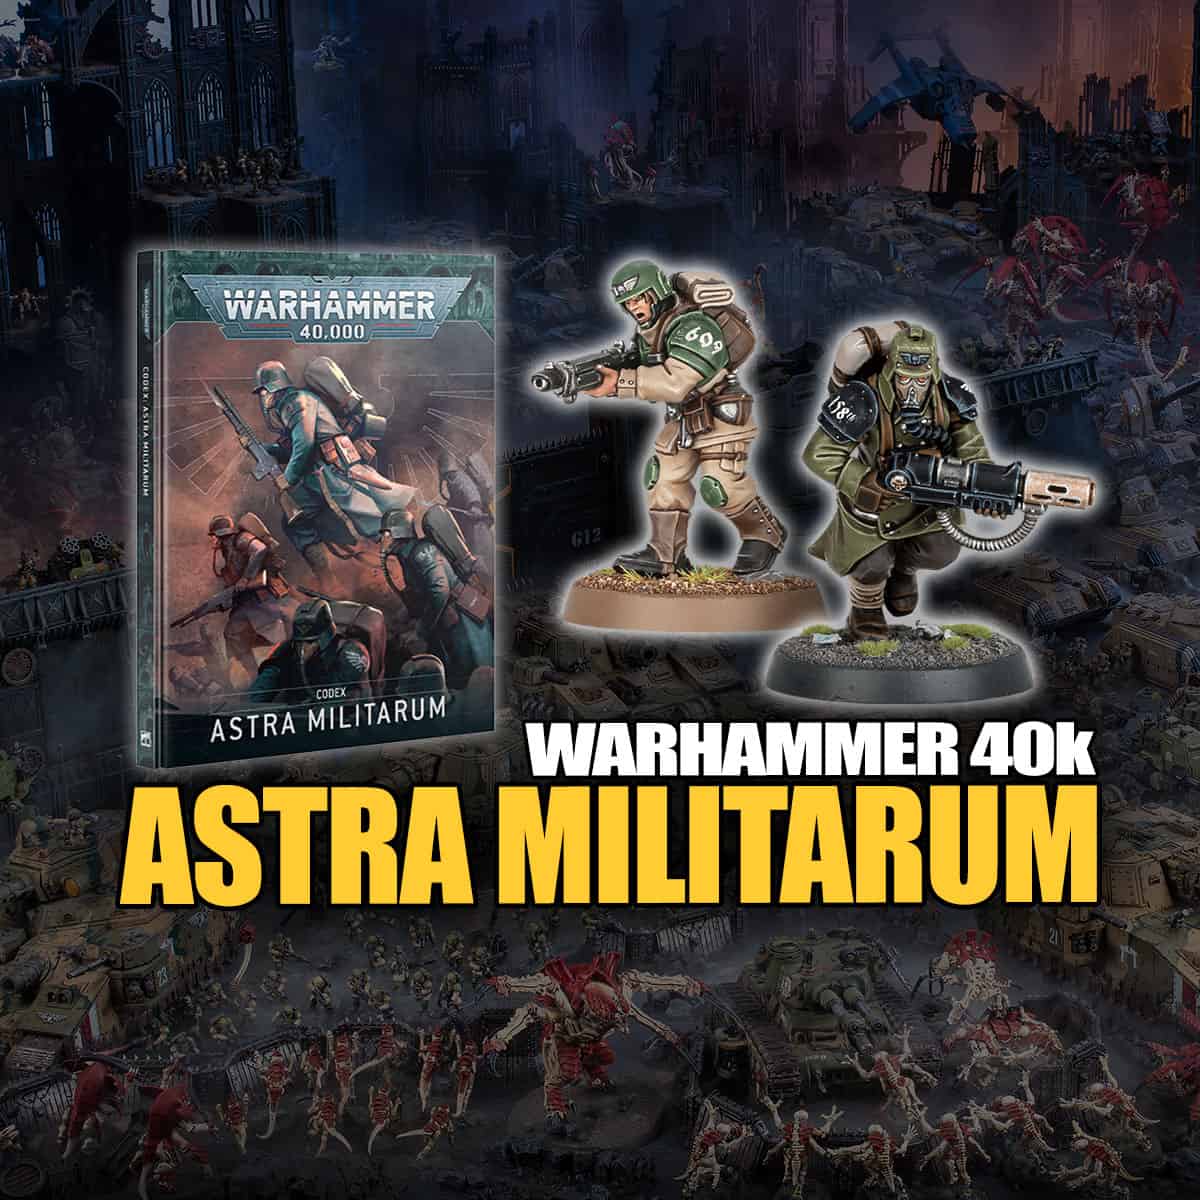
Breakdown of the Astra Militarum army rule, Combined Regiment detachment rule, and core Orders basics with key timing and targeting limits.
The Astra Militarum are back with a full 10th Edition Codex, and if you play Guard, the parts that matter are the ones you’ll touch every turn. So we’re keeping this focused on rules: how the army rule works, how Orders time out and who you can target with them, and what each detachment rule actually does on the table.
Here’s the order we’ll go in: the core army rule first, then Orders (timing, the 6-inch range, and who’s eligible), then the detachments from Combined Regiment on down, and finally the units that squeeze the most out of it all. No lore detours, just the stuff that changes how you build and play.
If you’d rather watch than read, the video below covers the same army rule and Orders basics we break down here, and then we go deeper into detachment picks in the sections below.
Why Play Astra Militarum in Warhammer 40k 10th Edition (Codex Overview)
Updated on July 9, 2026, by Rob Baer with the latest Astra Militarum codex rules, Orders timing, and detachment breakdowns.
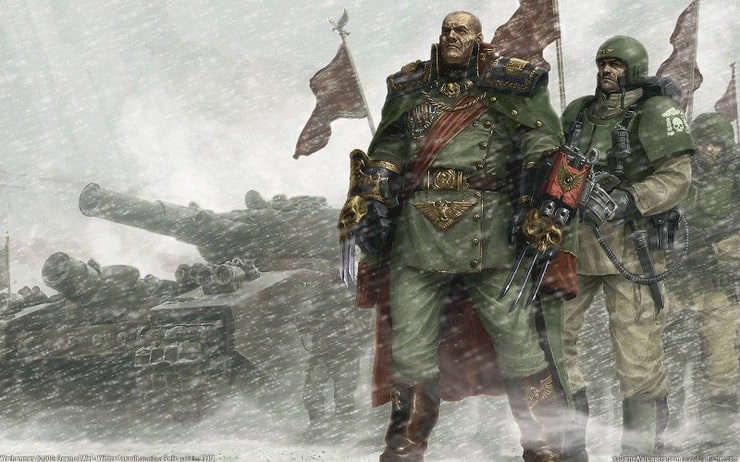
So why play Guard right now? Honestly, it’s the most rules-forward this army has felt in years, and the reason to play it is the same reason it can overwhelm you: the new Codex is built around an Orders economy that rewards planning two turns ahead. You’re not just moving models, you’re deciding which unit gets the buff that keeps it shooting, holding, or surviving.
If you like owning the board through objective control and a wall of firepower, this is your army. If you want a list that plays itself, it isn’t. The payoff is board presence and OC that grinds opponents off points; the cost is that every detachment has its own identity, and you have to commit to one. That trade is the whole appeal.
Astra Militarum Codex 10th Edition: Strengths and Weaknesses
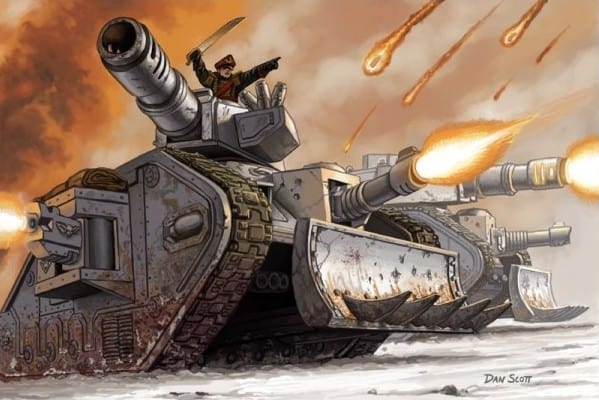
The Guard’s strength is math you can feel: Orders reward staging your officers within 6″ of the units that need them, so a well-placed Command Squad can hand out Take Aim! and Move! Move! Move! to two different squads and swing a whole turn. Pair that with the Leman Russ’s tank durability, Rogal Dorn, and Baneblades, and you take objectives by sheer volume of boots and tracks rather than any single hero unit.
The flip side is real. Guardsmen hit like wet cardboard in melee unless you back them with Ogryns or riders, so you plan two turns ahead rather than react. Infantry are slow, which means transports and Move! Move! Move! aren’t optional, they’re how you reach a mid objective on turn one. And there’s decision fatigue: you’re juggling Orders, stratagems, and a dozen units every turn, so if you hate reading the board, this army will punish you for it.
Core Army Rule in the Astra Militarum Codex 10th Edition
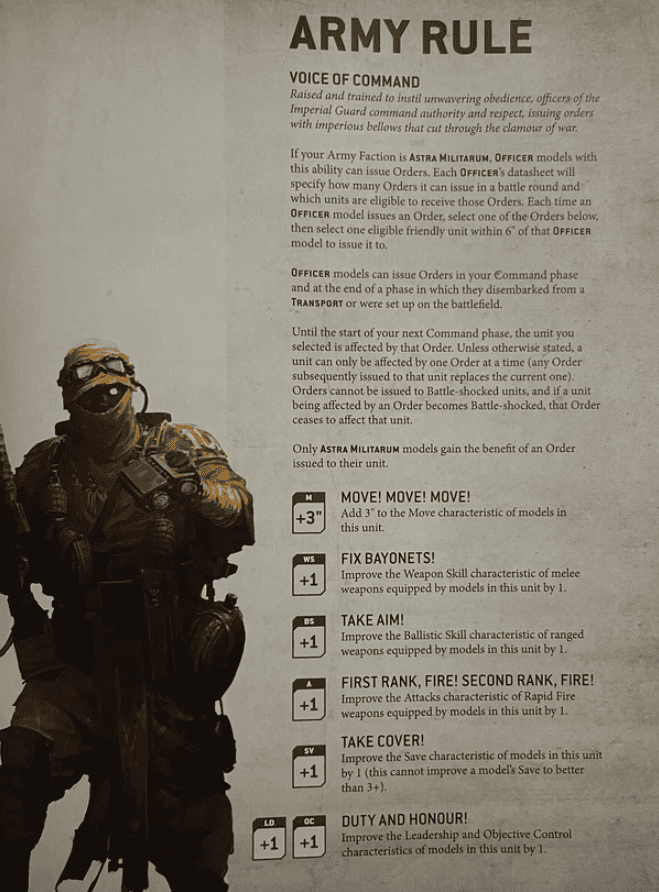
Here’s what the army rule actually does before anything else: it keeps the whole force firing at a punishing clip and leans on Orders to turn ordinary Guardsmen into a coordinated gunline. That’s the identity in one line, and everything else in the codex bends toward it. If you want the full reference, the full Astra Militarum army rule page is here, but the short version is what matters at the table: more reliable firepower, more tank staying power, and Orders that stack the odds every single turn.
Astra Militarum Orders (Voice of Command): 10th Edition Rules
Orders are the backbone of Astra Militarum gameplay, and in 10th Edition, they’re easier to use and even more effective. Officers bark their commands during the Command Phase or right after hopping out of a transport, with a 6-inch range (usually) to issue Orders to eligible Infantry or Vehicle squadrons.
Each Order grants a key buff, boosting movement, improving accuracy, or increasing durability. These effects last for the entire phase, making them a crucial tool for controlling the flow of battle.
A few things we’ve learned are actually issuing Orders instead of just reading them. Take Aim! belongs on your highest-damage unit before it shoots, so on turn one, that’s usually your biggest scariest shooting unit or a special-weapons squad about to delete a key target. Move! Move! Move! is your turn-one land grab: put it on a Guard blob or a transport, and you’ll reach a mid-board objective you had no business reaching. Keep your Castellans and Command Squads mobile so they sit inside 6″ of two units at once, because a stranded officer is a wasted Order.
The easiest mistake is the sequence: give the movement Order first, resolve the reposition, then decide where Take Aim! does the most damage, not the other way around. Order economy is the whole game with this army, so treat everyone like it costs you something.
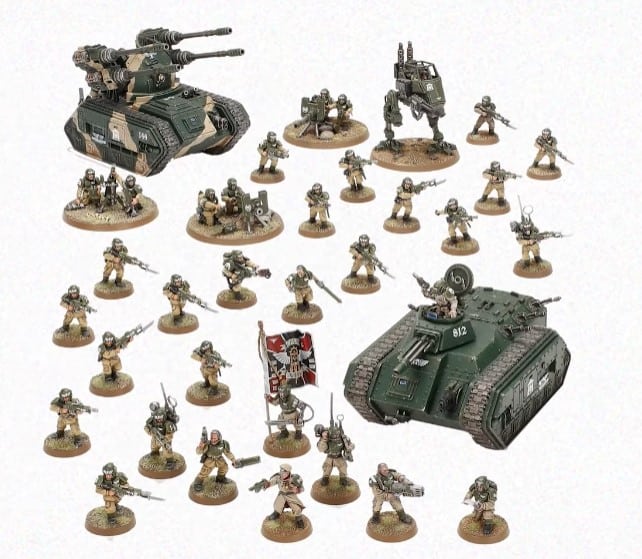
Here’s how a game actually flows. The Guard doesn’t do subtle; it does artillery, disciplined volleys, and last stands that’d make a Space Marine pause, so your first two turns are about board control: screen, stage officers, and use Orders to grab the mid before your opponent does.
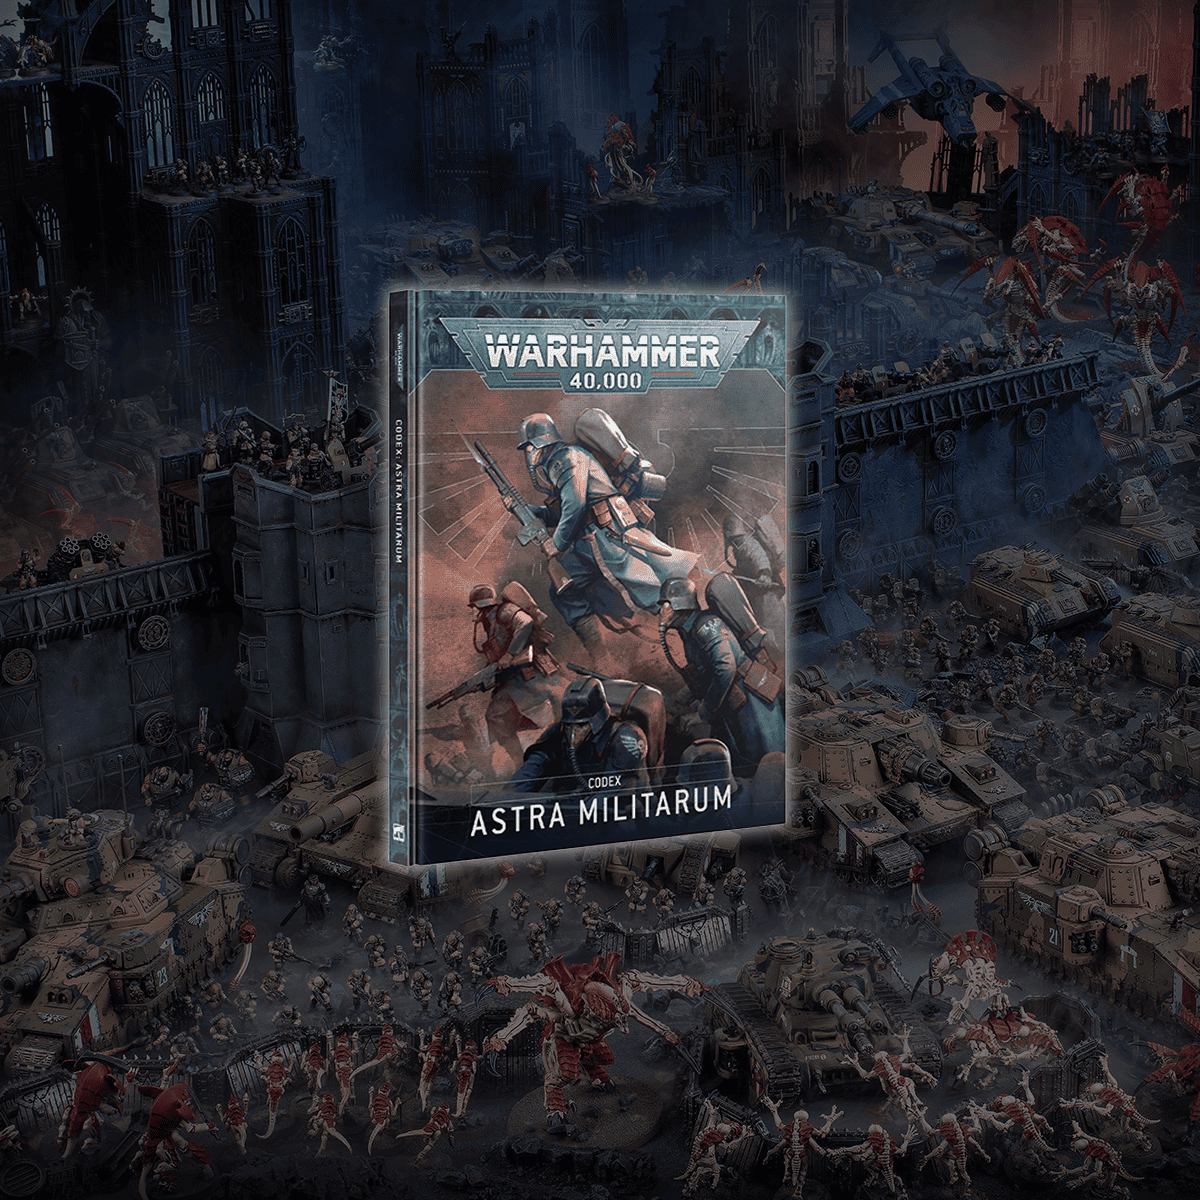
From there, the codex rewards disembark-and-order plays: pop a squad out of a transport, order it, and hit before your opponent resets. Whether you’re raining fire from Basilisks, charging in with Rough Riders, or just shouting Move! Move! Move! for the third turn running, the plan holds: stage turn one, trade smart turn two, and let Order economy and OC close it out.
Astra Militarum Detachments in 10th Edition (From Index to Codex)
Each detachment in the Astra Militarum Codex 10th Edition amplifies a different playstyle, whether you prefer rolling in with tanks, hammering foes with artillery, or swarming objectives with infantry. Let’s break down what makes each one shine and how to get the most out of them.
Combined Regiment Detachment
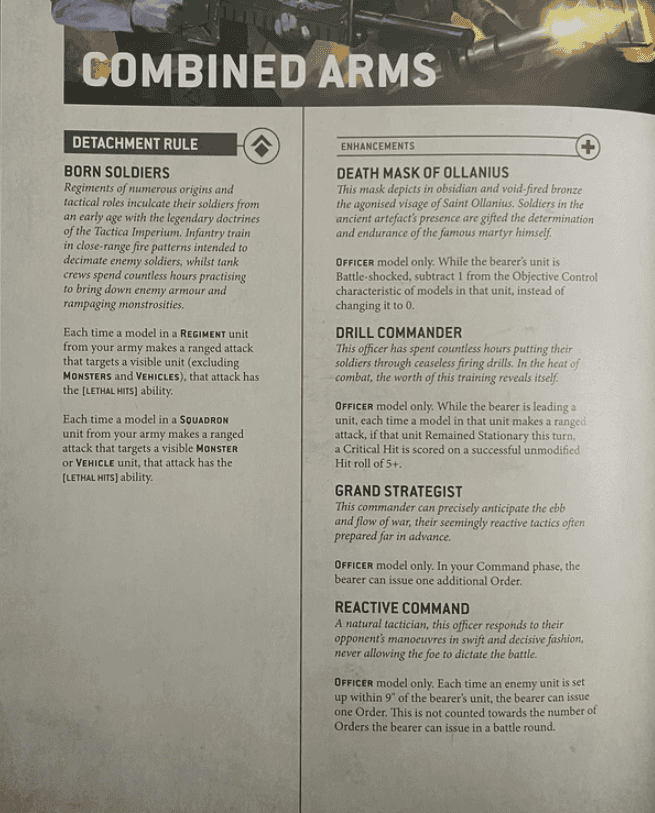
This is the all-rounder, and it’s the one we’d hand a new Guard player first. Born Soldiers hands out Lethal Hits, so your infantry punish regular targets while your tanks use it to crack Monsters and Vehicles. Grand Strategist gives you an extra Order a turn, Fields of Fire adds +1 AP when infantry and vehicles focus the same target, and Reinforcements walks a full squad back onto the board. Death Mask of Ollanius keeps a unit working through Battle-shock, so it holds instead of running.
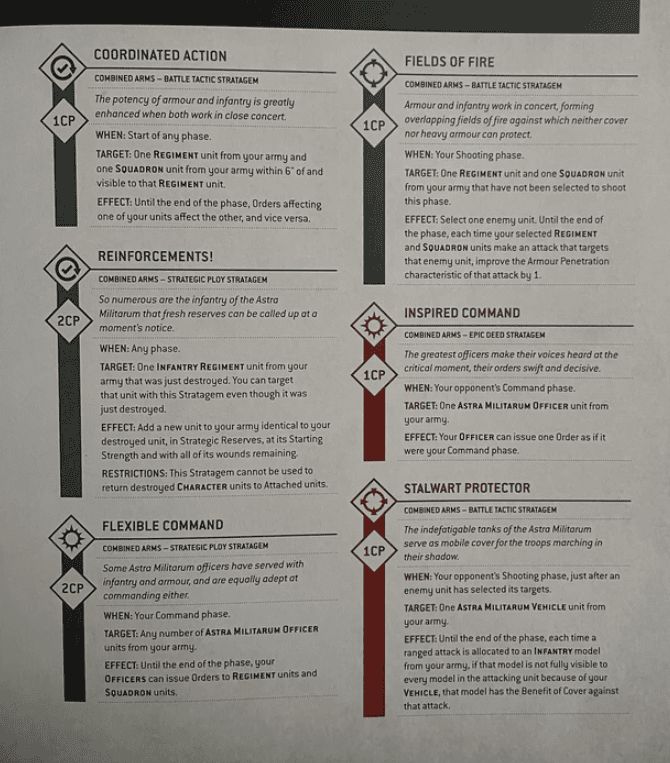
Who it’s for: anyone who wants flexibility over a gimmick. What it struggles with: pure-speed armies that dodge your gunline before Fields of Fire comes online, so you have to bait the focus target.
Siege Regiment
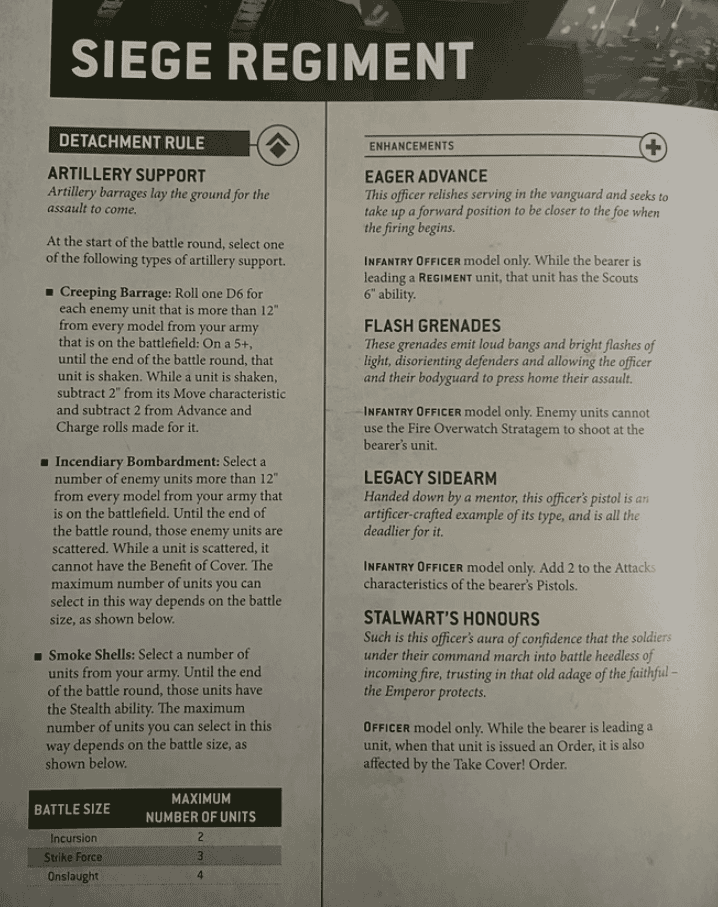
Love artillery? This is the one. Artillery Support lets you pick your poison each turn: suppress movement, strip Cover, or make your own guns Stealthy. Manticores and Basilisks become genuine problems when paired with Creeping Barrage; Flash Grenades on your officers shut down Overwatch so you can push in without eating a face full of fire; and Minefield locks down a lane with mortal wounds. Furious Fusillade even makes your infantry nasty at close range.

Who it’s for: players happy to win from across the table. What it struggles with: fast melee that closes the gap early, since your guns hate being tied up in combat.
Mechanized Assault
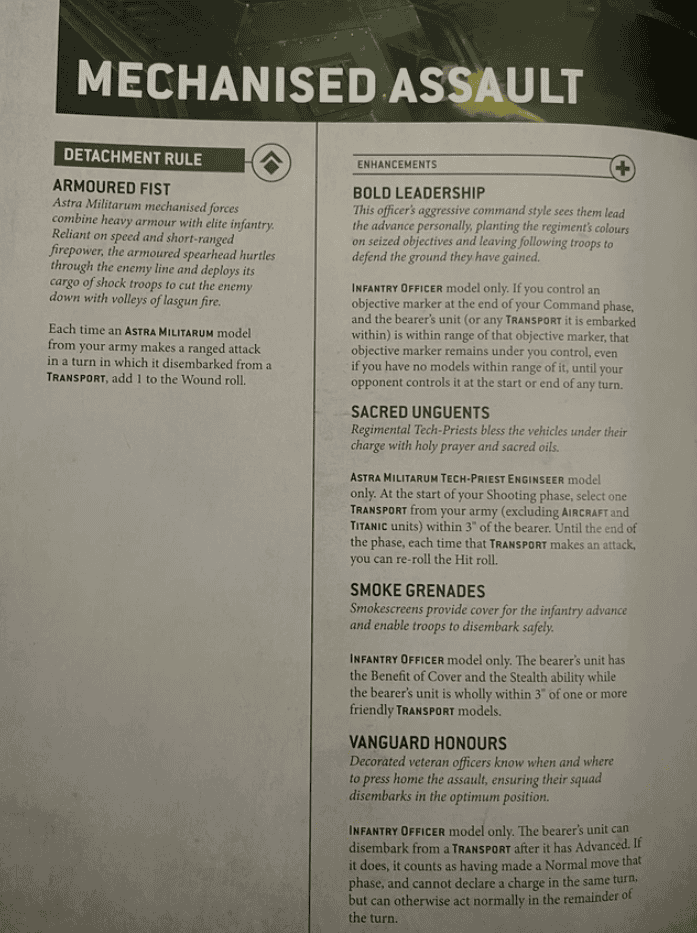
Transports stops being taxis and start being weapons here. Armoured Fist gives disembarking units +1 to Wound, Rapid Dispersal lets them reposition after they pile out, and Vanguard Honours even lets infantry disembark after an Advance for absurd reach. Hasty Extraction pulls a fragile squad back into a Transport at the end of your opponent’s turn, and Sacred Unguents keeps your nearby tanks re-rolling Hits.
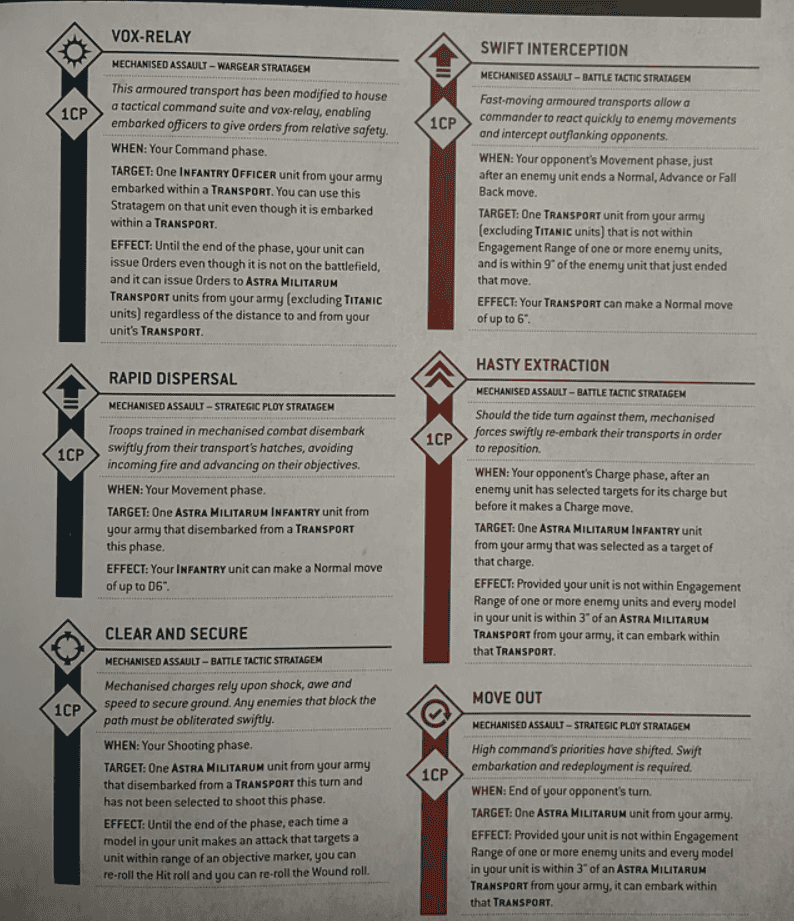
Who it’s for: aggressive players who like an alpha-strike disembark. What it struggles with: heavy anti-tank that pops your rides before the payload gets out.
Hammer of the Emperor
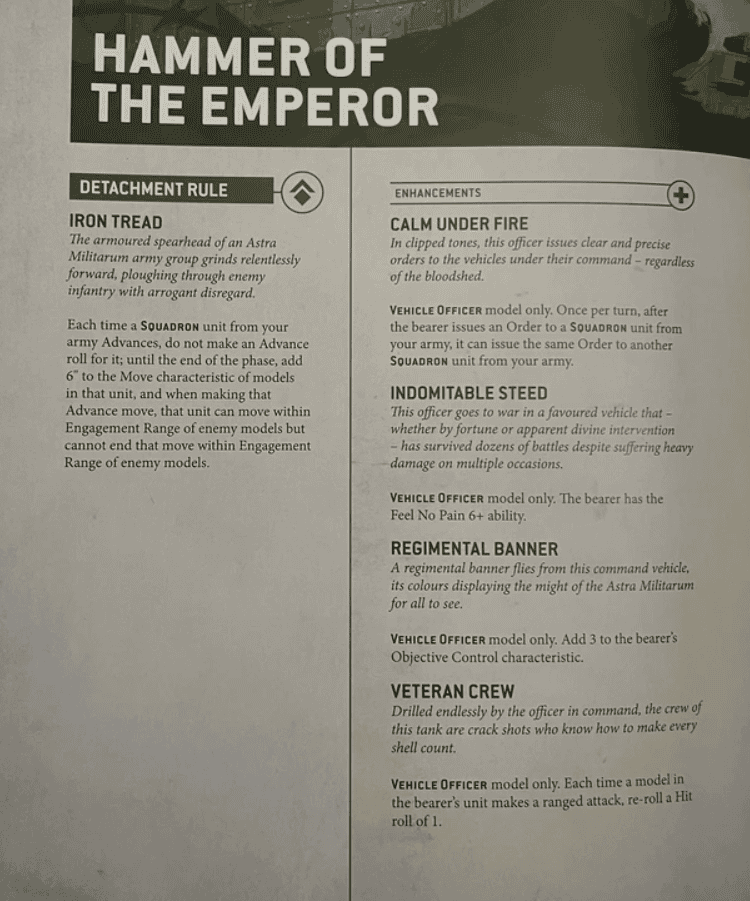
If you own a lot of tanks, this is where they earn their points. Iron Tread lets them Advance faster and roll through enemies, Blazing Advance keeps them shooting while they reposition, and Furious Cannonade adds +1 AP to tanks within 12″. Final Hour ignores those Ballistic Skill penalties on wounded tanks, and Veteran Crew re-rolls Hit rolls of 1, so your big guns don’t whiff.
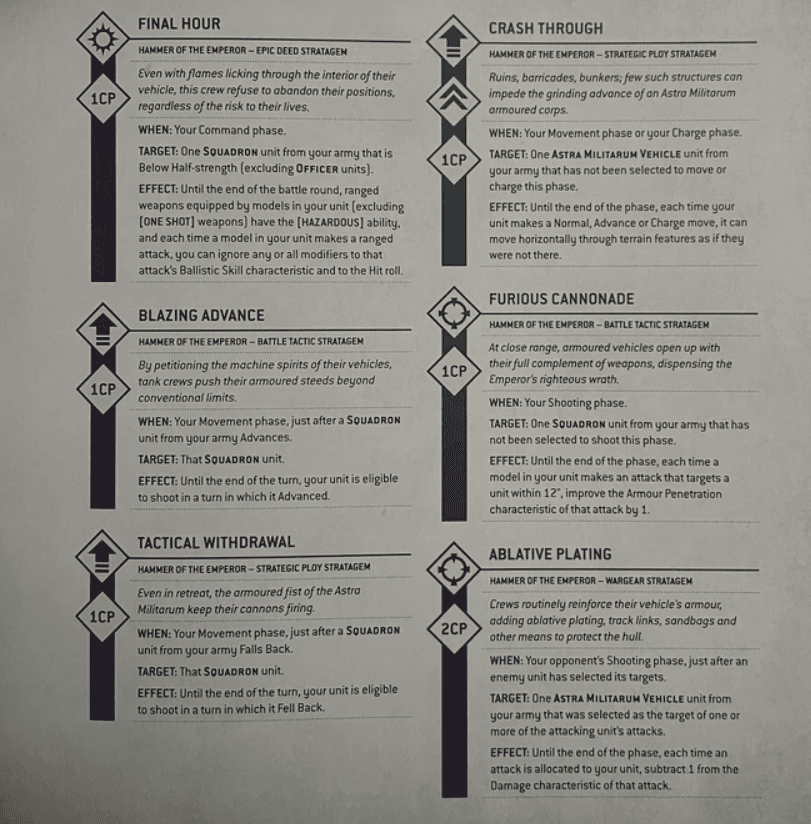
Who it’s for: the armored-column player who wants a steel tide. What it struggles with: objective-heavy missions where a small tank count gets out-bodied on points.
Recon Element
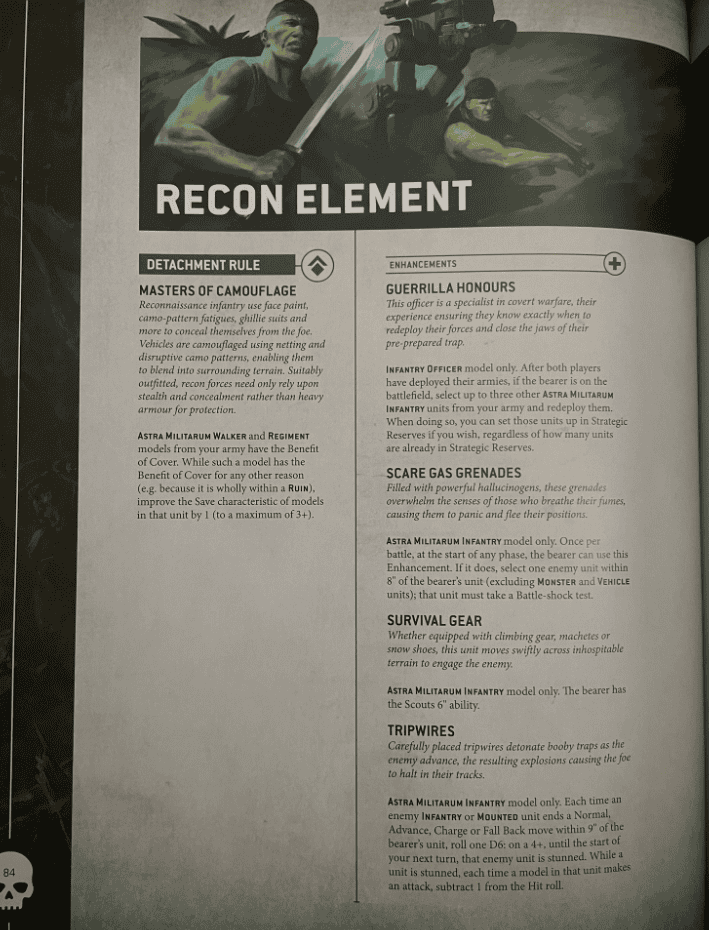
This one is all board control. Masters of Camouflage keeps your infantry and walkers alive with Cover and better saves, Guerrilla Honours redeploys up to three units after setup, Scare Gas Grenades force Battle-shock tests, and Tripwires slow the enemy down so they can’t reach the spots that matter.
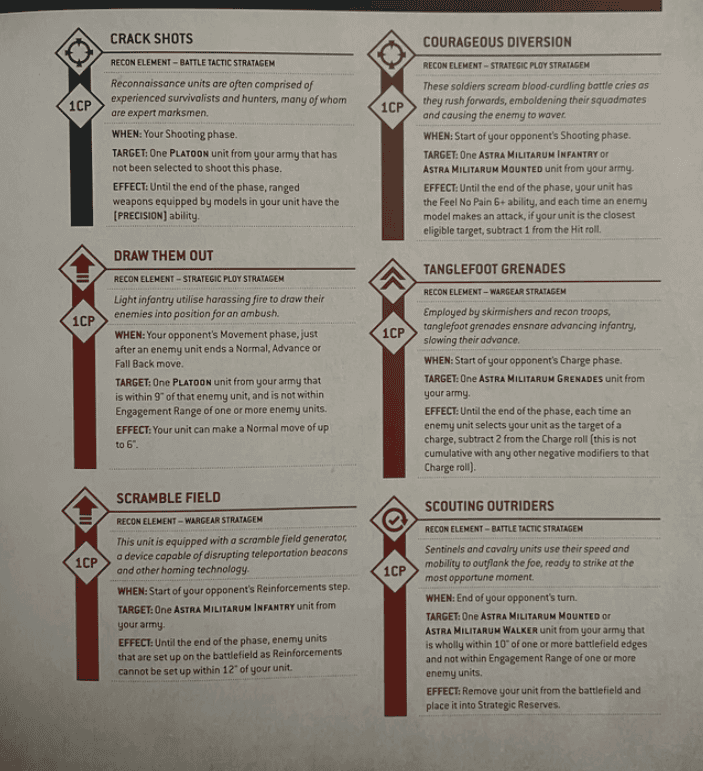
Who it’s for: players who win the deployment mind game before the dice hit the table. What it struggles with: raw firepower that doesn’t care about your saves and just removes the unit.
Bridgehead Strike
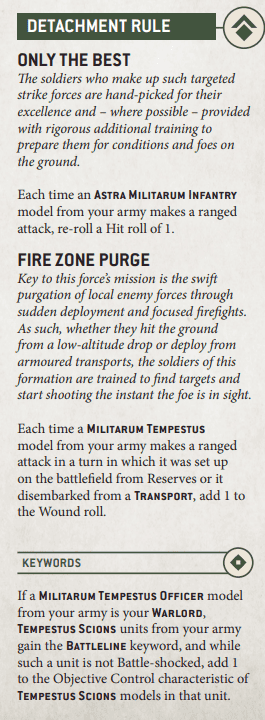
This is the Tempestus Scions specialist, built around high mobility and elite deep strikers. Vox-Relay lets your officers issue Orders clear across the board so your Scions stay coordinated wherever they land. Clear and Secure hands out re-rolls near objectives so those drops actually count, and your Tempestus units dominate objective control with plasma and melta doing the heavy lifting.
Who it’s for: players who like a drop-in, high-skill list. What it struggles with: gunlines that punish you the turn you arrive, so your placement has to be perfect.
So which units actually squeeze the most out of these rules? These are the ones we keep coming back to.
Best Units in the Astra Militarum Codex 10th Edition (with PDF Reference)
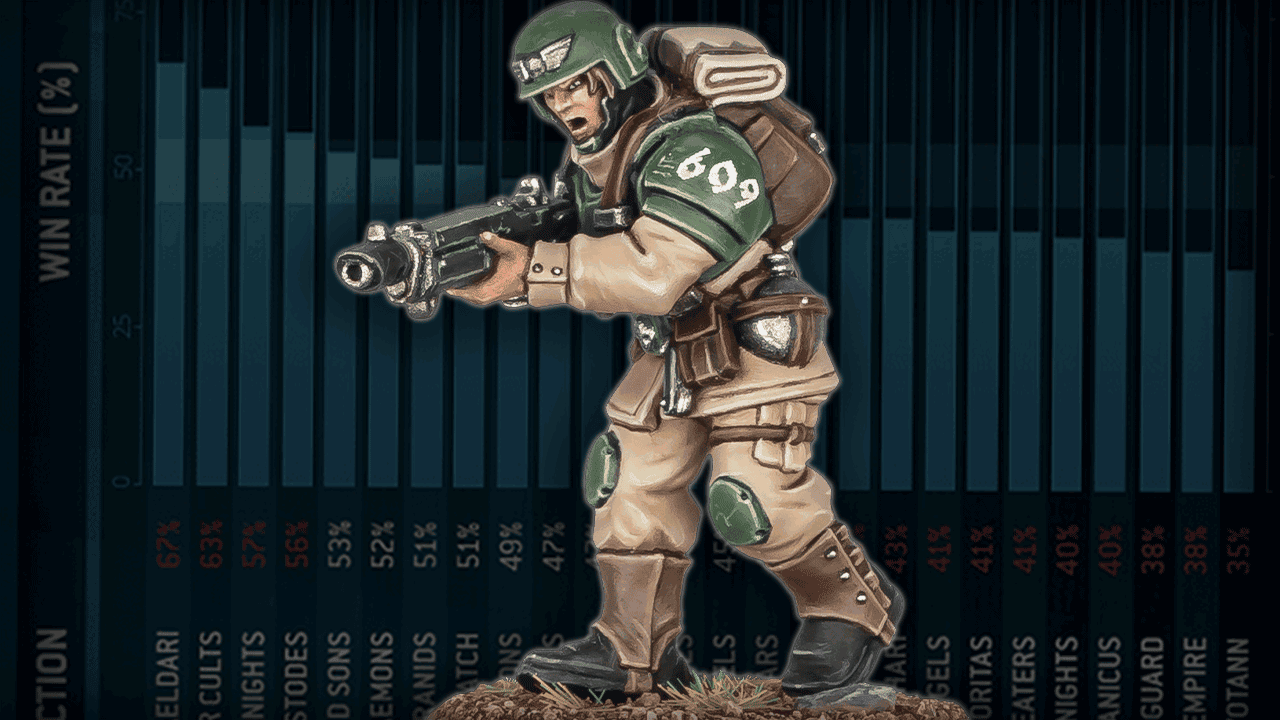
We’re not ranking these by raw stats. What earns a spot here is how well a unit uses the army rule, whether that’s soaking Orders, anchoring an objective, or pairing with a detachment ability to do something it couldn’t do alone. Everything below is a unit we’d actually build around.
Krieg Engineers
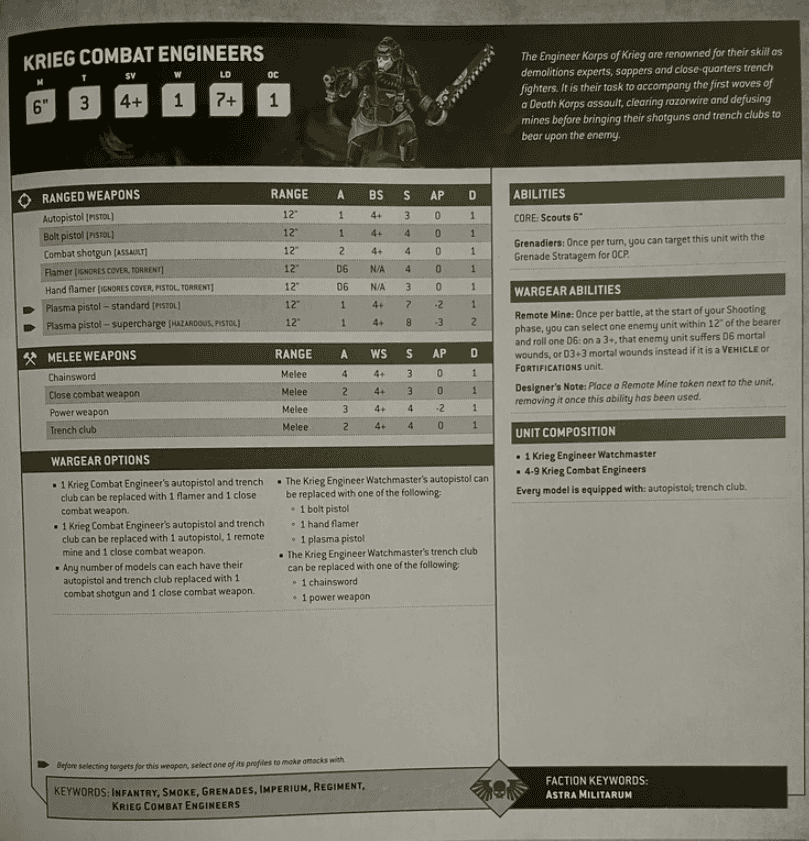 These guys are the sneaky saboteurs of the Astra Militarum (Imperial Guard) codex and a fun addition not in the index. Armed with grenades and mines, they specialize in mortal wounds, making them a nightmare for enemy vehicles and high-value targets. Their Remote Mine ability inflicts D3+3 mortal wounds on nearby enemy vehicles, leaving opponents scrambling to plug holes in their battle line.
That said, they’re not the toughest and can get a bit pricey for what they bring. Think of them as a disruptor unit, deploy them in the right spot, mess with your opponent’s plans, and force them to waste time dealing with these sneaky saboteurs instead of your more valuable units.
Death Korps of Krieg
 Hard-hitting, unbreakable, and covered in mud, the Death Korps of Krieg are a fan-favorite for a reason. Their Stubborn Tenacity lets them receive Orders even while Battle-shocked, which means they’ll hold objectives and keep firing no matter what gets thrown at them.
They come equipped with solid melee weapons and reliable ranged options, making them extremely versatile. They’re not the fastest, but if you need an infantry unit that can grind enemies into paste, these trench fighters won’t let you down. Stick them near artillery or a commanding officer for maximum efficiency.
Leman Russ Battle Tanks
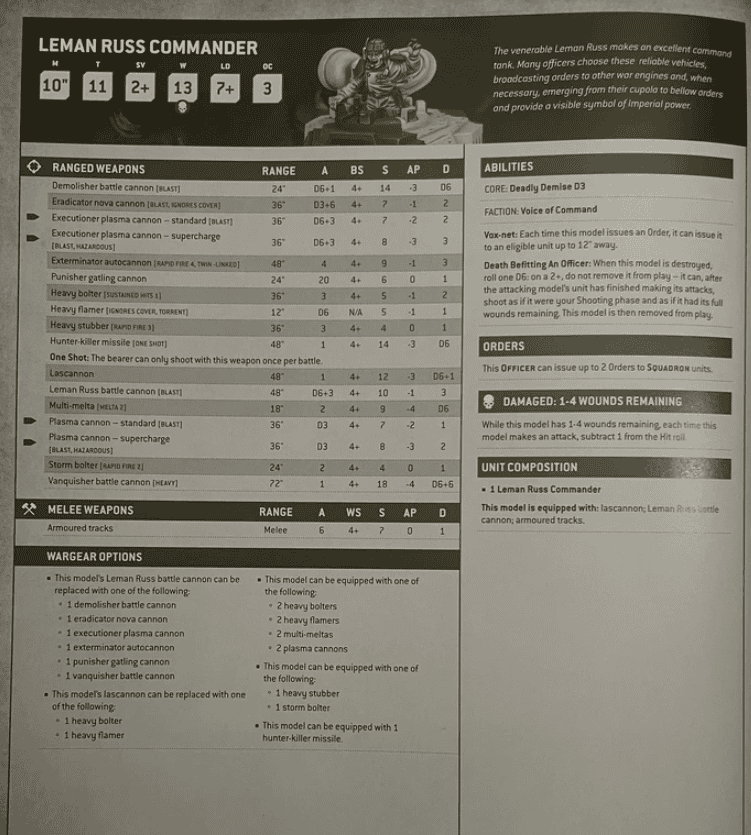
The backbone of Guard armor, the Leman Russ takes a beating and keeps blasting. The Order pairing we lean on: Take Aim! on a Leman Russ squadron, the turn it has a shot at a heavy target, then let Tank Commanders hand out re-rolls so the Battle Cannon actually connects. If you’re short on the real models, plenty of players run tank proxies to fill a squadron. However you field it, whether you’re holding an objective, softening a target, or deleting it outright, the Russ is never a wasted slot.
Tank Commanders
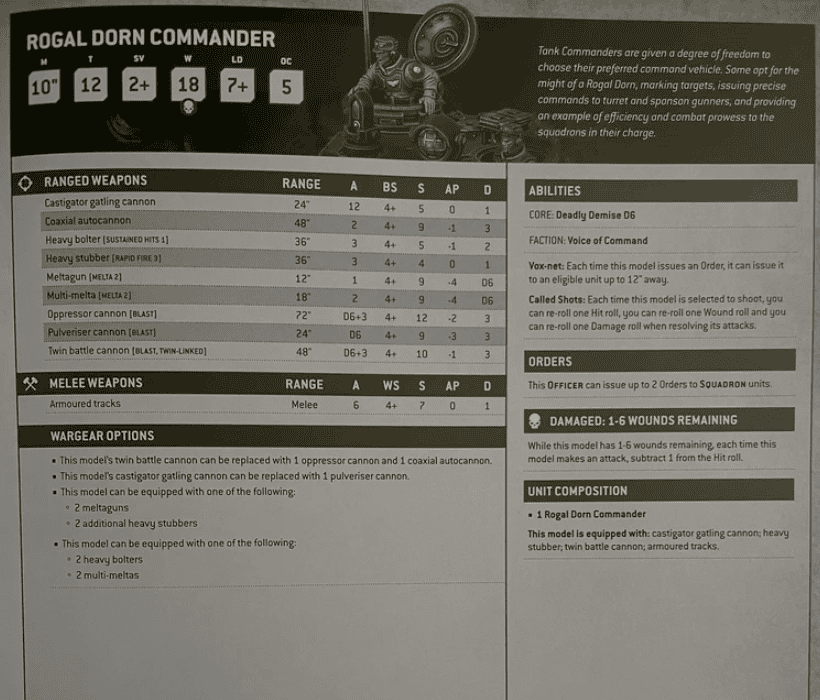
Tank Commanders are the brains behind the armor. They’re tougher than a naked tank, and they can issue Orders themselves, which is what makes them indispensable in a vehicle-heavy list: your tanks no longer need a separate officer babysitting them. The Called Shots ability on the Rogal Dorn Tank Commander re-rolls hits, wounds, and damage, so when something absolutely has to die this turn, that’s your button.
Death Riders & Attilan Rough Riders
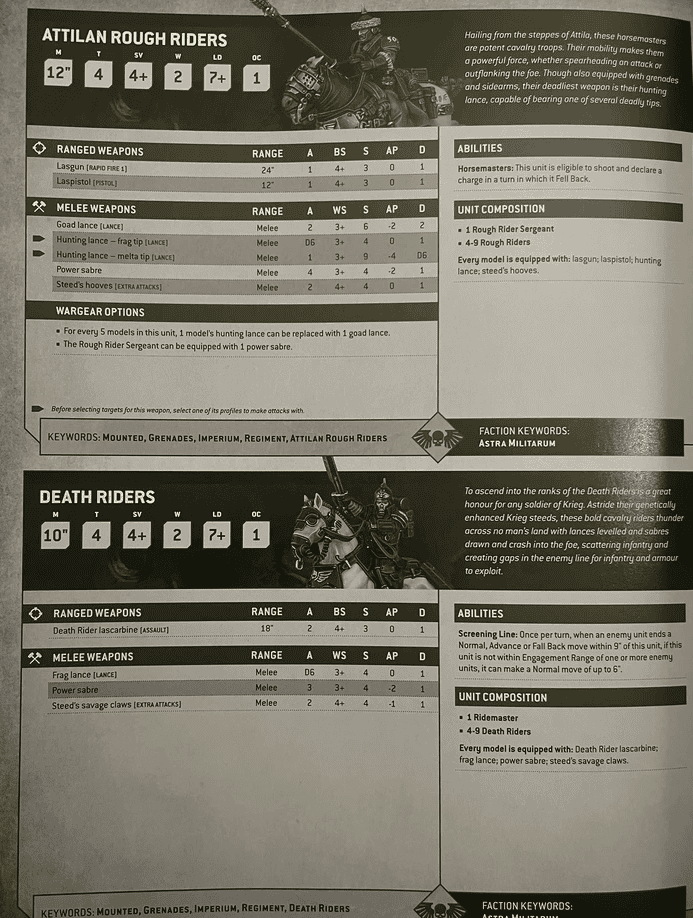
Cavalry in the 41st Millennium still rules. Attilan Rough Riders and Death Riders bring melee speed to an army that mostly fights at range, and their job is specific: screen, trade, and flip objectives your gunline can’t reach. Death Riders work as mid-board disruptors with reactive moves, while the Attilans want the high-impact charge with those lances. Run them out of a mobility detachment and pair the charge with an Order so they land where it hurts.
Artillery Team
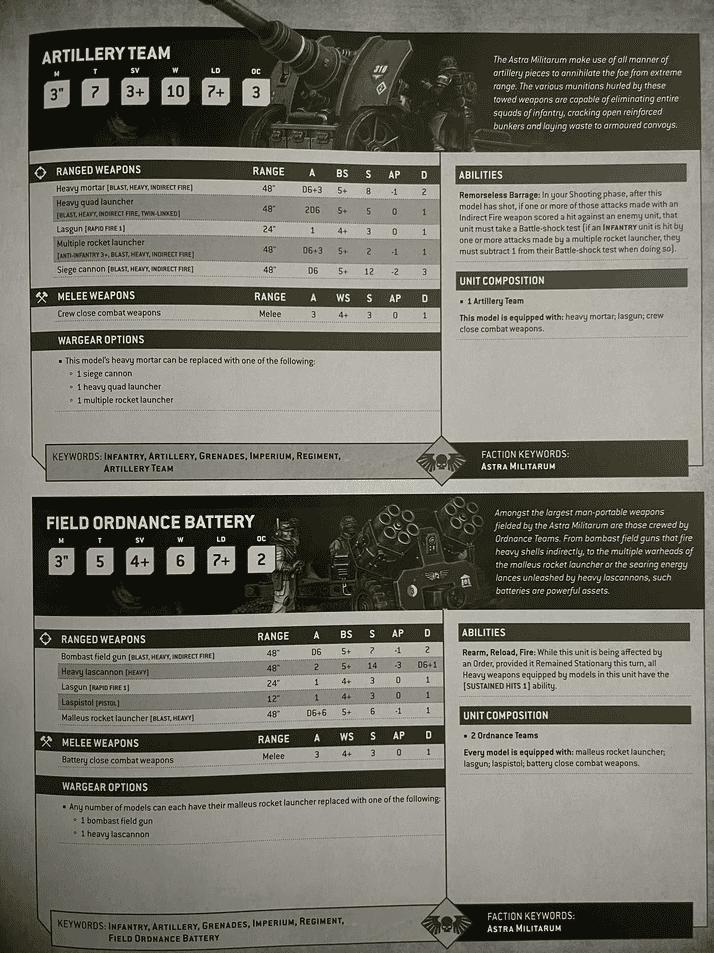
No Guard army is complete without guns firing from another zip code. The practical notes: prioritize the screens and characters your opponent is trying to hide, because indirect fire ignores the Cover they’re relying on. Feed them targets with a Siege Regiment’s Creeping Barrage or an Order that strips Stealth, and keep them back where a fast unit can’t reach them, turn one. Played right, they tax every move your opponent makes.
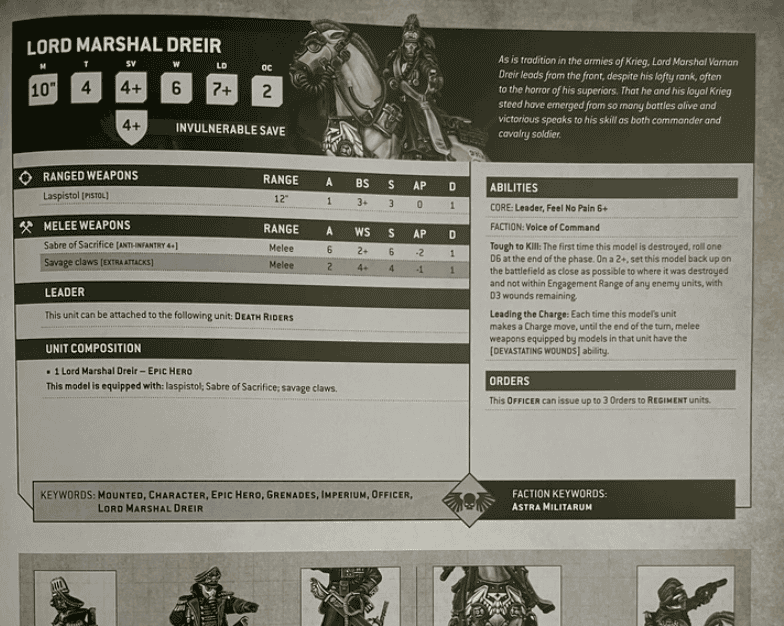
A quick word on loadouts: the point is to get the most from Orders and detachments, not just to pick the biggest gun. Leman Russ Battle Cannons now throw multiple high-strength shots, which is exactly why Take Aim! pays off on them.
Baneblade Cannons stay blast-heavy squad-deleters, and plasma and melta got better AP for cracking elites and armor. For loadouts, grenade launchers keep big infantry squads flexible, and Lascannons in heavy weapon teams are your answer to the scary stuff. Build for the detachment you picked, not in a vacuum.
Final Thoughts on the Warhammer 40k Astra Militarum Codex
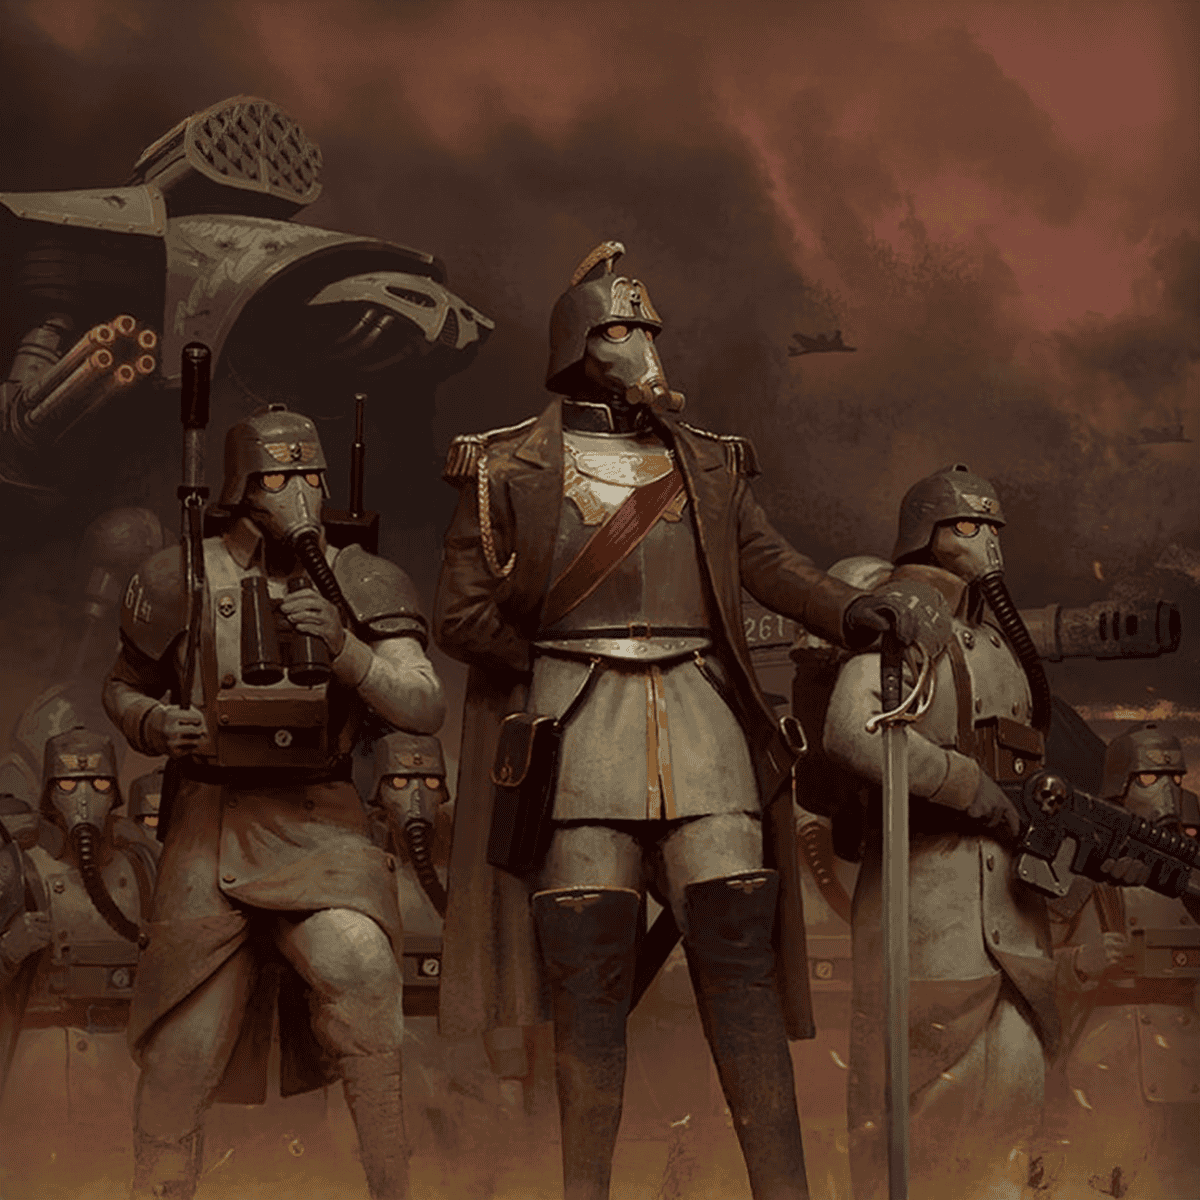
If you take three things into your next game, make them these: Order economy wins turns, so protect and position your officers; detachment identity is a real choice, so commit rather than split the difference; and OC plus firepower is how you actually close, not any single hero unit. That’s the codex in a nutshell.
The learning curve is the catch. In the first few games, you’ll feel the decision fatigue and probably waste an Order or two, and then it clicks, and you start seeing the board two turns out. Guard suits the player who likes planning over reacting and doesn’t mind managing a lot of moving parts. If that’s you, there’s no better army for holding a line and winning on points. If it isn’t, the volume of decisions will wear you down before the tanks do.
Where to Get the Astra Militarum Codex (PDF and Physical)
 Snag your new Astra Militarum codex from our handpicked list of retailers, and give us a high-five in support! Every qualifying purchase helps Spikey Bits keep the lights on and the fun going.

You don’t need a wall of links for this one. If you’re in the US, Amazon is the easy grab; in the UK, Element Games usually has the best discount, or go straight to Games Workshop for the physical book. If you just want the rules to reference, Wahapedia has them free, but the full book is worth it for the art and lore if you’re going all in.
🔗 Related Reads:
- All The New 40k Astra Militarum Minis!
- Latest Astra Militarum 40k Rules Balance Dataslate Updates
- New Astra Militarum Combat Patrol Box