By Daniel Høgh of Roses and Boltshells for Spikey Bits
40k as a hobby is all about collecting, assembling, painting and playing. It’s about making awesome stuff you either use or showcase – from the bog-standard black primed starter set marines to Golden-Daemon winner entries.
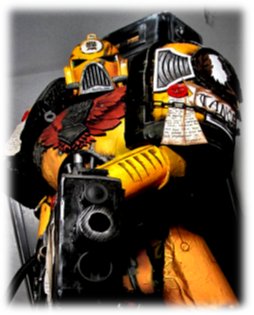
At the age of 12 I bought my first box of Space Marines, but back then I never would have imagined that today I would own several life sized 40k suits of armor, weapons and wargear.
I’ve made armour and wargear for Space Marines, Sisters of battle, Inquisitors, ADMECH priests and much more. Why? Because it’s bloody awesome that’s why. I do stuff because I find it cool! I look at something from a game, a movie or from artwork and go: Oh gee, that would look nicely on my wall – I just need to make it! Who wouldn’t like a life sized replica of their favorite weapon from 40k?
 A few years back I found the online 40k costume community Obscurus Crusade. It’s basically the best and brightest of 40k costume enthusiasts from across the globe, ready to help and provide feedback and just be awesome. So rest assured, if you find that 40k costumes is your thing, you’re not alone.
 HOW DO YOU DO IT?
People often ask this and they’re baffled by the fact it’s not that far away from assembling actual 40k models. There are myriads of ways of construction; Some use advanced papermodels pulled from 40k games (Pepakura) Some scratchbuild and others sculpt their armour and vaccuform it. I am a scratchbuilder, meaning I use only the model or artwork as reference and I build from scratch! No fancy templates or guides – trial and error!
Most of what I build from can be bought in your local DIY store and shopping centers. It’s never going to be perfect the first time but compare it to assembling and painting a 40k miniature the very first time. Practice makes perfect – okay maybe not perfect but at least you gain experience.
Step one! RESEARCH
Study what you’d like to make! Find pictures, models and whatever sources you can find to get an idea about what you want to create. A good idea is to get prints or have a screen nearby so you can reference the model as closely as possible. As a scratchbuilder, you will do a lot more work to reach the same amount of accuracy as you would doing Pepakura – but part of the joy of scratchbuilding is the freedom of creativity. Don’t start anything till you have a somewhat decent idea about what you want. It’s always possible to add more in the future.
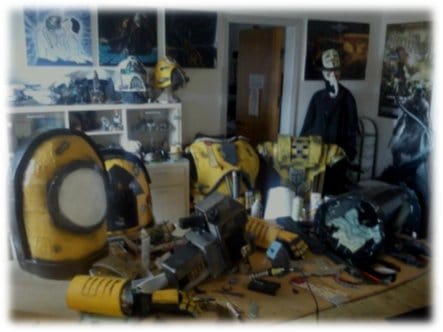
Step two! Prepare a workstation
I’m not saying it helps to have a garage or workshop – but it might ease your workflow and daily life routine. I set up shop in my living room, in my apartment, on the second floor. Hardly the best choice but I make do. Have lots of space, multiple trashbins, multiple electric outlets, proper ventilation and fresh tools! Put your health above anything else (I speak from personal experience)
Step three! Buy materials and tools
Regardless of the scale of the model you’ve planned you’ll always require a few basic things:
Craftknives/Hobby-knives with fresh blades. Hot-glue gun (Better buy both small and big version) 200+ glue sticks(as a start). Duct tape, Heat gun, Soldering Iron, sanding machine and a dremel tool.
This is the basic set of tools I use, but often my most trusted tools are my hands and eyes. So better buy a rebreather with proper filters, protective gloves and proper headgear too.
MAIN MATERIAL
Now you need to buy different kinds of foam! Most of my creations are made from foam and/or cardboard with the odd thingy I find in DIY/toy shops or in my own storage. As a start, you need the camp floor tile foam plates. You’ll know them as having jigsaw puzzle like sides that can interlock with each other. They have a plain side and a rubberized texture side. Depending on the size of your project you should always have a fresh supply of these, but as a start you should buy 4 packs. You can also freely invest in foam camping rolls. Buy the thick version (1-3cm/1 inch thick approx.) This is a lot more flexible than the foam tiles, but also a lot more vulnerable. It’s easy to cut, easy to use and easy to bend – it is however, also rather soft, so don’t use it for detail work.

SECONDARY MATERIAL
If you’ve got a weapon or rather rigid project planned, you might want to invest in industrial grade plastazote. It’s high density foam used for insulating and shock absorbing. It’s a lot thicker than ordinary foam and can be carved for great results. You may also try industry grade cardboard and Insulation board, as both offer great rigid frames and clean surfaces.
Step four! Get started
Don’t be afraid to jump knee deep into your project! The first cut is sometimes hard, as the first few pieces may look off. It always helps to have a marker around to draw temporary lines and a measurer to get the sizes right. Also, never be afraid to look silly – it will happen regardless and it’s a good thing to have a friend stand by, to offer critique or aid you in case you cut an arm off. Always be mindful of your tools and have a clear picture of what you want in your head.
Now I’ve given you the basics, according to my own techniques. For some it comes naturally, for others not so much. In honesty, I don’t need to think much when I do costumes – my hands just take over and I do things automatically as though I know how to do what and where.

Step five! Painting
Assembling the project is one thing. Making it look cool painted is another thing! Here you can pretty much apply whatever techniques you use for your miniatures. A few tips though; Painted Foam often looks just like foam, if left unsealed. So before you paint your project you should cover it in 2-3 layers of PVA(wood) glue. This will give you a somewhat hard surface that you can cover with a few sprays of plastidip. The Plastidip adds a protective layer of aerosol plastic which helps in hardening the surface. If you’re lucky, you might be able to buy something called Smoothcast, which is a polyurethane mix that basically turns the outer surface to plastic. Add a few layers of this and your armour/weapon is as hard as the real thing.
My last recommendation is; always be mindful of details! The details will make your suit stand out in the crowd and finally – make it your own! Go crazy and try something new and don’t be afraid to experiment.
My own personal trademark is to drown people in detail, both construction wise and paint wise.
Have fun and if you’d like, follow us on facebook at www.facebook.com/rosesandboltshells
– Justina and Daniel, Roses and boltshells