Jstove here, and today I’m taking a break from satire and tournament cheater garbage articles to bring you some quick and easy hobby heat.
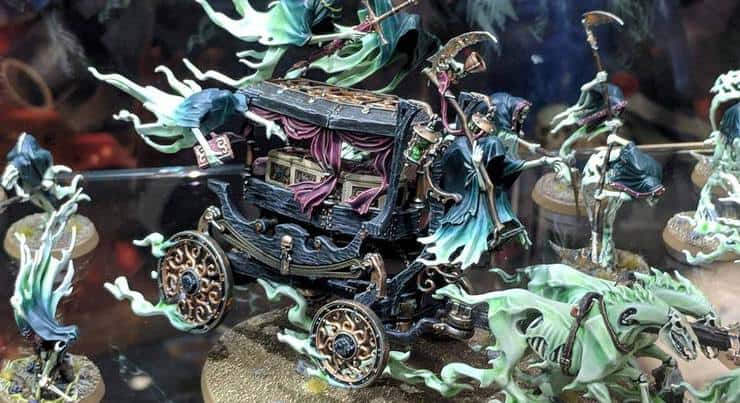
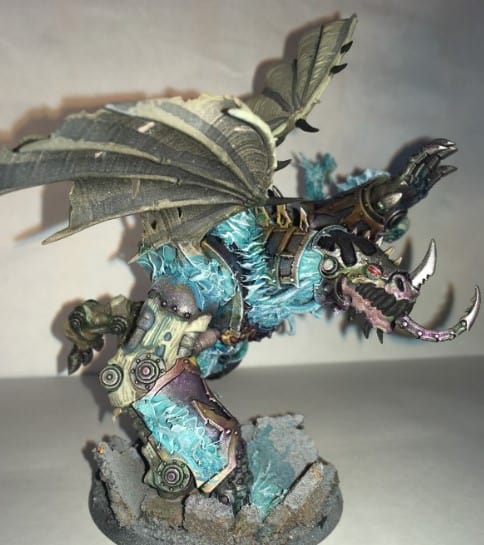
Today, I’m showing you super easy three-step ectoplasm to make your spooky chaos and/or undead boys look straight out of the Haunted Mansion, with some WIP shots of the dudes I’ve been banging on in the beats lab. (The ectoplasm itself is done, the models are still WIP)
Getting Spooky

This technique is actually really simple and picking what you want to spook up is actually more of a chore than actually applying the paint. Basically, you want the maximum amount of detail and texture. This ectoplasm technique uses two major ancient Chinese techniques as our boy Kenny likes to say- glazing and dry brushing.
The more texture and gribbly bits you have to pick up the shade and highlight, the better your spook is going to end up looking. That means that you want to get extra heated with your GREEN STUFF INDUSTRIES TENTACLE MAKER to get those sick tentacles, blazing fire, fur, spooky ghost sheets, and whatever else you got on the model. The more of it the better.
So if you want your dudes to straight up be popping out of hell with that warpflame, slice up some Tzeentch Daemons or sculpt up some green stuff and really get it in. Because when it comes to spooky ectoplasm, more is always better.
The Paint List
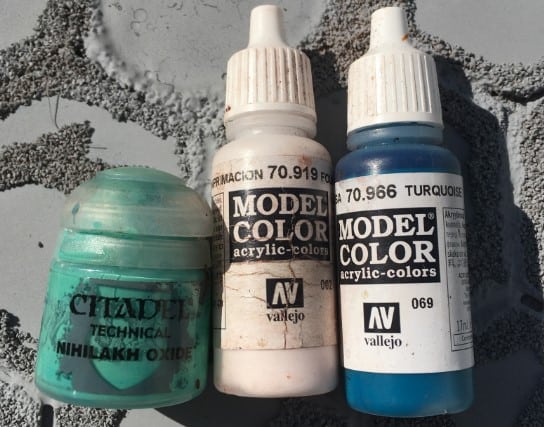
To make easy ectoplasm, you need 3 paints.
- GW Nihilakh Oxide.
- The blue or green color you want to dye your ectoplasm. I’ve also experimented with purple.
- Any white paint.
In my formula, I used Nihilakh Oxide, Vallejo Turquoise, and Vallejo Foundation White.
Step One: Nihilakh Oxide
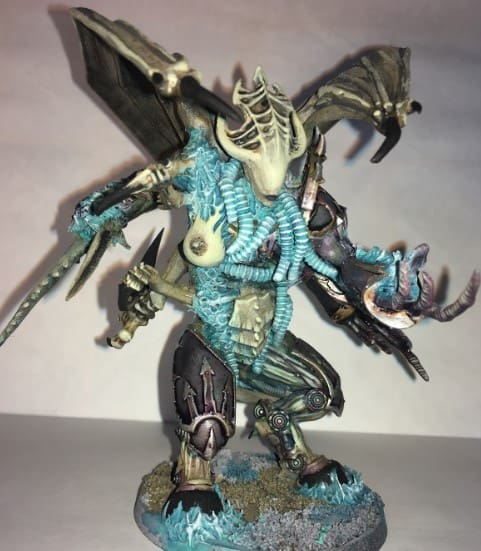
Slather all the parts you want to spook up with Nihilakh Oxide. Ideally, this should be done over a white primer or grey primer base. Be liberal with your paint and allow the stuff to do its job. You have to keep in mind that this technical paint has a bit of a chunky flow with the pigment. Don’t fight it. That’s what’s going to give you the base for your ectoplasm.
Step Two: Tint
After the Nihilakh Oxide dries completely, glaze all the ectoplasm with your chosen color. For this step, you can use a wash if you like, but I personally use a watered down paint (about 3 parts water to one part paint). I want the pigment to be a little chunky and separated. This way, the color doesn’t go on evenly and really seeps deeply into the nooks and crannies and collects there.- This is actually the opposite of what you want to happen with washes.
With washes, we want the pigment to get into the nooks and crannies without pooling. But with ectoplasm, we really want the spooky essence to throw off an unholy glow. So smothering the color really unevenly on the details will help us get there.
Step Three: Drybrush
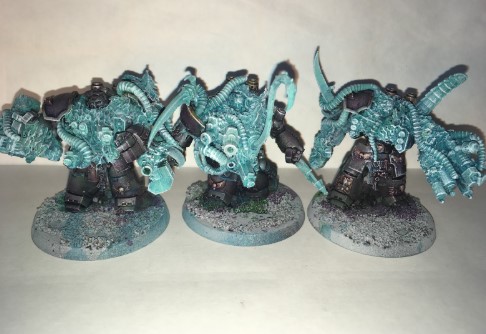
Once the tint color is completely dry, hit your ectoplasm with a white drybrush to pick up the edges and pop the texture on the model. Keep it super light, and remember that you aren’t painting natural fire.
With ectoplasm, we want the deep color from the chunky pigments of the Nihilakh Oxide and the watered down paint to really show through on the deep parts. That way it’ll look like the depth and color are coming from the deepest and most dense part of the model.
This is the opposite of natural fire. Where the hottest and whitest part of the fire is at the source of the flame and the coldest and reddest part is at the end of the flame where it tapers off to smoke.
Color Matching Nihilakh

Keep in mind that when you use Nihilakh as your base, that it’s always going to be that verdigris bronze color. Your tint color is going to build on that. This means that for this technique, the best colors for your ectoplasm are going to be green and blue tones. They’ll build on the natural color of the Nihilakh pigment.
If you experiment with other colors, you can get a tonal shift as the Nihilakh shows through under your tint color. It all depends on what you want your ectoplasm to look like. If you want to have a deep tonal shift, experiment with going off the palette. If you want to have the brightest, most eye-popping color, you’ll have to stay in green and blue tones to build up on the Nihilakh Oxide.