Learn how to paint NMM gold on miniatures with expert non-metallic techniques from Monument Hobbies, covering color choices, layering tips and more!
Updated on April 23rd, 2025, by Rob Baer with new information and links to relevant content.
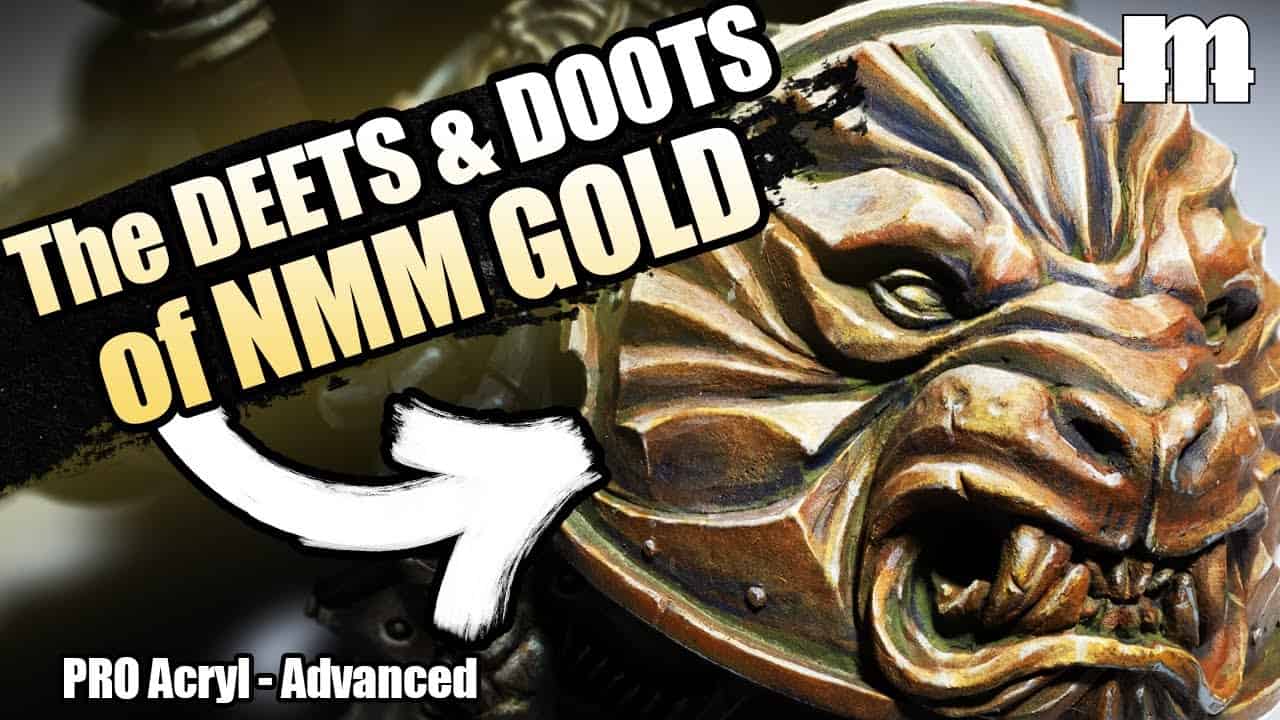
Getting gold to shine on miniatures without a single drop of metallic paint might sound impossible, but it’s all about technique. Non-metallic metal (NMM) gold is a game of contrast, color placement, and smooth layering. Done right, it creates the illusion of reflective metal using nothing but standard paints and smart lighting tricks.
This guide breaks down how to paint NMM gold step by step, using expert techniques straight from Monument Hobbies. From selecting the right colors to layering shadows and highlights, everything here is designed to make gold armor, weapons, and details look like real metal, whether on Warhammer miniatures or for other games
Here’s how to do it.
Introduction to Non-Metallic Metal (NMM) Gold
Painting gold without using metallic paint? Sounds like a magic trick, right? But it’s not—it’s just a technique called non-metallic metal (NMM) gold. Instead of relying on shiny pigments, this approach uses carefully placed highlights and shadows to create the illusion of reflective metal.
The key is contrast. The brighter your highlights and the deeper your shadows, the shinier the effect. Light placement is everything, so understanding where your imaginary light source is hitting the model will make or break the illusion.
What is NMM Gold?
 This technique is all about tricking the eye. By layering colors strategically, you mimic the way real gold catches light. Instead of metallic paints, you use standard matte colors to build reflections, creating the illusion of a gleaming surface.
It’s less about what’s in your paint pot and more about how you apply it. The goal? Sharp, bold contrasts—deep shadows, glowing midtones, and razor-thin highlights. Get those right, and suddenly, your flat paint job looks like polished metal.
Why Use NMM for Warhammer 40k Models?
So why go through all this effort when metallic paints exist? Simple—control and style. Metallic paints reflect real light, which can sometimes make small details hard to see. With NMM, you dictate where the shine appears, making the model pop under any lighting.
It also creates a more painterly, high-contrast look that stands out beautifully, especially for Warhammer 40k miniatures. Whether it’s ornate armor or an ancient relic, learning how to paint NMM gold gives your models a unique, hand-crafted finish. Plus, nothing says bragging rights like achieving a flawless golden shine without a single drop of metallic paint.
Since this post is from Monument, all the paints used in the tutorial are from them. So be sure to snag any of the linked paints in the video and give us a high-five in support! Every qualifying purchase helps Spikey Bits keep the lights on and the fun going.
The Six-Color Workup for NMM Gold

Getting a rich, reflective look without a single drop of metallic paint sounds tricky, but a solid color workup makes all the difference. The key to mastering how to paint non metallic gold lies in layering the right colors to create depth, warmth, and contrast. A strong foundation sets up everything, and the right highlights pull it all together.
Choosing the Right Paint Colors
Gold isn’t just yellow with highlights—it’s a mix of warm, cool, and deep tones that play off each other. Starting with dark yellow-green gives the base a slightly aged, muted foundation. It won’t look like gold yet, but don’t panic. Shadows get punched in with dark purple, adding richness and separating light from dark areas.
For the first hit of warmth, orange oxide comes into play. This adds depth and makes the future highlights pop. Moving up the scale, orange-brown bridges the gap between shadows and midtones, giving the model that signature golden hue.
To start making things shine, bright yellow ochre lays the groundwork for highlights, bringing in a more classic gold tone. The final touch? Bright pale yellow, carefully placed on edges and raised surfaces, creating that crisp metallic effect.
Layering & Blending for a Realistic NMM Effect
The process starts with a full coat of dark yellow-green, covering every area meant to be gold. Once that’s set, dark purple goes into the shadows, focusing on recesses and undersides. A messy application works since later layers will refine everything.
Orange oxide gets dry brushed over raised areas, pulling warmth into the surface. Then, orange-brown smooths transitions, while yellow ochre starts defining reflective spots. The final step is bright pale yellow, carefully applied to edges and high points to give that polished metal effect.
Step-by-Step Process for Painting NMM Gold
 Getting that perfect non-metallic gold effect can feel like sorcery, but it’s really just a game of contrast, color placement, and a bit of patience. The trick to learning how to paint NMM gold is understanding how light interacts with reflective surfaces. A solid color workup, smooth blending, and bold highlights will take a flat, matte surface and turn it into a shining piece of armor.
Step 1 – Establishing the Base with Dark Yellow-Green
 The first step is slapping on a dark yellow-green base coat. It might not look like gold yet, but stay with it. This color helps set up the undertones and makes the final gold pop. Think of it as an identifying color—something that helps you map out every surface that will eventually gleam. Cover all gold areas evenly, making sure to get into the recesses.
Step 2 – Creating Depth with Dark Purple Shadows
 Gold isn’t just bright yellow—it has deep shadows that add richness. Dark purple is the secret weapon here. Instead of just using black or brown, purple gives depth while keeping the shadows interesting. Brush it into recessed areas and anywhere light wouldn’t naturally hit. This contrast is what sells the final effect, so don’t be afraid to push it. It will look messy at this stage, but that’s fine. Later layers will blend everything together.
Step 3 – Warm Undertones with Orange Oxide
 Gold has a warm glow, and orange oxide is what brings that fire to life. Using a dry brush technique, lightly sweep the paint over the raised areas. This softens the transition between the dark shadows and the upcoming gold tones. It’s all about creating a natural warmth without completely covering the layers beneath. A little patience goes a long way here—too much, and you’ll lose all that depth you just built.
Step 4 – Enhancing Midtones with Orange-Brown
 Now it’s time to shift things toward an actual gold-like tone. Orange-brown bridges the gap between those fiery undertones and the golden highlights. This is where the model starts looking less like an abstract painting experiment and more like metal. Focus this layer on the areas where light would start hitting more directly, leaving some of that orange oxide showing underneath. This color also helps bring out the shape of the model, so be mindful of edges and curves.
Step 5 – Highlighting with Bright Yellow Ochre
 Here’s where things start looking like gold. Bright yellow ochre is the first real gold shade in the process, bringing everything together. Brush it over the most exposed areas where light would hit the strongest. This creates sharp contrasts between light and shadow, giving the illusion of reflection. Avoid full coverage—leaving some of the orange-brown beneath helps maintain depth.
Step 6 – Adding the Final Shine with Bright Pale Yellow
 The last step is where the magic happens. Bright pale yellow acts as the final highlight, catching edges and raised points to create that signature metallic shine. This should be applied sparingly—just enough to suggest a sharp reflection. Overdoing it will flatten the effect, so be precise. Small, pinpoint highlights on edges and high points make all the difference. This final touch is what turns everything from “kind of gold” to “definitely metal.
FAQs About Painting Non Metal Metallic
Painting non-metallic gold might feel overwhelming at first, but once the basics click, it becomes second nature. There are a few common questions that come up when figuring out how to paint NMM gold, so let’s break them down.
What’s the Best Way to Start Painting NMM Gold?
The best way to start is by focusing on contrast. Gold isn’t just yellow with a few highlights—it’s a balance of deep shadows, midtones, and bright reflections. A dark yellow-green base sets the foundation, while dark purple shadows add richness. Orange oxide and orange-brown bring warmth before layering on yellow ochre and bright pale yellow for the final shine.
Blocking out light and shadow areas early helps avoid confusion later. It might look rough at first, but once highlights are placed, the illusion starts working.
Can You Use This Technique on Other Metallic Colors?
Absolutely. The method works for silver, copper, bronze—any metal effect you need. The difference comes in color choices. For steel, start with a dark blue-gray base, push shadows with dark blue or black, and highlight with light gray and white. Copper benefits from red-brown and orange tones, while bronze works well with deep green shadows and warm gold highlights.
The key is the same: contrast, edge highlights, and proper light placement.
How Do You Avoid Making NMM Gold Look Too Flat?
One of the biggest mistakes is blending too much. Gold has sharp reflections, so keeping highlights crisp makes a big difference. Instead of fading every layer smoothly, let some transitions be more defined.
Another trick is using a variety of colors in the shadows. Purples, blues, or deep reds make shadows more dynamic, giving the gold a more realistic look. Adding reflected light on lower edges also helps, reinforcing the illusion of metal catching light from multiple angles.
What Brushes and Paints Work Best for NMM Gold?
A fine detail brush is essential for edge highlights and reflections, while a soft round brush works well for blending midtones. Synthetic or sable brushes both work, depending on preference.
For paints, anything with good opacity and smooth blending works. Dark yellow-green, dark purple, orange oxide, orange-brown, yellow ochre, and bright pale yellow are excellent starting points. Thinning paint slightly with water or glaze medium helps build smooth layers without losing control.
Final Thoughts on Painting NMM Gold
 NMM gold isn’t about fancy paints—it’s about smart color choices, strong contrast, and knowing where the light hits. Start with a solid base, punch in those deep shadows, build warmth with midtones, and hit the right edges with bright highlights. The sharpest reflections make all the difference.
It might look messy at first, but trust the process. Each layer brings more depth, and once those final highlights go on, the gold effect clicks into place. Take your time, experiment with color variations, and don’t be afraid to push the contrast.
Get Your Monument Hobbies Non-Metallic Paints Here!